Discovery 3 Engine re-build

This site contains affiliate links for which LandyZone may be compensated if you make a purchase.
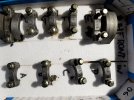
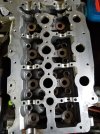
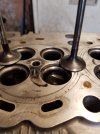
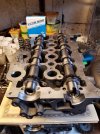
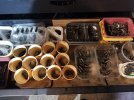
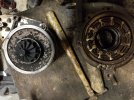
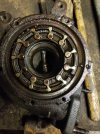
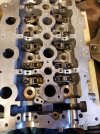
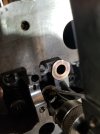
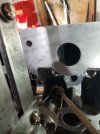
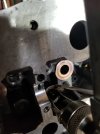
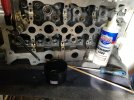
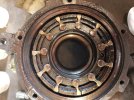
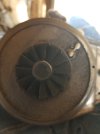
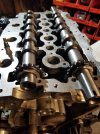
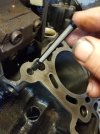
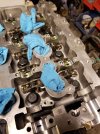
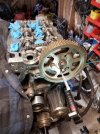
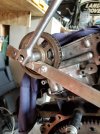
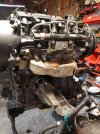
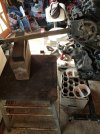
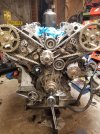
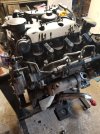
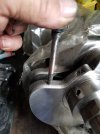
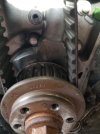
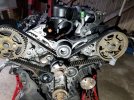
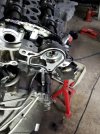
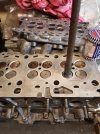
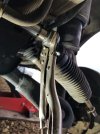
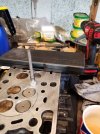
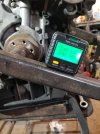
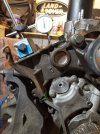
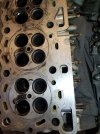
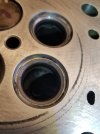
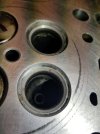
Hi all pulled 07 motor again not happy with oil leaks, turbo leaking from supply line and vanes seized main issue i think was timing so made myself mk 1 version of crank locking pin as made on lr time to same spec don't have a lathe so welded an extension on to the short 10mm that blanks this hole, ground and filed to exact length when I fitted it and set the crank to stop, the timing mark on front pulley and the flywheel locking pin do not line up flywheel refitted to incorrect marking on front pulley?
 

Attachments

  • 20231002_142118.jpg
    20231002_142118.jpg
    218 KB · Views: 66
  • 20231002_142156.jpg
    20231002_142156.jpg
    206.6 KB · Views: 57
  • 20231002_142207_001.jpg
    20231002_142207_001.jpg
    435.4 KB · Views: 66
  • 20231002_142236.jpg
    20231002_142236.jpg
    290.4 KB · Views: 62
Finally found someone to make timing pin at a reasonable price should get it next week all work now done on the original heads only a slight bend on 6 of the exhaust valves all on one head, will be refitting them before putting engine back in just have a bit more grinding then re assembly. Also had a few diesel leaks on return Line on my 09 so replaced the leak off pipes £67 from maltings seem ok quality also the return from the cooler hopefully can move forward this week managed to get some berrymans chem dip so cleaning pistons ready for the motor that broke its crank just need a set of king bearings for the next stage
 

Attachments

  • 20231028_161414.jpg
    20231028_161414.jpg
    327.6 KB · Views: 46
Finally found someone to make timing pin at a reasonable price should get it next week all work now done on the original heads only a slight bend on 6 of the exhaust valves all on one head, will be refitting them before putting engine back in just have a bit more grinding then re assembly. Also had a few diesel leaks on return Line on my 09 so replaced the leak off pipes £67 from maltings seem ok quality also the return from the cooler hopefully can move forward this week
 
Hi all not done too much since been cold in workshop and been busy at work but mot came round again so checked out my d3 all ok apart from steering arms so replaced them both easy to do just set in off road, they weren't too tight, tracked it and it passed no advisory. Two days later jumped in and nothing no dash lights, plugged in diagnostic lot of loss of communication codes no contact with instrument cluster was repaired in July with a lifetime warranty so sent it back, they couldn't find a fault but as the issue might be intermittent they replaced the board and re soldered and reloaded my software I think, anyway it now works so all good again. Been tidying the workshop so I can change the heads back to originals now their rebuilt as I have the motor out of the 09 will photo the timing pin I had made thanks Christian and vera I know it's a bit late but happy new year to all
 

Attachments

  • 20231120_143628.jpg
    20231120_143628.jpg
    357.5 KB · Views: 29
  • 20231120_143517.jpg
    20231120_143517.jpg
    347.1 KB · Views: 30
  • 20231120_141357.jpg
    20231120_141357.jpg
    270.8 KB · Views: 31
  • 20231120_140854.jpg
    20231120_140854.jpg
    241.5 KB · Views: 30
  • 20231120_143628.jpg
    20231120_143628.jpg
    357.5 KB · Views: 29
Hi all been messing in the workshop with my 09 d3 today mainly to check and familiarize myself with the timing got the timing pin (as seen on TV) earlier this week, before i removed the engine it run badly, couldn't seem to get it timed, today I set number 1 to tdc with dial gauge then fitted the pin, I made a kind of wrench with box and a old spark plug spanner to remove movement and using a angle gauge rotated on until it stopped against the pin read 30.10 did this multiple times from tdc remembering to measure in direction of rotation the result was the flywheel locking pin would not go in was around three quarters of the pin out probably 1 or maybe 2 teeth out? Flywheel loosened and rotated pin fitted so all sorted hopefully I was also curious about the ford factory pin can say honesty it's not a myth
 

Attachments

  • 20240207_162830.jpg
    20240207_162830.jpg
    298.7 KB · Views: 30
  • 20240207_162737.jpg
    20240207_162737.jpg
    237.3 KB · Views: 28
  • 20240205_170259.jpg
    20240205_170259.jpg
    351.5 KB · Views: 30
Been out in the workshop today re-oiled the 06 block and crank and moved as i needed the stand I use a engine assembly lube as it's so sticky, all looks good, also cleaning the pistons soaking in berrymans reusing rods and pistons no signs of wear but replacing rings. Going with king bearings cleaning 07 which I was messing around with the timing, valves now ground in but I forgot to order valve guide seals, but still have to clean the heads tomorrow
 

Attachments

  • 20240210_172620.jpg
    20240210_172620.jpg
    232.3 KB · Views: 27
  • 20240210_145931.jpg
    20240210_145931.jpg
    234.8 KB · Views: 27
  • 20240210_145336.jpg
    20240210_145336.jpg
    330.6 KB · Views: 23
  • 20240210_172402.jpg
    20240210_172402.jpg
    325.7 KB · Views: 23
More cylinder head fun after finding scoring in one of the cam guides, possible to repair will get it looked at at re furb time thanks guys, have been cleaning a replacement and found two pits in one of the exhaust seats don't look as bad in picture don't thing it will lap out if you like so will also keep this for re furb, onto 3rd head borrowed from my 06 motor just have the inlets to lap in fiddly and boring job can reccomend loud rock music and lots of tea, but the difference is worth it in my opinion, I only lap with fine paste and only about two minutes max, also did piston protrusions over the week end practiced several times bought a engineering bridge from proform got highest reading of 0.64 on left bank and 0.65 on right so going with a 3 notch gasket? it had a 5 notch on it fitted by previous owner when attempting rebuild, one pic shows egr build up on inlet valves
 

Attachments

  • 20240218_132006.jpg
    20240218_132006.jpg
    265.9 KB · Views: 21
  • 20240220_104035.jpg
    20240220_104035.jpg
    275.4 KB · Views: 24
  • 20240220_104011.jpg
    20240220_104011.jpg
    236.7 KB · Views: 21
  • 20240220_104020.jpg
    20240220_104020.jpg
    265.4 KB · Views: 22
More cylinder head fun after finding scoring in one of the cam guides, possible to repair will get it looked at at re furb time thanks guys, have been cleaning a replacement and found two pits in one of the exhaust seats don't look as bad in picture don't thing it will lap out if you like so will also keep this for re furb, onto 3rd head borrowed from my 06 motor just have the inlets to lap in fiddly and boring job can reccomend loud rock music and lots of tea, but the difference is worth it in my opinion, I only lap with fine paste and only about two minutes max, also did piston protrusions over the week end practiced several times bought a engineering bridge from proform got highest reading of 0.64 on left bank and 0.65 on right so going with a 3 notch gasket? it had a 5 notch on it fitted by previous owner when attempting rebuild, one pic shows egr build up on inlet valves
Loving following this thread.:):):)

Wondering, do you not use a tool like this for lapping in valve seats? I bought one years ago, only uses fine grinding paste, never looked back.

 
Hi mate tried one before and couldn't get on with it, it's really only a few hours so not so bad my lapping tool is 40+ years old still good, hopefully putting heads back on now I'm happy with them, still find it amazing how fuel and air polish the seats, still using the D3 from the french trip, still going strong, nearly got through all the wine lol, nice to hear from you hope you are all well
 
Finished the heads today and give them a good clean they will get another before reassembling, initially before I removed the valves I put them on the bench and filled the inlets with brake cleaner as they were so filled with gunge but it also showed up lapping issues as a couple of exhaust valves were weeping, it does evaporate but fairly evenly but does clean both sets of ports up nicely, also added a pic of how I store cam caps, one side numbered the other letters both readable from behind the engine if you see what I mean, just waiting for valve guide seals
 

Attachments

  • 20240221_144800.jpg
    20240221_144800.jpg
    280.9 KB · Views: 21
  • 20240221_144706.jpg
    20240221_144706.jpg
    281.2 KB · Views: 20
  • 20240221_130843.jpg
    20240221_130843.jpg
    211.5 KB · Views: 24
Hi mate tried one before and couldn't get on with it, it's really only a few hours so not so bad my lapping tool is 40+ years old still good, hopefully putting heads back on now I'm happy with them, still find it amazing how fuel and air polish the seats, still using the D3 from the french trip, still going strong, nearly got through all the wine lol, nice to hear from you hope you are all well
Well, thanks! (Well mostly!)
Visas all got, ferry booked, "just" got to fix the ACE to get the D2 through the MOT. Before leaving again in April!
You must be enjoying the wine!
Hope you are all well too!
 
Hooray valve guide seals arrived today can assemble tomorrow, three notch gaskets and bolts not until Tuesday as paddocks had to order gaskets in, sorting through cams and lifters using originals, but going to switch a few which are a bit marked up, have some spares as I am a hoarder, but only keep parts with little or no sign of wear would rather fit certain replacement parts used OEM than cheapo, cams are all new bought by previous owner, much thicker and heavier than the other OEM cams I have, and have no ID numbers. Also noticed valve springs have a different color ID before 06 on the jag and D3 are red, and blue green on the 09 D3 so will be fitting originals does anyone know is this a date code or a rating? The hydraulic lifter in the picture was also a first, came apart when I pulled it out of another head. Fun part tomorrow putting valve collets in no space for a special tool ( I did try a couple) will be using the screwdriver and pre-lube method
 

Attachments

  • 20240222_164652.jpg
    20240222_164652.jpg
    306 KB · Views: 20
  • 20240222_131625.jpg
    20240222_131625.jpg
    302.4 KB · Views: 23
Hooray valve guide seals arrived today can assemble tomorrow, three notch gaskets and bolts not until Tuesday as paddocks had to order gaskets in, sorting through cams and lifters using originals, but going to switch a few which are a bit marked up, have some spares as I am a hoarder, but only keep parts with little or no sign of wear would rather fit certain replacement parts used OEM than cheapo, cams are all new bought by previous owner, much thicker and heavier than the other OEM cams I have, and have no ID numbers. Also noticed valve springs have a different color ID before 06 on the jag and D3 are red, and blue green on the 09 D3 so will be fitting originals does anyone know is this a date code or a rating? The hydraulic lifter in the picture was also a first, came apart when I pulled it out of another head. Fun part tomorrow putting valve collets in no space for a special tool ( I did try a couple) will be using the screwdriver and pre-lube method
Can you not do the collets with a magnet? Or would they slip off due to lube?
Maybe lube the valve stem then put the collets in dry, lube em after?
I've got a compressor like this, works fine although the handle can hurt after a while, had to make an extension for mine. But at least you can fiddle the collets in quite easily.
Daresay you've already tried one though.

No idea re the valve springs. You could do the maths with a caliper etc to see which ones were stiffer but how would you know what stiffness you want?
Hmm!!
 
Yes have a very similar compressor to you, I compress the spring bit of pre lube on the valve grooves then as you said have a slightly magnetic screwdriver maneuver it into position a it sticks to the valve well usually, as for the springs I'm sure someone knows will do some more research
 
Finished fitting valves today 14mm socket perfect for tapping the seals in, you can hear the note change when their home, I use a split straw pushed through to seal to meet the valve and ease it through the seal, fitting the collets I found it easiest to paint a little pre-lube using it as a glue in this case onto the valve, with a slightly magnetic screwdriver and a tiny blob of grease you can slip the collets on worked perfect I then give the valve a little press, just to ensure the collets are seated I used all original rockers all in good condition, replaced 4 lifters all others were solid. Gaskets and bolts have been dispatched today. Turbo actuator was stuck you could hear it trying to do its thing so was expecting this, heated and stripped the turbo this evening the rotating ring was solid lots of wd and gentle tapping it's now free going to continue brake cleaning and soaking in wd
 

Attachments

  • 20240223_202238.jpg
    20240223_202238.jpg
    415.3 KB · Views: 19
  • 20240223_202040.jpg
    20240223_202040.jpg
    426.1 KB · Views: 21
  • 20240223_171150.jpg
    20240223_171150.jpg
    318.2 KB · Views: 20
  • 20240223_142644.jpg
    20240223_142644.jpg
    176.1 KB · Views: 18
  • 20240223_142532.jpg
    20240223_142532.jpg
    219.6 KB · Views: 19
  • 20240223_142641.jpg
    20240223_142641.jpg
    171.2 KB · Views: 18
  • 20240223_130812.jpg
    20240223_130812.jpg
    345.7 KB · Views: 19
Cleaned turbo several times yesterday so full of carbon build up I suspect this is why so many actuator arms seize up, the ring rotates inside the cast molding of turbo body and carbon builds up inside causing a resistance that the actuator can't handle, the little lever pictured slots into a notch inside the ring turning it and opening or closing the vanes, now all clean and as free as a bird, also fitted new exhaust studs, turbo studs were so seized I decided to leave them as they are in good condition, fitting heads over next couple of days
 

Attachments

  • 20240224_122728.jpg
    20240224_122728.jpg
    351 KB · Views: 19
  • 20240224_122622.jpg
    20240224_122622.jpg
    140.1 KB · Views: 18
Fitted heads today remembered to clean and check the turbo feed filter goes in thick end down or would restrict feed it seems, put both crank timing pins in will stay there now until belt is on. fitted the heads all went quite smoothly well so far anyway, put a little oil under the head of each bolt. Sat the cams in just to show their happy position notches about 11 o'clock, two black link's line up with the notches, after the cam caps are fitted will fit seal and timing wheel, notches on cams are at 12 o'clock when the timing pins are lined up, still have to check end float, cams, timing chain and tensioner are fitted as a unit, still undecided whether to use these new aftermarket cams or use a set of good condition oem from my spares, little bolt sitting on the head is the blank for the crank stop timing pin, there's a clue in its shape I suppose
 

Attachments

  • 20240228_174734.jpg
    20240228_174734.jpg
    256.3 KB · Views: 19
  • 20240228_155951.jpg
    20240228_155951.jpg
    273.1 KB · Views: 24
  • 20240228_155951.jpg
    20240228_155951.jpg
    273.1 KB · Views: 25
Fitted cams today well left hand cylinder decided to go with the used oem, used 50/50 Lucas pre-lube and 10w 30 mix to lube everything, new tensioner and chain fitted, cam seal, timing wheel, and have set the pin, cleaned and prepared r/h side, work stops play tomorrow but hopefully remaining cams and timing belt on monday, ps I did smooth out the loctite 518 on the end caps before fitting
 

Attachments

  • 20240302_133347.jpg
    20240302_133347.jpg
    388.4 KB · Views: 22
  • 20240302_144246.jpg
    20240302_144246.jpg
    345.3 KB · Views: 21
  • 20240302_142830.jpg
    20240302_142830.jpg
    340 KB · Views: 24
Fitted remaining cams and chains on right hand head have pictured my homemade cam locking tool needs a tidy up I bolt it to the cams and use blocks and my little bench to hold it in place the fuel drive I use the other end which has two prongs which fit in the spokes and lock it against the engine stand. the timing I use a hammer handle to hold the belt on the bottom pulley, moving the cam pulleys fully clockwise fit the belt as tight as possible working anti clockwise, until at the tensioner, adjust to correct tension (the little window thingy) the two part cam pulleys allow the belt to tension all the way round if they were solid it would only tension from the bottom pulley to the right hand cam this would allow movement ( a margin of error as the tension evens out ) tighten the pulley bolts before removing the timing pins rotated the engine many times and nice and smooth so all good, fuel pump, rails and injectors also fitted I do reuse the pipes but I line them up before tightening the fuel rails, fuel pump guards two pieces 07 on. Egr on right hand side fitted, exhaust manifolds used some plastic pipe as spaces pulled them out after tightening the others, also vacuum pump, wiring next as it goes behind everything on the left hand side probably Saturday would like to fit next weekend hopefully
 

Attachments

  • 20240306_133632_002.jpg
    20240306_133632_002.jpg
    266.1 KB · Views: 24
  • 20240307_124615.jpg
    20240307_124615.jpg
    328.6 KB · Views: 18
  • 20240306_133910.jpg
    20240306_133910.jpg
    341.2 KB · Views: 23
  • 20240304_180120.jpg
    20240304_180120.jpg
    320.4 KB · Views: 25
  • 20240302_144246.jpg
    20240302_144246.jpg
    345.3 KB · Views: 22
  • 20240307_124635.jpg
    20240307_124635.jpg
    270.6 KB · Views: 19
Part fitted wiring today right of the bat one of the bolts that hold the metal wiring fixing snapped off at the top of the rear fuel belt timing cover so removed the brass insert and epoxy in a bolt fitting rest of wiring tomorrow, ffu
 
Back
Top