Discovery 3 Engine re-build

This site contains affiliate links for which LandyZone may be compensated if you make a purchase.

tyregeezer

Well-Known Member
Posts
537
Location
Rural Norfolk
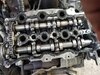
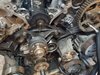
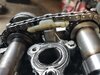
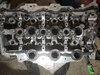
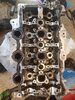
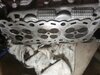
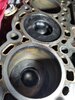
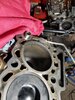
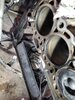
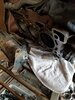
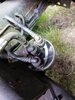
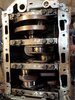
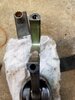
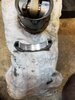
HI all following on from my other thread now stripping motor SOMEONE has had a go at repairing, Issues so far, removed rocker covers both covers were stuck down with sealant it appears its had two new cams on right side i think new cam chains and tensioners,chains not set to black links/cam notches but appear to be set correctly ( i also found bits of tensioner in sump) will clean everything out oil ways ect here's the bigggy two different size head gaskets five notches on right no notches on left head gasket (WTF) this side had a slight knock when turned over to show me i expect the gasket is two thin and valves are touching pistons can anyone enlighten me on a no notch gasket please will be removing heads over next couple of days any help or advice appreciated pics when i work out issues with downloading keep the faith TY
 
Hi all pics from last post 1st pic buy a new gasket 2nd pic head gasket? three notches different (sorry missed that yesterday) 3rd timing chains note black link on timing chain new cams? TY
 

Attachments

  • buy a gasket.jpg
    buy a gasket.jpg
    390.3 KB · Views: 148
  • head gaskets.jpg
    head gaskets.jpg
    314.8 KB · Views: 147
  • timing chain.jpg
    timing chain.jpg
    244.9 KB · Views: 153
Head gaskets are sized to the highest piston on each bank, so it is potentially possible for each bank to have a different thickness, if piston protrusion warrants it. However I'd size them the same, as long as the highest protruding piston has a gasket thick enough so it can't contact a valves.
 
Hi Thanks yes just got in from work have been reading about how to check which gasket you need measuring piston height I'm not even sure this is the issue at this point but if it is I'm sure there will be a mark lol will be taking heads off tomorrow, many thanks TY
 
Hi all, have removed left hand head, problems found so far valve chains set incorrectly, bent valve, valve tops roughed up (to say the least) thank goodness it never started but hardly a mark on piston, liquid gasket gunge everywhere, one cam cap wrong way round and it looks like someone lightly hand sanded the head face! i have not seen this engine run so can only speculate on original problem i think the cams are new and seem undamaged also the rockers, belts and pulleys new. I am going to strip the other side tonight i have two spare heads which i will fit with its cams etc after lapping valves and new guide seals, other heads will be looked at by machine shop for useability i will also be removing the sump extension and cleaning oil returns, things sit on top of baffle plate, also turbo rebuild as spewing oil, pipework and intercooler clean hopefully damage limited to top end keep the faith TY
 

Attachments

  • cylinder head.jpg
    cylinder head.jpg
    384.6 KB · Views: 143
  • cylinder head 2.jpg
    cylinder head 2.jpg
    399.1 KB · Views: 129
  • bent valve.jpg
    bent valve.jpg
    356.2 KB · Views: 133
The best laid plans of mice and men on closer inspection of bores have decided not to use this motor there's no cross hatching but lots of glaze but is ripe for rebuild (i hope) i can't hand on my heart put this in without going deeper i have a s type lump so going to use that instead after I've checked it out i was planning on changing vg seals and lapping valves, oil seals, gaskets, belts and oil pump will be starting over next few days God Bless the King TY
 

Attachments

  • cylinder head.jpg
    cylinder head.jpg
    384.6 KB · Views: 110
  • cylinder head 2.jpg
    cylinder head 2.jpg
    399.1 KB · Views: 109
The best laid plans of mice and men on closer inspection of bores have decided not to use this motor there's no cross hatching but lots of glaze

When I fitted a replacement piston in my FL2 engine, I deglazed the bore that the replacement piston was going in. There were also some impact marks on the cylinder walls from the nut that was rattling about in there.
Compression is good and even on all cylinders, so my crude replacement piston and deglaze did the trick.
It's all back together now, and has run faultlessly for the past 2 years, apart from an occasional misfire, which I'm putting down to a faulty injector.
 
This is what I have, one head removed from jag lump heads seem spot on both motors have stood longer than i was led to believe both have glazed and a little surface rust in bores no vertical wear/scores pistons seem like it may be a low milage seems tight see pics what do you think? I was hopefully going to hone, rings, shells, oil pump i have most other parts and not in a hurry I also have a friendly machine shop just down the road TY
 

Attachments

  • rust.jpg
    rust.jpg
    314.4 KB · Views: 136
  • rust 2.jpg
    rust 2.jpg
    349.6 KB · Views: 135
This is what I have, one head removed from jag lump heads seem spot on both motors have stood longer than i was led to believe both have glazed and a little surface rust in bores no vertical wear/scores pistons seem like it may be a low milage seems tight see pics what do you think? I was hopefully going to hone, rings, shells, oil pump i have most other parts and not in a hurry I also have a friendly machine shop just down the road TY
The cross hatching is visible in the second picture.
Don't forget that the cross hatching is only there to help retain oil while new rings bed in.
It'll wear out eventually, but that doesn't mean a loss of compression, as the rings are then bedded to the bore, so seal properly.
 
Yes I'm taking two blocks (one is spot on the pictured one has some minor rusting in bore) to machine shop next week whichever one is used will be fitted with new rings and shells i am looking to use one of these blocks for a project for myself when time allows crank will also be polished thank for your advice and interest. Can I ask have you or anyone heard from Gary Gstuart haven't heard from him in a while thanks TY (Steve)
 

Attachments

  • up cylinder.jpg
    up cylinder.jpg
    320.5 KB · Views: 100
  • rust block.jpg
    rust block.jpg
    345 KB · Views: 94
  • rust 2.jpg
    rust 2.jpg
    349.6 KB · Views: 99
Yes I'm taking two blocks (one is spot on the pictured one has some minor rusting in bore) to machine shop next week whichever one is used will be fitted with new rings and shells i am looking to use one of these blocks for a project for myself when time allows crank will also be polished thank for your advice and interest. Can I ask have you or anyone heard from Gary Gstuart haven't heard from him in a while thanks TY (Steve)

If you put the @symbol before any members name ie @gstuart it then pings up in their recent alerts, the upside down teardrop thing in the top right, member then sees it and gets a prompt to get their arse in gear!

I will test it on you @tyregeezer
 
just to let you know @lynall @Nodge68 have pinged @gstuart thanks TY

@tyregeezer Many thks for tagging me , really sorry for the delay

ur doing an absolute cracking job there mate and will have a good catch up of ur threads, also hope ur elbow and back are better

plus hope this isn’t cheeky in any way plse, with the engine now out are u able to take some more pictures of the fuel filter for me please , just then I can try and match it up with mine without having to try getting underneath

this was my old picture and trying to then see how good it matches , once again hope u didn’t mind me asking , million thks

E0719701-9533-4E38-9A88-6050BBF59754.png
 
Last edited:
Great to hear from you mate no need to apologise we all need space and time now and again just good to know you're ok. Yes of course iI will post some pics of fuel filter when out in workshop tomorrow (my go to place for peace, quiet and contemplation) anything I can do to help no problem get it done and out on an adventure. Going over to the machine shop Tuesday to get two blocks checked out if i can get the jag lump stripped. Always here to talk should you need remember what i say keep the faith my friend Steve
 
Great to hear from you mate no need to apologise we all need space and time now and again just good to know you're ok. Yes of course iI will post some pics of fuel filter when out in workshop tomorrow (my go to place for peace, quiet and contemplation) anything I can do to help no problem get it done and out on an adventure. Going over to the machine shop Tuesday to get two blocks checked out if i can get the jag lump stripped. Always here to talk should you need remember what i say keep the faith my friend Steve

bless u , so very grateful to u and that would be amazing if u would be so kind to get some pics when u have a free moment plse , will just confirm if the pipes were fitted in the right orientation

Also wondering if I fitted my pressure gauge onto that fuel test point at the back of the engine if that could also indicate if the pipes are correct , just trying to ensure I do as much as I can myself before I book it into my local garage for its MOT

Apologises as don’t want to divert this thread to much , hope ur projects goes to plan and know like myself is very interesting following this project

thks again

gary
 
Hi Gary, no problem drifting off at all added some pictures for you the first of filter in situation note the pipes running down the chassis, if they match you should be good you might want to remove filter bracket for a better view. The second pic shows colour codes, supply from tank is yellow, supply to HP fuel pump blue (large) small blue is a vent, white should return to cooler. Been working on rebuild I bought a lump "which can be seen running" (evilbay) I did and had it shipped should have known better have come to the conclusion that it has stood for some time my plans at this time are to use the other block I have just needs a hone, but will use internals crank looks spot on, big end journals look good minor rust on counters crank and pistons peened new rings crank journals polished new shells, wear mainly on top shell, no scoring anywhere, hopefully the rusty jag block will rebore well that's the plan so far will also do the costings at some point. keep the faith Steve
 

Attachments

  • filter in situ .jpg
    filter in situ .jpg
    246.4 KB · Views: 106
  • filter.jpeg
    filter.jpeg
    310.4 KB · Views: 105
  • bottom end.jpg
    bottom end.jpg
    310 KB · Views: 105
  • worn shells.jpg
    worn shells.jpg
    166.3 KB · Views: 125
  • con rod normal wear.jpg
    con rod normal wear.jpg
    255.2 KB · Views: 110
you may need to substitute white for small yellow when talking fuel lines also can be indicated by arrows in pointing at connector, out pointing away from connector you should be able to work out the other two visibly Steve
 

Attachments

  • my filter.jpg
    my filter.jpg
    218.4 KB · Views: 80
Back
Top