Cheers Don,

My next project is to mess around with different carbs so no doubt they'll either be black bright or have holes melted in them before long....

D
 
No pictures tonight, I left my camera behind, but instead a cry for HELP!

Stripped timing cover off and cleaned up, scraped crap off piston heads and cleaned up gasket surfaces, removed timing chain and then I started on the tappets.

I thought these would be easy! Well I'm proper stuck I got the first and second brass followers and rollers out buit can't shift the guides. Somehow I've managed to get the first one completely wedged and the second one will move up and down about 1/8" and side to side about 15 degrees but thats all. Now I'm stuck!

Any ideas of tools I could use to get them out?

I'm very chuffed off that I've got stuck so easily!
 
In the absence of advice I asked my mate round who was an engineer in the army. He's never worked on Series before but had the right idea - what it required was brute force and ignorance.

Insert jack handle with a bayonet peg into guide and get the biggest pair of grips available and twist until it comes loose. With a bit of grease and rubbing the top of the bores with emery we got them all out. Only slight panic was when peg sheared off and nearly disappeared into the depths but managed to catch it and replaced with a nut and bolt which worked even better.

We were both knackered by the end of 2 hours...only one thing for it...:beer2::beer2::beer2::beer2::beer2::beer2: - hangover now!

Anyway here's some more pics. I gave in and decided to order a new cam chain and tensioner sprocket even though they looked fine to me!
 

Attachments

  • DSCF0068-s.JPG
    DSCF0068-s.JPG
    138.9 KB · Views: 234
  • DSCF0070-s.JPG
    DSCF0070-s.JPG
    132.2 KB · Views: 217
  • DSCF0072-s.JPG
    DSCF0072-s.JPG
    186.7 KB · Views: 275
No harm in putting on a new chain & tensioner. Looking forward to hearing about the improvement when finished
 
Sorry no pictures today but I thought I'd go up and do some more prep so mainly cleaning stuff up and "practicing". I installed the new cam, being careful not to scrape the bushes and it feels nice and smooth. I looked at the new and old cam side-by-side and the looked identical to me. I expected there to be more valve lift on a fancy cam!

I had a quick go at timing it in and I think I've got the measure of that using two dial guages on the inlet and exhaust push rods. Will see if it is that simple with the new chain...

Then I decided to try and fit the distributor /oil pump skew gear - what a fecking nightmare. After an hour of swearing I gave up. There's a hole that holds the collar plus you need to get the distributor roughly the right way round - how the hell are you meant to do it! Any ideas....?????

D
 
once cams set to crank fit skew gear so master spline is 20 degrees to front dizzy securing bolt,then with a sharp scribe or similar work the bush round you will need to put a screw driver through oil hole to push skew gear up a bit till locater hole is aligned you wind screw in till nipped then back off a turn,often cam sprockets have more than one key way to get timing as near as possible
 
Last edited:
Thanks james,

I'm guessing that is with cylinder four tappets on the rock I keep getting it all straight in my head then lose it...

Thanks for tip about screw driver in oil hole - that should help! Beginning to wish I'd take the whole engine out now...
 
yes if cyl 4 is on the rock cyl one is ready to fire,i usually fit pointer(with tube or nuts as spacers) and pulley to get tdc
 
I'll be setting the timing when I've put it all back together. I'm guessing that the only reason for getting the skew gear in the right direction is so the distributor is the right way round and the vacuum advance doesn't get in the way. Other than that if I get it wrong when it's back together I could just swap the HT leads round to correct it?

D
 
Will try to, got chain now - I was just thinking through "whats the worst that could happen" for getting the skew gear wrong. I've done a dry run using the old chain on the cams and am happy that I can time them in nicely with in a degree or so using a pair of dial guages.

Cheers

D
 
if you cant get it perfect which you usually cant go for cam rotated clockwise as looking at front of engine as this advances a tadge ,chain running in will retard back to correct spot use a pair of internal circlip pliers etc to fit skew gear ,master spline should be 20 degrees towards block from front dizzy stud is your cam sprocket maked for aligning
 
Cheers James,

Sprocket is marked but instructions from ACR say to try all the keyways to see which gives nearest approximation. When I was test-dialing it in with a pair of DTIs the second keyway anti-clockwise gave about 0.01mm closer on follower lift. I will try and get it that close when I do it properly. No idea how many degrees that equates to but it seemed pretty close, like you say chain will bed in anyway so I'll take your tip and err on the side of advanced if there's a choice.

I'm finding piston TDC by eye whilst the engine is off I compared the marker which is miles out (bent) and typical errors when lining up with another dial guage or by sighting across the piston crown. I found the latter was just a bit better than the judder in the timing guage.

No idea how much a degree or so will make to performance but since I've paid top-dollar for the bits I might as well do my best by them, plus I like ****ing around with stuff like this - a lot easier on the back than wrestling a new set of springs on!

D
 
Well another six hour session tonight and still not even half finished!

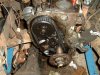
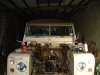
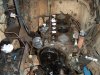
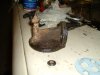
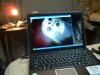
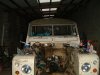
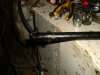
First up I spent an hour messing around getting the oil pump/distributor skew gear lined up. This is a bugger of a job! With James's advice and a bit of lateral thinking I decided to take a laptop and web-cam with me! This still wasn't easy but easier than doing it blind! Pictures #1 and #2 show the setup and what I was looking at.

Next up I cleaned up the oil filter housing and bolted it on - a nice easy job...except for all the oil I managed to tip down the front of my trousers...

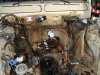
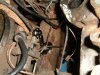
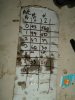
Then on to the interesting bit...timing in the cam. I used two dial guages on the end of the two push rods. When the cam's at the right point the two should be lifted by 0.017" or 0.44mm. I tried each keyway on the sprocket to see which was closest and picked the one that was closest but slightly advanced. The card shows the balance for each setting. I picked the one #1 anti-clockwise from the one marked "P".

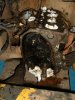
Then I refitted the adjuster and front cover and water pump. Then I took it off again because I'd forgotten to tighten the chain damper and locknuts. So off it came again...did up the tabs...replaced the cover tried to put the pulley on and nocked the keyway out...cover off and on again and glued the keyway in with blue sticky this time....Now I've just noticed in the pictures - I forgot to do up the lock tabs on the cam sprocket...What a knob head!:mad::mad::mad::rofl::rofl: So that's something to do instead of going to the pub tomorrow then!

Then I test fitted the head, nowhere near does it fit! Ground a bit off the thermostat housing on the head and the water pump housing. Tried again...repeat for about half an hour until I got there. Forgot to take pictures of that bit.

Put all the new cam followers in and tried to put new lockwire in but snapped it then called it a day - I could murder a pint!

Question: How are you meant to set the damper position?. In the book it mentions a max lift of 0.025" but does that mean if you pull at the chain or when the chain is taught?
 

Attachments

  • s-DSCF0084.JPG
    s-DSCF0084.JPG
    231.3 KB · Views: 220
  • s-DSCF0083.JPG
    s-DSCF0083.JPG
    141.8 KB · Views: 210
  • s-DSCF0082.JPG
    s-DSCF0082.JPG
    212.8 KB · Views: 213
  • s-DSCF0081.JPG
    s-DSCF0081.JPG
    144.9 KB · Views: 208
  • s-DSCF0080.JPG
    s-DSCF0080.JPG
    224.9 KB · Views: 361
  • s-DSCF0079.JPG
    s-DSCF0079.JPG
    138.3 KB · Views: 213
  • s-DSCF0077.JPG
    s-DSCF0077.JPG
    128.7 KB · Views: 221
  • s-DSCF0074.JPG
    s-DSCF0074.JPG
    120.2 KB · Views: 217
  • s-DSCF0073.JPG
    s-DSCF0073.JPG
    188.2 KB · Views: 223
  • s-DSCF0090.JPG
    s-DSCF0090.JPG
    116.2 KB · Views: 220
Thanks, that's what I thought but new one is always touching a bit even adjusted out. I'm tempted to put the old on back if I'm going to have to take that pigging front cover off again!
 
Only managed an hour and a half last night. Got the front off and tightened up and _locked_ all the bolts! Put front back on, dropped keyway for main pulley again, repeat....Thing is I can now remove the front in about 90 seconds flat with the aid of a cordless impact driver...

Fuel pump and covers back on block so no ready to fit head and give it a test firing. I'll cover everything sensible in oil and gonna wind the engine until oil starts to come out of the head feed line....anything else I should do before firing up?

D
 

Attachments

  • s-DSCF0091.JPG
    s-DSCF0091.JPG
    217 KB · Views: 337
Last edited:

Similar threads