steve2286w
Well-Known Member
I got a kit like this, the 9.5mm? dia goes in injection pump, while the other bit screws in btm flywheel cover screws in slot in flywheel stop it turning

Last edited:
if you 'edit' ther link and change unfurl="true" to unfurl="false" the link doesnt show "Pardon our interruption"...
https://www.ebay.co.uk/itm/142607741269
my link includes crank puller tool which doubles up for using to take the pump out without removing the belt.I got a kit like this, the 9.5mm? dia goes in up pump, while the other bit screws in btm flywheel cover screws in slot in flywheel stop it turning View attachment 340803
Funny how I did both Ebay links the same and they came out different.if you 'edit' ther link and change unfurl="true" to unfurl="false" the link doesnt show "Pardon our interruption"...
https://www.ebay.co.uk/itm/142607741269
Thanks for letting me know, whether I remember or not is a different matter.
border
Well-Known Member
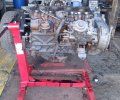
Thanks Borrowed that kit from a Mate. Got another bloody problem now though, Some of the nuts on timing case have rounded off, Tried everything to loose them off, left them with penetrating oil over night, Heat, and even those Irwin bolt extractors, but they are to small to get a grip on as they are only 10mil bolts, made one worse after loosing my temper so god knows how Im going to get that one out. Any Ideas ?
Also got engine out today, Do I need the fly wheel and casing off to fit to Engine Stand or will it go on as it is ?
Thanks Everyone for help and advice.
Also got engine out today, Do I need the fly wheel and casing off to fit to Engine Stand or will it go on as it is ?
Thanks Everyone for help and advice.
Attachments

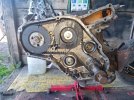
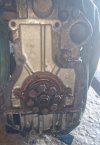
I would grind the bolt heads off, remove the timing cover, strip that down and then remove the timing chest which could be fun! then you have full access to remains of the bolts, the worst three are normally the ones around the water gallery (top right in first pic), all the timing cover bolts are M8, the bolt heads are weird 10mm is to loose and 3/8 is to tight.
Better to remove flywheel housing to fit onto engine stand.
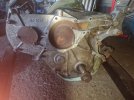
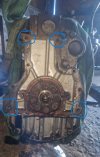
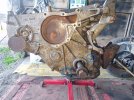
I wonder what that blanking bung in the flywheel housing is for in the 3rd picture?
Better to remove flywheel housing to fit onto engine stand.
I wonder what that blanking bung in the flywheel housing is for in the 3rd picture?
border
Well-Known Member
Yes I was wondering about that bung too.I would grind the bolt heads off, remove the timing cover, strip that down and then remove the timing chest which could be fun! then you have full access to remains of the bolts, the worst three are normally the ones around the water gallery (top right in first pic), all the timing cover bolts are M8, the bolt heads are weird 10mm is to loose and 3/8 is to tight.
Better to remove flywheel housing to fit onto engine stand.
I wonder what that blanking bung in the flywheel housing is for in the 3rd picture?
steve2286w
Well-Known Member
CharlesY knew his engines and how to loosen bolts, That plug is similar position to the 2286 but without the inspection cover , do you have one at btm as the 200tdi should, wonder if it’s a hybrid or off another engine, see if it lines up when engine at TDC a or EP with slot in flywheel
There is codes on the block and head which tell you the casting date
What does btm flywheel housing loook like has it had the mod recommended by glencoyne drilling extra bolt holes
For fixing to stand I got long 10mm bolts from screwfix and extra nuts into block


There is codes on the block and head which tell you the casting date
What does btm flywheel housing loook like has it had the mod recommended by glencoyne drilling extra bolt holes
For fixing to stand I got long 10mm bolts from screwfix and extra nuts into block
Last edited:
Some of them have them for timing, I think they line up with the "wrong" slot in the flywheel. Ours doesn't have it, maybe the earlier engines have it?Yes I was wondering about that bung too.
Pretty sure it's on one of TrailerFitters 200tdi videos.
border
Well-Known Member
The bolts are only m10 I think and dont think they go in to the housing very far, got flywheel and housing off ready to try but a Bit worried if 4 bolts will hold it on stand, I know its been done before as have seen pics of them on. Do you have any pics of which holes you used when yo done it Mate ?CharlesY knew his engines and how to loosen bolts, That plug is similar position to the 2286 but without the inspection cover , do you have one at btm as the 200tdi should, wonder if it’s a hybrid or off another engine, see if it lines up when engine at TDC a or EP with slot in flywheel
There is codes on the block and head which tell you the casting date
What does btm flywheel housing loook like has it had the mod recommended by glencoyne drilling extra bolt holes
For fixing to stand I got long 10mm bolts from screwfix and extra nuts into block View attachment 340871View attachment 340872
Thanks
Attachments
Last edited:
steve2286w
Well-Known Member
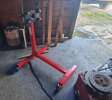
you should use the top 2 and the bottom 2 holes , my stand is a clarke and you can see the adjusting brackets and the long 10mm bolts with additional locknuts, it can revolve 360 degrees and lock in position just under the rubber gloves with a pin this is on my 2286 engine but very similar block , i think i got the stand after doing the tdi engine

WoodyO
Well-Known Member
I'd probably grind the heads off those bolts to get the cover off, then tackle the stud that's left in the casing.
Edit, too slow on that reply.
Yes, I've currently got a 200tdi almost fully build up, turbo, manifolds, etc. on a Clarke 350kg engine stand using the four bolt holes mentioned above.
Edit, too slow on that reply.
Yes, I've currently got a 200tdi almost fully build up, turbo, manifolds, etc. on a Clarke 350kg engine stand using the four bolt holes mentioned above.
border
Well-Known Member
Thanks my stand looks exactly like yours, I measured how far the studs go in to engine and the top is 2 about 35mm and bottoms about 30mm, the tubes on stand are 70mm so think I will need bolts about 120mm or longer. pic of mine so is it 4 bolts circled ? just found pic of my stand too.you should use the top 2 and the bottom 2 holes , my stand is a clarke and you can see the adjusting brackets and the long 10mm bolts with additional locknuts, it can revolve 360 degrees and lock in position just under the rubber gloves with a pin this is on my 2286 engine but very similar block , i think i got the stand after doing the tdi engineView attachment 340940
Attachments
steve2286w
Well-Known Member
I used 100mm long bolts, yes use the circled holes, don’t need to go full depth, I used additional nuts on the bolt to nip them up and saved cutting bolts

 www.toolstation.com
High Tensile Set Screw
High tensile zinc plated steel. Use when a full threaded bolt is required.
www.toolstation.com
Last edited:
border
Well-Known Member
Thanks Again Mate will order someI used 100mm long bolts, yes use the circled holes, don’t need to go full depth
High Tensile Set Screw
High tensile zinc plated steel. Use when a full threaded bolt is required.
border
Well-Known Member
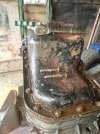
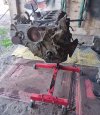
Thanks Everyone, Got it on tonight, its at a bit of an angle, in first pic, not sure why, but it does turn right round with a bit of effort. Not sure what to do first either give tops of pistons and block a good clean or take sump off and see whats what in the bottom end, sump bolts look very rusted so have wire brushed them and soaked them in penetrating fluid, frightened to touch the bloody things in case they start rounding off like others.
The 2 on timing cover circled in last pic will not budge tried tapping smaller socket on but no joy
Some have mentioned grinding them off then having a go at the studs but not sure if there will be enough of them sticking out to get a grip on them. think before I do that might try and cut a slit in them to see if a big screwdriver might move them but not building my hopes up, these bloody things are Stuck Solid. at last I have better access to them now with it been on the stand.
.
Attachments
steve2286w
Well-Known Member
Land Rover Manuals
Also the 200tdi article on turner engineering
The discovery 1 manual very helpful and Britannia does good videos , he has loads so have a search
Sump:bolts should not be tight, sometimes a 1/4 “ drive rattle gun helps with small tight bolts
The crank is a biggie and it’s bearings so a clean area needed to clean ,label and bag things up for later
Once you get a bare block then can paint up rebore as required then build from there , if you don’t have the kit to measure bores local engineering co should do it quite cheaply
Enjoy
border
Well-Known Member
Bit further forward, Finally got front timing cover off, got sump and ladder rack off, to inspect bearings on crank, think they could do with been replaced, then again would be mad not to while I am this far in. Have not took timing belt off yet, Do I need to remove the Timing Pump to when I take the pulleys and rear plate off before I can lift crank out. ?