Window mechanism!

This site contains affiliate links for which LandyZone may be compensated if you make a purchase.
Sorry Methos thats not it. I used normal solder with aly. flux. I don't know if that stuff will work as i haven't tried it.

No problem Ianada thanks for the effort, My drivers door is the one that went few months ago, its holding with the brake cable fix just now, but I know the end is going to ping off it at some point because i didn't feel the joint at the end was very good.

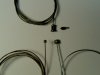
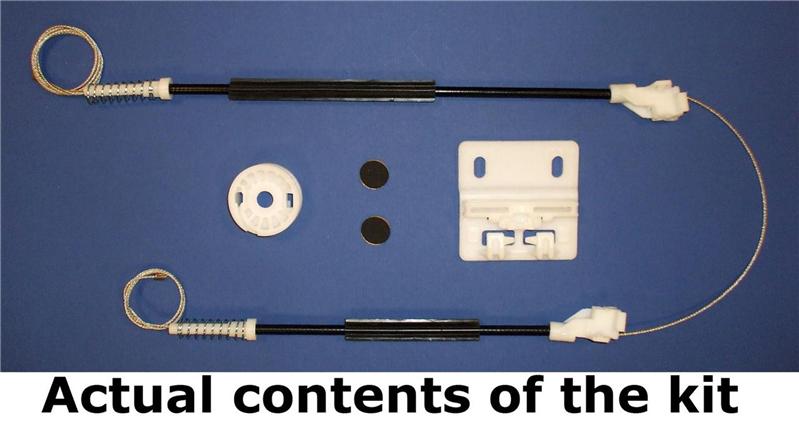
i have seen new cable sets on ebay for about a tenner which might be a bit easier for you
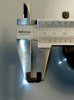
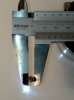
Thanks, I'll have a look and see what kind of solder etc comes with it, the cable fix works great, I just need to terminate the end better so i can press the button with confidence :eek:

Thanks to all. ;)

Methos.
 
I have just successfully completed this repair for under £7

Used Bike GEAR (not brake) cable as it has the right ferrule on one end for the spindle.

On the other end I used a pear shaped "solderless nipple" - this allowed me to partially clamp off the cable in place against the tensioning spring and then draw the cable tight and partially compress the spring to get the right amount of tension.
Once happy, final tighten of screw in nipple against cable and solder a section of cable to secure hold and trim off excess.

Did both winding wires in drivers regulator - £2.99 from bike shop

End fittings £1.89 each - VWP - motorcycle control cables

Bit of a tricky job to get right - especially rewinding the spindle

All lubed up and working like new.
 
Good job Mark2 only the gear cable is much thinner than a brake cable. Originally, I was going to use one, but didn't like the way the finer cable nestled within the furrows of the spindle and pulleys. The runner system on the window is less than precise.
Strands are also finer in the gear cable, tensile strength and all that nonsense.

First 2 Attachments show OE brass hex lug dimensions.

Third attachment - OE window cable at top with detached hex lug, gear cable on left and brake cable on right.
 

Attachments

  • window-cable-lug-side-view.jpg
    window-cable-lug-side-view.jpg
    62.9 KB · Views: 535
  • window-cable-lug-head-.jpg
    window-cable-lug-head-.jpg
    67.4 KB · Views: 542
  • -window-brake-cables.jpg
    -window-brake-cables.jpg
    82.1 KB · Views: 603
I had the same thought about the cable spec, and even tried a brake cable first but, had a few probs getting the winding & tension right.

plus the gear cable fitted my pear type ferrules free from the depths of my toolbox

If it lasts 5 years I shall be happy
 
I'm just in the process of doing mine right now... problem is that the old cable is really chewed up and I can't measure it.

I'm doing one of the rear windows (passenger side) and wonder if anyone has the measurements from the first "nipple" to the middle lug, then from that to the other nipple?
 
Firstly I was doing my driver's door window, which had stuck in the up position.

So, this meant it wasn't easy to reach the bolts for the window glass holders.

I undid the regulator mountings and lowered the whole thing enough to be able to get a 10mm spanner to them - bit of a blind reach.
It would be (just) possiible to get round and cut the up/down cables to allow the window to drop enough to get at these bolts.

I then started out attempting to measure the cable lengths and match them,but this is nigh on impossible with mangeled bits. I expect these measurements are given in the Fix kits on ebay.

So, I started with the glass holders/runners at their uppermost position.
Then wound the "raise" cable onto the spindle (as it works up from the bottom of the spindle) and fed the other end thru the spring on the holder/runner.
At this point I put a solderless nipple on the cable to hold it in place.
Then I returned to the spindle and ensured I had good tension around it and just enough "lead on" area for the "down cable"

Next I clamped the runner to the slide and pulled the cable tight thru the solderless nipple so I could push that down to partially compress the spring, thus the spring applies tension to the cable and provides a degree of shock absorbance to the system.
This must also allow a certain amount of stretch in the new cable.
Tightened up the solderless nipple.

Second task was to fit the "Down cable" in a similar fashion - this is easier as the cable attaches at the top of the spindle and has a half (180deg) turn around before it exits the spindle housing.

Having tensioned and tightened the nipples I then did a check run up and down to ensure all worked ok with no slack in the cables as the regulator travel direction reversed - which can be taken up by loosening the nipples and tensioning further.

When happy all working ok, bend the excess cable slightly as it exits the nipple and apply solder to ensure it holds and trim off the excess cable.

Lube everything up - best is Silicone Lubricant (NOT WD40 as this stays wet and attracts dirt - Silicone drys to a low friction coating)
Use the same stuff on the glass rubber runners

Fitted and all is working luvly.

Next weekend - Nearside Rear passenger window (5 door TD4)
 
Great thread with excellent advice. For all those who have read this and thought " I hope mine don't ever snap" they will eventually so get those door panels off and lubricate the cables as LR never did!. D..
 
Trying to be a cheapo and avoid coughing up best part of £20 for £5 worth of parts, but am struggling to get hold to a solderless nipple that will do for the middle "lug" on the rear side window mechanisms.

Thought I had it cracked yesterday, but the middle lug kept sliding along and buggered the cable.

I've got 3 back windows to do, as my mate has asked me to do his two (and his driver's door)... hopefully I can find a motorbike or push bike shop near home that has the bits tonight.
 
Can't help yet with the specific details as I have not had the rear regulator out yet.

But, the link to Vehicle Wiring Products in my earlier post gives all the sizes and types of ferrules, soldered and solderless nipples tha you are ever likely to need.
and,
you can get the cable in a roll from them.
If you order early enough they can get the stuff out to you next day.

I used the solderless nipples because they allowed me to make adjustments before I finally fixed it with solder.

Bike shops will not supply these any more as they consider there is a liabilty risk in relation to brakes and safety.
 
Right... I've nearly got it sussed.

Got the fittings, cable etc sorted.

However, when I test it and run it right to one end or the other, the "loose" cable (i.e. the one that pulls the other way) comes off the spool and bollockses up the reel.

Can't work it out, unless I've put too many turns of cable on to the spool????

It's the rear side window one.

Any suggestions??? Have I literally just not gt it tight enough???
 
Assuming it is the same as the front spindle -

wind on the "raise" wire from the ferrule locator on the bottom of the spindle, winding the cable up the spiral grooves until you have one free groove at the top, ensuring you have kept it taught.
Then slide the spindle onto the geared drive withe the upper ferrule locator (for the down cable) to your right as you look at it from the top, and the "raise" cable exiting to the right.
Then make a fix of the other end of the "raise" cable to keep it all in tension.

You can then put the "down" cable ferrule in it's locator on the spindle (without removing the spindle) and wind it anticlockwise around the remaining free top goove a half turn to it's exit point from the winder housing and then make a fix at the other end on the runner to put that run in tension.

If all looks well, you can refit the top of the winder and then attend to the final tensioning of the cables on the runners.

This sets the winder position in it's "up" position - and the runners must be at the top of the sliders when you finally fix the ends.

The winder spindle works by reversing the motor - as the down button is pressed the "down" cable will wind onto the spindle into the spiral grooves as the "raise" cable winds off and vacates those grooves - and vice versa.
 
Got it sorted earlier... it was just not tight enough. Brought one end stop in 3/4 inch and it's fine.

Reckon I did the job for less than £3... cost a few hours labour (of mine) arsing about, but think I could do the job in less than 1 hour start to finish.

Well pleased... just hope it lasts!
 
Excellent

Once mastered yer can feel right chuffed that you can fix any of the windows for under a tenner
 
I can't measure the cables as the cables snapped and chewed it up. Can anyone give me the measurements of the cables for the front windows.
 
straighten out enough of it to get an approx measurement ,heat and drill out as little of the old wire from end connections to remove before sweating(solder) into the ned of your new wire....
look up hoist cables in yellow pages less £ per metre.
 
See fitting in the thread Window Regulator

Use the kit at ebay OSCO £9.99, is easy to fit, less hassle than making new cables, and new drum and guides as these get mashed up when unit fails

396832855_o.jpg
 
Back
Top