Window mechanism!

This site contains affiliate links for which LandyZone may be compensated if you make a purchase.
Well it's been a long time coming.......................

Was driving to work on monday morning after a severe frost.
Car had warmed up nicely, went to put the frosted window down, then 'twang'


Have done a bit of a how to......the idiots guide.


Remove all door trim, followed by plastic membrane (you can tape this back on)

Attachments (drivers door, 3dr model shown. 5dr and newer models may vary slightly)

1. Lower window to show the window clamps, if the window doesnt go down, push it manually
2. Mark the clamp positon on the glass, undo both clamp bolts (10mm), remove the glass (easiest when removed diagonally)
3. Undo the door strut bolts (T25 torx, x4) and the regulator bolt (10mm), there is a cable clip on back of the strut, reach up and unclip the cable. Disconnect the wire multi-plug on the regulator itself.
4. I marked the position of the window runner bolts (10mm) loosen the bolts, two per runner, then pop them out.
5. fold the runners sideways, so they cross over in the centre, RH runner comes out first, then the regulator. You might have to shuffle the whole assembly to do this!
6. Keep the runners crossed and remove from the door
 

Attachments

  • 1 Window clamps lowered.jpg
    1 Window clamps lowered.jpg
    140.1 KB · Views: 5,582
  • 2 Glass marked for position.jpg
    2 Glass marked for position.jpg
    111.7 KB · Views: 5,636
  • 3 Door strut T25 torx bolts x4.jpg
    3 Door strut T25 torx bolts x4.jpg
    100.5 KB · Views: 5,325
  • 4 Marked bolts.jpg
    4 Marked bolts.jpg
    62.2 KB · Views: 5,270
  • 5 RH runner out first then regulator.jpg
    5 RH runner out first then regulator.jpg
    132.4 KB · Views: 5,587
  • 6 Runners folded.jpg
    6 Runners folded.jpg
    145 KB · Views: 5,300
Last edited:
7. Undo the 4 self tappers on the back of the regulator (T25 torx screws, x4) Note the bottom left one on mine is a standard flat head screw.
8. Remove the backing plate.........the snapped cable, right up at the lug.
9. Remove the runner with the broken/loose cable.
10. Remove the cable from the 'spring end'
11. You might need to roll the cable around the pulley(s) using the recess
12. Measure a new cable relative to the old one. Cut slightly longer than needed (you'll trim to exact length once the lug is fitted) Mark the replacement cable where the new lug will start and end (the good cable was removed to facilitate repair and for demonstration purposes)
 

Attachments

  • 12 Cable measured.jpg
    12 Cable measured.jpg
    146.4 KB · Views: 5,207
  • 11 Roll cable around pulley recess.jpg
    11 Roll cable around pulley recess.jpg
    179.7 KB · Views: 5,256
  • 10 Remove larger lug.jpg
    10 Remove larger lug.jpg
    242.3 KB · Views: 5,224
  • 9 LH runner turned over.jpg
    9 LH runner turned over.jpg
    227.1 KB · Views: 5,258
  • 8 Cable snapped 1.jpg
    8 Cable snapped 1.jpg
    187.4 KB · Views: 5,358
  • 7 T25 torx screws x4 on backing plate.jpg
    7 T25 torx screws x4 on backing plate.jpg
    143.4 KB · Views: 5,299
Last edited:
13. After you have cut the cable to size, refit the spring and cable sleeve
14. I'm using a lead lug, so I have bent the cable back on itself (pic is a bit fuzzy :eek:)
15. I have placed a few fishing weights on a spoon for smelting, use a rag on the handle.....lol... it's gonna get hot. Melt the lead over a gas flame (any gas camping stove or blow torch will do)
16. Once the lead is in a molten state, give the cable end a quick heat over the flame. Insert the cable into a pre-drilled hole in some hard wood (5-6mm deep), use a 5 or 6mm drill bit. It doesn't matter if it's over sized, the lead is easily shaped/cut to size with a Stanley knife or metal file.
17. Quickly pour in the molten lead, hold the cable steady until set (could take 10-30 secs depending on temperature)
I have deliberately poured in more than needed, this is simply to show that anyone can have a go at this....doesnt have to be precision engineering!!
18. Nice shiny new lug, the nipple is from the shape of the wood drill bit
19. new lug relative to where it sits in the spindle (Actual size should be 4mm wide by 5mm long, see previous post no.24), Trim or file down to size.
20. Lug filed down to size and excess cable trimmed too.
 

Attachments

  • 20 Trimmed lug to fit recess.jpg
    20 Trimmed lug to fit recess.jpg
    136.7 KB · Views: 5,322
  • 19 New lug ready for filing-trimming.jpg
    19 New lug ready for filing-trimming.jpg
    138.3 KB · Views: 5,044
  • 18 New cast lug(01).jpg
    18 New cast lug(01).jpg
    224.4 KB · Views: 5,053
  • 17 Lead solidifying.jpg
    17 Lead solidifying.jpg
    218.5 KB · Views: 5,063
  • 16 Cable in cast hole.jpg
    16 Cable in cast hole.jpg
    146.4 KB · Views: 5,049
  • 15 Lead weights.jpg
    15 Lead weights.jpg
    207.4 KB · Views: 5,190
  • 14 Cable kinked.jpg
    14 Cable kinked.jpg
    109.3 KB · Views: 5,088
  • 13 Refit spring & sleeve.jpg
    13 Refit spring & sleeve.jpg
    176 KB · Views: 5,136
Last edited:
21. Fit the cable assembly/sleeves back on to its runner and pulleys. Wind the cable halfway around the spindle. Sometimes you'll need to coax the cable into postion by bending it slightly! Especially on the first bend from the lug
22. Likewise fit the 2nd cable back into its runner then counter rotate the second cable around the spindle in the opposite direction, they should meet approx halfway in adjacent furrows (assuming you have the two clamps at the same height on the runners) Keep a firm grip on the cables to prevent unwinding!!
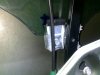
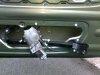
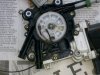
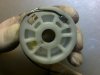
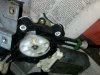
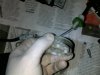
23. Hold spindle just above the regulator, clip the green D shaped flange into position. Put a little tension on the cable by pulling away from the green flange. lower the spindle on to the motor splines. Keep a firm grip!!
24. Stretch the other cable over the lower outlet (there are two to choose from, go for the one with the most tension on the cable) Note... If the white cable sleeve end doesn't reach, lift the spindle off again and rotate a few degrees to give some slack. Then re-apply tension and refit the white sleeve stop.
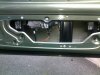
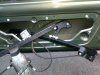
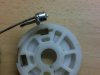
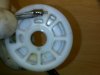
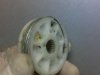
25. Spindle in place with cables nestled around it :)
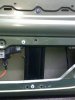
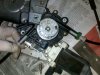
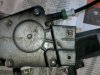
26. Refit the backing plate, making sure the long tab back slots into the green D-flange. Refit the torx screws and breath a sigh of relief.

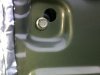
Grease or oil all cables and runners

Refit the runners in reverse order of how they came out, tighten up all bolts, clip the cable to the strut again and connect up the regulator multi-pin plug.

Before refitting the glass, give the regulator a quick test using the window switch. With the window out dont run the clamps all the way to the top, just run them with a few inches of travel up or down!!

When you're happy it works, lower the glass into its original position and tighten the clamps, refit the door membrane (duct tape will do) followed by the door trim and handle.

Job done, give yourself a pat on the back and go for a pint/cuppa ;)
 

Attachments

  • 25 Wire nestled in furrows.jpg
    25 Wire nestled in furrows.jpg
    232.1 KB · Views: 4,973
  • 24 second  wire stretched under tension.jpg
    24 second wire stretched under tension.jpg
    212.7 KB · Views: 5,144
  • 23 allign spindle with cable in place.jpg
    23 allign spindle with cable in place.jpg
    227.2 KB · Views: 5,044
  • 22 Counter rotating cables from each runner.jpg
    22 Counter rotating cables from each runner.jpg
    178.9 KB · Views: 5,300
  • 21 Cable wound halfway.jpg
    21 Cable wound halfway.jpg
    114.8 KB · Views: 5,059
  • 26 Backing plate nestled in D collar.jpg
    26 Backing plate nestled in D collar.jpg
    240.3 KB · Views: 4,965
Last edited:
HELP!!!
OK, first off guys, thanks so much for this thread.
Second, I had 3 snap on me in a week, so I got all 4 kits, I started by doing the(in America) Drivers side rear window, got it off no problem when I refit the wire put it back together and tried it the window went up and down 4-5 times and then it came unraveled again, tried it 3 more times(left it a little loose,tried it tight as possible) and the same thing,it keeps coming unraveled.
What the heck am I doing wrong?
 
Back
Top