Ex-Army 109 New Spring fit problem

This site contains affiliate links for which LandyZone may be compensated if you make a purchase.

pearcestev

New Member
Posts
12
Location
West Sussex
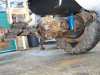
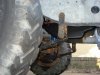
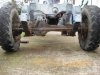
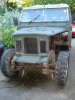
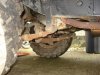
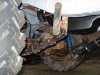
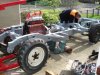
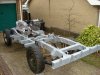
Rebuilding a 3/4 ton 4x4 Ex Army 109" that has 1 ton suspension and have fitted new front and rear springs. We have shackles and higher ride height so 1 ton replacements for the shocks and springs were purchased from DLR. With the new springs fitted and the engine in the bay there is still a gap preventing me from attaching the lower mount to the shock absorbers and also there is a 2" gap between the front drive shaft and the axle drive plate. Has anyone else encountered this with ex-army 109's on higher suspension? Attached are a few photos. The old springs are almost flat whilst our new springs have a good old curve to them. The axle is the same and is fitted nid=cely so that the small bolt in the spring goes thought the bottom plate etc. Any tips anyone? have posted a few pics so you can see the issues.
 

Attachments

  • 1.jpg
    1.jpg
    50.3 KB · Views: 904
  • 2.jpg
    2.jpg
    49.5 KB · Views: 598
  • 3.jpg
    3.jpg
    49 KB · Views: 729
  • 4.jpg
    4.jpg
    41.8 KB · Views: 547
  • 5.jpg
    5.jpg
    58.7 KB · Views: 603
While rebuilding my swb I had to compress the springs to get the shocks on. There's supposed to be a preload on them to set the bushes correctly. I set them to the distances in the manual but I'm not sure how to work out the distances for your vehicle.
 
Yep it's a galvanised Richards Chassis ordered as a 109" Ex-Army with the box section rear member. As far as i am aware that is the only real difference between a civvy one. Picture attached. Sawn up and chucked the old chassis now so cannot do a check measurement but if anyone out there knows different please let me know. Photo attached of the military rear of the chassis.
 

Attachments

  • 6.jpg
    6.jpg
    62.6 KB · Views: 2,597
trolly jack under the axle, chain around jack and chassis, wood blocks to protect chassis, compress spring, do up bush bolts.
 
i did my springs not long ago and used a ratchet strap around the chassis and the axle pulled to the exact size that is in the manual, tightened the bolts up and done
:)
 
The military chassis uses different front of rear spring hanger outriggers, as I found out when I needed to replace one, hence why I mentioned it. The civvy one has only one spring position and is in the middle of the two positions of the Milspec one. Also, the separate outriggers for the Milspec are NOT available anywhere that I found. I left the hangers on the chassis, while cutting off the rest of the outrigger, then cut the hanger section off the civvy outrigger and welded it back on the chassis and the hanger.

IMAG0031.jpg


IMAG0032.jpg


IMAG0036.jpg


IMAG0035.jpg


IMAG0043.jpg
 
Brand new leafs need some use to find their set[working position]Longer shackels also mean diff output further away than normal,undo collar and extend shaft some to reach,when all back together and vehicle has sat on them for a bit you should be able to put collar back on and do up spring bolts as oxides says.
 
Brand new leafs need some use to find their set[working position]Longer shackels also mean diff output further away than normal,undo collar and extend shaft some to reach,when all back together and vehicle has sat on them for a bit you should be able to put collar back on and do up spring bolts as oxides says.
Many thanks for everyones input here. Today i used the trolley jack and a strop which i had to compress the springs and tighten them to the specs in the manual (although had to add 40mm for the bump stop extenders). Also did the back and found this really quite easy to do. Have also managed to do up the webbing straps for the back axle having done this. However the drive shaft is still 15mm away from the face of the diff flange and i thought about undoing the cap on the drive shaft to let it extend but was a bit nervous about driving it like that. Also the shocks which are the 1 ton version are fully extended and probably stopping the spring curving further. Anyway at least they are attached. If only the water pump hadn't broken whilst i was trying to drift out the shaft! Never mind can't win em all.
 

Attachments

  • 6.jpg
    6.jpg
    49.7 KB · Views: 423
  • 7.jpg
    7.jpg
    38.1 KB · Views: 444
  • 8.jpg
    8.jpg
    46.9 KB · Views: 429
Back
Top