Discovery Rust - Boot, Sills and Wings

This site contains affiliate links for which LandyZone may be compensated if you make a purchase.
Today Was Saturday - Inner Wings Started.

aha but first I finished off the nearside sill. Took longer than expected because the bloody welder was playing up. No matter how much i tried the welder just splattered away and made me look like a novice :mad:

So I changed the 5kg wire reel which I had just put in and then it seemed ok although i did loosen off the tension on the wire - Question is could this be the problem?

I mean look at the first photo and tell me that isn't crap :(

Anyhow onto the inner wings. I started with the nearside again as I had all my tools that side of the car :D As you can see from the photo it was a bit of a mess.

The only way to tackle this is to litterally cut all the rusty metal out and go back to good sound metal. Obviously you will get some good metal with a little surface rust so I didnt go mad. Once finished there wasnt much left :(

I will be patching and welding tomorrow and hopefully get both sides done!!!!!

Finally i brought some weld through primer to try and aid in the rust prevention between panels. all i can say is the stuff I have doesnt seem to be working well.

I finally wrapped the day up by seam sealing all the welding seams that I have done on the vehicle. It made it look almost professional :)

More tomoorow when I am not tired and ****ed off from the crappy welding of today.
 

Attachments

  • IMG_0344 (640x480).jpg
    IMG_0344 (640x480).jpg
    64.8 KB · Views: 986
  • IMG_0338 (640x480).jpg
    IMG_0338 (640x480).jpg
    70.4 KB · Views: 1,018
  • IMG_0339 (480x640).jpg
    IMG_0339 (480x640).jpg
    64.8 KB · Views: 802
  • IMG_0340 (480x640).jpg
    IMG_0340 (480x640).jpg
    50.2 KB · Views: 770
  • IMG_0341 (640x480).jpg
    IMG_0341 (640x480).jpg
    64.6 KB · Views: 757
  • IMG_0348 (640x480).jpg
    IMG_0348 (640x480).jpg
    70.6 KB · Views: 950
  • IMG_0347 (640x480).jpg
    IMG_0347 (640x480).jpg
    65.7 KB · Views: 884
  • IMG_0346 (640x480).jpg
    IMG_0346 (640x480).jpg
    69 KB · Views: 849
  • IMG_0349 (640x480).jpg
    IMG_0349 (640x480).jpg
    55.9 KB · Views: 800
  • IMG_0345 (480x640).jpg
    IMG_0345 (480x640).jpg
    64.2 KB · Views: 814
I had a similar problem and found that as the wire ran out on the wheel, the welder didnt have enough "pulling power. Stripped the drive mechanism and the spool holder - cleaned all the dust and debris off it and re-nipped the spool clamp and it works 50 times better.
 
Hi Green hornet, you wasn't joking was you thats some work to do there, still all looking good so far and i hope ya have a better day tomoz with the welding.
 
Well today is Sunday - Where The Hell Did The Weekend Go?

OK - Reply Business First.
Mad Hat Man,

Yep I will try that. Although the welder is 9 years old, the thing is hardly used and literally like new. thanks for the tip

Mr Noisy,

I did cut back to good thck metal and at times on some thinner stuff it seemed OK. Today was a lot better. Tx

Now for todays events.

Firstly I had a friends birthday party to go to last night. It was his 40th and despite him being on here I wont embarrase him by saying his name. Any how It was a great night and to prove my dedication to the Disco - The GreenHornet not the dancing kind at the party, although man I lit up the dance floor with the missus. They played Madness and Abba and YMCA and all the classics that you love to dance and act a prat to...... anyhow where woz a? Yes thats it the Disco - So I never had a drink as I needed to have a clear head for today. Unfortunately my stepson was very ill bless him and the missus kept me awake all night - not in the good way either :( getting up and down to him as he was throwing up every half hour.

Anyhow the work today -

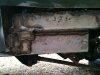
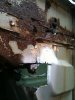
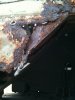
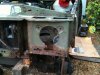
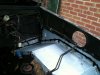
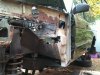
First up i did some patching of the bulkhead. This rot was caused by poor welding of the previous owner and also the shoddy seams from Land Rover :mad: Man they had such a 'It'll Do' approach sometimes. Today the welder behaved itself and on the inner wing works today I went through a reel and a half of wire. (I am using 07kg reels at the moment) as you can see the welder behaved himself to a large degree and the little stop starts are me spot welding then bending the patch panel and then welding some more. As you can see I used the weld through primer which worked fine today since I discovery you have to have sprayed it on good clean metal first.

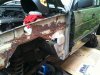
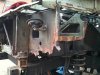
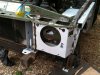
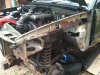
Once all the patches were done i then started to position the front body mount. This is a different mount as I could only get the 300 series panels. BTW are the wings different from a 200 to a 300 AND what fixings do I need for the trim and indicators - Any pictures anyone please)

I then positioned the light panel and the inner wing followed by the upright and wing brace. All done with clamps and mole grips first to ensure it all fits.

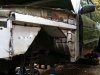
Once I was happy I then stitched welded where I didnt need too much strength and seam welded everywhere else.

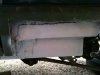
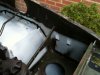
This was quickly followed by seam sealer to make sure the panels wont rot out from the edges again and then some zine primer to aid against rust. On top of this I will put tetrosyl '?' and then some black paint for niceness :)

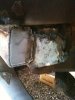
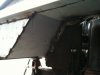
I finished off the day by painting the rear legs of the chassis around the tank area to see if it will cover OK and boy does it look nice!! :D:D:D

Now then during the week, as it is dark, I may be stripping the brakes off and cleaning them up. Fitting new pipework and pads. Also dependant on rigging a light up, I will also hopefully be painting the areas around the suspension ready for all the new items which need to grace the new rustless (well a lot less than before) Disco.

I just need to think about the boot area now. I am going to chequer plate and make the rear section removalble so I can get easy access to the tank. Also I will be making an area to the side of the chassis, near where the silencer once sat (More on that later :)) so I can mount an air tank for tyre inflation and air lockers (Once I can afford them). This way I dont have to have a compressor running in the car all the time. Although I am looking at running a compressor pump from the engine ;)

All in all a good day and I even had the new grill on it which looks nice

BUT

I actually do prefer the 200 front end on a modified Disco :D But what can you do.

I hope the pictures are fun to see and that I am giving you an interesting read.
 

Attachments

  • IMG_0359 (640x480).jpg
    IMG_0359 (640x480).jpg
    56.6 KB · Views: 753
  • IMG_0358 (640x480).jpg
    IMG_0358 (640x480).jpg
    52.4 KB · Views: 726
  • IMG_0357 (640x480).jpg
    IMG_0357 (640x480).jpg
    32.7 KB · Views: 739
  • IMG_0356 (640x480).jpg
    IMG_0356 (640x480).jpg
    57 KB · Views: 750
  • IMG_0355 (640x480).jpg
    IMG_0355 (640x480).jpg
    66.7 KB · Views: 767
  • IMG_0348 (640x480).jpg
    IMG_0348 (640x480).jpg
    70.6 KB · Views: 747
  • IMG_0347 (640x480).jpg
    IMG_0347 (640x480).jpg
    65.7 KB · Views: 701
  • IMG_0346 (640x480).jpg
    IMG_0346 (640x480).jpg
    69 KB · Views: 773
  • IMG_0354 (480x640).jpg
    IMG_0354 (480x640).jpg
    60.6 KB · Views: 749
  • IMG_0360 (640x480).jpg
    IMG_0360 (640x480).jpg
    49.1 KB · Views: 814
Last edited:
Very interesting read mate, you knock spots off me when it comes to writing a build thread!! :D

Something to look into, I have seen a fella using an aircon compressor as an air compressor for lockers etc.

I would have thought it would not be lubricated on plain air, but maybe it'll be ok?

That would be far superior to an electric pump and much cheaper than a purpose designed pump which are about 500 quid I think!!
 
Yeah lubrication would be an issue. aircon obviously has a lubricant in it but you can't put oil or similar in a normal compressor arrangement can you?

You have air lockers don't you?
 
I do have air lockers yes.

I saw a car in total off road a few weeks back that had an aircon compressor fitted for the air system.

I scratched my head!

I'll see if I've still got the copy...
 
I was gonna say some people experience problems of the umit pumping out grease but im sure theres some guys out there that have found a way round this
 
Tomo, it appears the Sedan pump is the best all road unit to use and is actually fitted to RRC and Discovery's alike so i will be adding this to my collection of wants.

HEADLIGHTS - 200 to 300 Conversion

Now I have searched for this information so please bare with me.

I have replaced the front end of the Disco but unfortunately I could only get new 300 series panels so my 200 lights wont fit. I have purchased both lights and trim and indicators and grill off of fleabay however I cant seem to understand how the edge of the wing/headlight trim and indicator all sit and secure. If someone could help me out or even take a couple of photographs that would really help and once sorted then I will cover this in the thread as a 'To Do'

Cheers
 
Hi mate the panel under headlight has 1 screw and a push fit then the indicator sits in the two cut outs and has a spring which you pull back and clip in from inside bonnet, i will take some pics tomoz for ya hope this helps
 
Back
Top