Series 2 Broke my rear differential

This site contains affiliate links for which LandyZone may be compensated if you make a purchase.
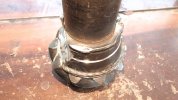
I think the cover you have may have been poorly repaired after the original thread was damaged.

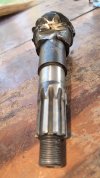
The old cover could still be modified by welding or brazing a threaded steel ring onto it.

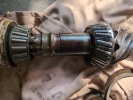
Either a tapered plug or one with a shoulder and copper washer would work depending on what is easily available.

Do you know anyone with a lathe? They should be able to make the threaded ring from a piece of steel bar.
 
Just a update, the parts I ordered are starting to trickle in. Just waiting for a reasonably priced Dana 60 spreader I found on fleabay, decided not to use the prybar method and go by the book. I don't have a drill press at the moment or the spare iron and lathe to make one. The only thing I regret right now is not ordering some shims. Got the new cover/plug and cork gasket yesterday. Waiting for the 4 bearings and spreader. Thanks for the comments so far. In hindsight I may seem excited about my repair adventure because I don't get to work on machinery too often, but I bet to most farmers it must be similar to just "another day in the office".
 
update, I just got the diff spreader a couple days ago, glad I bought it as I still had to pry it out after wrenching a fair bit with the spreader. Another tool I am glad I had was a long solid small dia metal pipe to push out the bearing seats on the pinion. It was fairly evident what I destroyed and IMO its good news. The bearings on the pinion, the one closest to the carrier the rollers were recessed, so it was steel on steel. I did drive it like that at slow speed for 30 minutes until I got home when I broke it, so I hope nothing was grinded off the pinion or carrier. Maybe I'll post some pictures later.

Almost forgot, I have a question about the nut I torque down on the pinion flange. Is that how I set preload by torque it and that crushes the crush sleeve a bit providing I have one? I stopped for today after taking the pinion out, but Ill look if I have one in there tomorrow. The internet videos to me are a bit unclear, I do have a small wrench to test resistance when the time comes.
Edit #3 pictures, I do see the crush sleeve now.
 

Attachments

  • IMG_20240317_154702_402.jpg
    IMG_20240317_154702_402.jpg
    215.4 KB · Views: 32
  • IMG_20240317_154545_180.jpg
    IMG_20240317_154545_180.jpg
    289.7 KB · Views: 29
Last edited:
Decided I'm going to clean out the axle tube tomorrow while I'm waiting for one last item. I'm a bit shocked at the amount of metal flakes and perhaps rust inside. I think Ill be on the road again in a week :)
 

Attachments

  • 2024-03-22 14-30.jpg
    2024-03-22 14-30.jpg
    145.9 KB · Views: 22
Still waiting for the tool I bought on fleabay to pull the race off the pinion. As I am running out of freetime for the future and I tried to use a dremmel with a cutting wheel and grind a channel through it. Worked on this for some time today, even applied heat to race and keeping the pinion chilled. I failed and if anybody has any tips. I used a ball peen hammer and a chisel. Edit: I feel like it is heat welded to the pinion shaft, like the two things fused together. I know it is a interference fit by my goodness did i beat this thing hard and it will not budge. -
I found a diffrent type of bearing race puller, it is two half moons that clamp together, I found it localy and plan to use it with the press. what a bugger.
 

Attachments

  • IMG_20240402_145932_537.jpg
    IMG_20240402_145932_537.jpg
    163.6 KB · Views: 32
Last edited:
Clamp type puller should have it off but I am surprised it has not moved now it has been split.
However with the colour change in the metal and the distortion of race does indicating it has been friction welded to shaft. Good luck.
 
Last edited:
Clamp type puller should have it off but I am surprised it has not moved now it has been split.
However with the colour change in the metal and the distortion of race does indicating it has been friction welded to shaft. Good luck.
Thanks, the little jerk will be off tomorrow. I see the delivery guy closing in on my home. Ill have pictures of the tool I bought and how easily the little twirp slides off with the right tool. (wether permitting) lol
 
Failed-
My 20 ton press broke, so took to friends shop, his 80 ton could not do it either. Its like its fused on there. Might have to put it on a lathe is my guess. Just peel it off. I applied heat on it as well.

Edit: Friends was 50 ton press not a 80, and that brand new race puller thingy flew off and is knackerd a bit. Got a second slice through the race and it went a bit deep and put a gouge in the pinion shaft. That is all until monday. I need to get the diameter for the machine guy. I might just use the timken bearing dimensions from their website and add something for interference.
 

Attachments

  • IMG_20240406_084351_446.jpg
    IMG_20240406_084351_446.jpg
    160.6 KB · Views: 24
  • IMG_20240406_084007_555.jpg
    IMG_20240406_084007_555.jpg
    262.3 KB · Views: 27
Last edited:
Strewth, it must have welded itself to the shaft then. Machine it off only way from here I recon and then you may end up with damaged shaft surface. A way out then may be to turn it a tad under size and use a speedy sleave to make it up to bearing inner size. Talk it out with your machine chap.
 
Strewth, it must have welded itself to the shaft then. Machine it off only way from here I recon and then you may end up with damaged shaft surface. A way out then may be to turn it a tad under size and use a speedy sleave to make it up to bearing inner size. Talk it out with your machine chap.
Thanks, I don't know anything about speedy sleeves, I wonder if there is a limit on the length. Ill post what the pinion looks like today before going to machine shop. According to wikipedia and Timken the diameter is the same. 1.6250" (Dana 60 pinion shaft, Timken HM803110, Britpart 607180) I checked my new bearing cup inner diameter and my pinion shaft with my digital vernier and they both are indeed 1.6250". So that's the number I'm going to give to the shop today.
Edit: I may be getting cup, cone and race confused.
 

Attachments

  • IMG_20240408_075443_132.jpg
    IMG_20240408_075443_132.jpg
    208.5 KB · Views: 21
  • IMG_20240408_075411_584.jpg
    IMG_20240408_075411_584.jpg
    215.8 KB · Views: 24
Last edited:
You have not yet removed the old inner race, it is where the race sits you have to measure. If it is as I think the case that the race spun and friction welded itself to the shaft there will be "fit" issues.
This may have removed some of the surface metal of the shaft. It may be the metal flowed the other way and race metal stuck to the shaft and can be removed.
In the first case shaft may now be under size. I mentioned speedy sleave [a thin metal sleave] that fills a gap between two items, usually a shaft and seal. I do not know if this can be done with shaft bearing though.
There was just a hair of space behind what was the cone. I was able to take a solid measure, it matched Wikipedia's entry. I'll report back when machinist is done. (lathe I assume)

Edit: 04-12-24, I have run out of freetime, pinion is still at machine shop. Hopefully I get some time in July to continue.
 
Last edited:
Back
Top