MollyNomad
Well-Known Member
Hey All.. IRD REBUILD SAGA Continues
I’m still here but in a much reduced capacity… in welding wire and ability.
Having spent some time trying to identify a bearing etc and finally
Looking at some video footage I
had made during the disassemble..I identified where said bearing was located. That only took 5 weeks(conservative estimate) Once all the races were installed and the pinion and ‘layshaft’( ) pressed together the next step into torque the nut that secures the lay shaft to the pinion. 184ft/Ibs.
Not being able to torque said nut with my fingers looking at an article I found online in ‘Autowotsisface’ regards an ATB diff instal they mentioned a ‘jig’ for that process. So armed with merely those words I set about fabricating said ‘jig’ Not having a picture to work off/plasma cutter etc I raided my LT35 van shelving for box section.. After much brain storming( i.e. ‘Nil’) it became apparent that actual
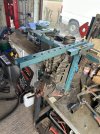
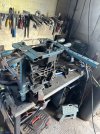
Brain storming would be needed so everything was ‘shelved’(pun moment) for several weeks. Not being one to sit on a project, 5 months later I decided it was time. So last week I managed to bond together some sections of box section, drill some holes, way too much grinding and a fair bit of ‘cussing’ I still hadn’t progressed much. Booked some time off and mixed in with hospital visits, a funeral and my ex wife giving me her car(as in ownership) I have now ‘finished’ my ‘jig’. It looks nothing like what I envisioned… maybe that’s a good thing. Anyhoo, I attach some photos of how it looks. It’s needs ‘dressing’ and maybe a lick of paint. I intend to keep it once utilised .. need some bolts to tie the centre IRD ‘carrier’ to the mounting end sections. Have ‘hung off my large ‘bar’ and the nut turns..catastrophic failure may be part of the future however. With that in mind some buttresses on the bottom of one of the uprights..
Once torqued the re assembly will continue.
Thanks for reading this far..
Best
M
PS.. ATM the end sections are held in place by screw drivers in the absence of them bolts!
I’m still here but in a much reduced capacity… in welding wire and ability.
Having spent some time trying to identify a bearing etc and finally
Looking at some video footage I
had made during the disassemble..I identified where said bearing was located. That only took 5 weeks(conservative estimate) Once all the races were installed and the pinion and ‘layshaft’(
) pressed together the next step into torque the nut that secures the lay shaft to the pinion. 184ft/Ibs.Not being able to torque said nut with my fingers looking at an article I found online in ‘Autowotsisface’ regards an ATB diff instal they mentioned a ‘jig’ for that process. So armed with merely those words I set about fabricating said ‘jig’ Not having a picture to work off/plasma cutter etc I raided my LT35 van shelving for box section.. After much brain storming( i.e. ‘Nil’) it became apparent that actual
Brain storming would be needed so everything was ‘shelved’(pun moment) for several weeks. Not being one to sit on a project, 5 months later I decided it was time. So last week I managed to bond together some sections of box section, drill some holes, way too much grinding and a fair bit of ‘cussing’ I still hadn’t progressed much. Booked some time off and mixed in with hospital visits, a funeral and my ex wife giving me her car(as in ownership) I have now ‘finished’ my ‘jig’. It looks nothing like what I envisioned… maybe that’s a good thing. Anyhoo, I attach some photos of how it looks. It’s needs ‘dressing’ and maybe a lick of paint. I intend to keep it once utilised .. need some bolts to tie the centre IRD ‘carrier’ to the mounting end sections. Have ‘hung off my large ‘bar’ and the nut turns..catastrophic failure may be part of the future however. With that in mind some buttresses on the bottom of one of the uprights..
Once torqued the re assembly will continue.
Thanks for reading this far..
Best
M
PS.. ATM the end sections are held in place by screw drivers in the absence of them bolts!
Attachments
Last edited:

 )
) 
