Shelly crane
Member
Sorry I meant the tyres max pressure is 80, we didn't fill it to 80  just put enough in to get it to the garage.
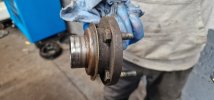
Update on leak: PO definitely didn't do the front output seal just before we bought it. Also the flange is knackered (and has been for long time), one side has a deep groove, the other side has more grooves (see pic) so they have ordered parts.
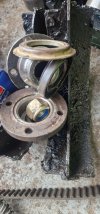
There was also a leak from the drum looking part and they said that was ruined from the leak so another has been ordered. The drum thing is behind the transfer box is there a proper name for that part?
just put enough in to get it to the garage.Update on leak: PO definitely didn't do the front output seal just before we bought it. Also the flange is knackered (and has been for long time), one side has a deep groove, the other side has more grooves (see pic) so they have ordered parts.
There was also a leak from the drum looking part and they said that was ruined from the leak so another has been ordered. The drum thing is behind the transfer box is there a proper name for that part?
Attachments
Shelly crane
Member

Doubt you need a new drum, maybe the equivalent flange and seal as per the front one.
It's advisable to replace the shoes but I don't bother to no ill effect. Probably cheap enough and since you are paying for them to be taken out might aswell fit new one I guess.
I would just clean up the shoes and grease up the adjusters .
It's advisable to replace the shoes but I don't bother to no ill effect. Probably cheap enough and since you are paying for them to be taken out might aswell fit new one I guess.
I would just clean up the shoes and grease up the adjusters .
That flange is deffo completely knackered, as will be the seal.
Cheap/easy enough to replace.
The 'drum' is the hand brake, a new one will NOT be neccesary, just a clean up and all put back together (as @Anaconda said).
New shoes maybe required (maybe) but remember its only a handbrake that stops your car rolling away. To be honest I always leave mine in gear, the handbrake gets used very rarely.

 ashcroft-transmissions.co.uk

 www.lrparts.net
Cheap/easy enough to replace.
The 'drum' is the hand brake, a new one will NOT be neccesary, just a clean up and all put back together (as @Anaconda said).
New shoes maybe required (maybe) but remember its only a handbrake that stops your car rolling away. To be honest I always leave mine in gear, the handbrake gets used very rarely.
STC3433 - LT230 Rear Flange
LT230 Rear Flange - STC3433 These often need changing as the old oil seal can wear a lip on the flange so the new seal may leak. Please note, we can only supply the dust cover and the flange as part of a complete kit (STC3433)
ashcroft-transmissions.co.uk
Land Rover Defender - Handbrake parts and handbrake systems | LR Parts
Thousands of Land Rover & Range Rover Spare Parts & Accessories at LR Parts. Get a huge range of Handbrake parts online today at a price that won't be beaten!
dag019
Well-Known Member
How very American of you using psi! However 80psi sounds very high, are you sure that is correct? At the risk of starting a large debate on tyre pressures I tend to run mine at about 32-34psi (2.2 bar in correct measurementsGotta keep positivewas actually down to 13 psi and the tyre should be 80
") ), So 80 sounds very high unless you are very heavily loaded all the time.
), So 80 sounds very high unless you are very heavily loaded all the time.If you are unsure for your vehicle the old fashioned chalk test. Rub a heavy line of chalk across the tyre and go for a short test drive. If just the centre of the line is worn away the tyre is over inflated, if just the edges are worn away the tyre is under inflated.
dag019
Well-Known Member
Better late than never but see the routing I have for my bonnet release cable through the grill, again very crude, but has been loke if for years and not broken:We will 100% be doing this, great idea! And shouldn't have a problem opening it with the latch through the grill now. We were trying the wrong latchas didn't know how the release cable worked until the video above, didn't realise that it just pulled a little latch too!
Thankyou all again
Last edited:
Shelly crane
Member
Thank you can see how that works will do this on our next day offBetter late than never but see the routing I have for my bonnet release cable through the grill, again very crude, but has been loke if for years and not broken:
View attachment 340572
View attachment 340573

Shelly crane
Member

Shelly crane
Member
We have a car too yeah. Landy is going to be more for our adventures / camping trips, we want to make draws in the back and a dog bed above. Roof rack. Awning. Going to paint the doors to match the body. Get a spare wheel carrier put on. Just enjoy it and keep learningSo, what are your plans for your Defender in terms of using it?
(Apart from fixing it)
I presume it's not your only vehicle.
we recently found Suffolk landrover club too who have off road tracks which looks good!dag019
Well-Known Member
As you have a nice flat paint colour rather than modern metallic, you can easily paint the doors yourself with some coach enamel in the correct colour and some small gloss rollers. Give everything a good clean, sand down, coat of etch primer (again with a gloss roller), and then top coat with the gloss roller. I have done both of my land rovers using this method and it is very in keeping with the rest of the body work if you are not filling all the dents and trying to achieve a perfect better than factory finish.Going to paint the doors to match the body.
Shelly crane
Member
We are definitely painting ourselves we were going to use TA paints landrover paint as it can be rollered on too? Not bothered about perfect finish but we may replace the badly dented 2 panels (one front wing, 1 back wing)As you have a nice flat paint colour rather than modern metallic, you can easily paint the doors yourself with some coach enamel in the correct colour and some small gloss rollers. Give everything a good clean, sand down, coat of etch primer (again with a gloss roller), and then top coat with the gloss roller. I have done both of my land rovers using this method and it is very in keeping with the rest of the body work if you are not filling all the dents and trying to achieve a perfect better than factory finish.
Attachments

but we may replace the badly dented 2 panels (one front wing, 1 back wing)
Have you looked to see how easy (it wont be) to replace those.
Reach in give it a bang and pop out some of the dent if you can/want, but most of us live with the odd dent here & there. At the end of the day its the least of our worries
.J
dag019
Well-Known Member
I have used paintman (LINK) and Paddocks (LINK) for paint, but mine is just standard Masai red so is not a difficult colour to get hold of an match.We are definitely painting ourselves we were going to use TA paints landrover paint as it can be rollered on too? Not bothered about perfect finish but we may replace the badly dented 2 panels (one front wing, 1 back wing)
If you are talking about the dents of the drivers wing I personally wouldn't bother. They are not that bad and these days even second hand wings are very expensive. Also the back wing I assume you are referring to the tub side? if that is the case that is a very difficult panel to replace, you cannot just unbolt and bolt back on without replacing the whole tub, so again unless it is really awful would just straighten as best as you can and leave it. Land rovers are one of the few vehicles where a couple of dents are in keeping with the "design" and just add "character". In the rebuilds of my 110, and my series I have never bothered doing anything with the dents, I just clean and repaint over them. As soon as you fix them on one panel you will just start to notice them on the other panels!
Which will all be rusty, then theres the wiring you disturb then theres the etc,etc.The front wing is a nut and bolt job to change
Leave it as is I think we would all agree
.J