Sitec's Cummins powered 101!

This site contains affiliate links for which LandyZone may be compensated if you make a purchase.
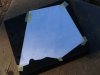
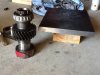
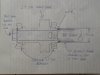
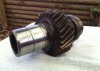
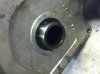
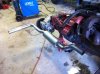
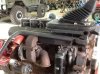
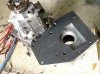
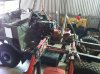
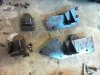
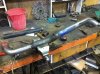
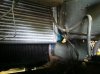
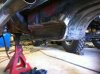
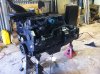
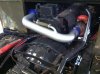
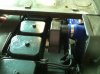
Before the Cummins could go in, I had to make an LT230 fit the ZF 5-42 which sits behind the 6 pot. Now, this has been done before by Nick (nrs91) and now by a few others.. Still holding u responsible Nick!!! :p. So with that in mind, I set about making a plate to get them mated..... This involved several pieces op paper, several measurements and a lot of drilling!!!!
 

Attachments

  • image.jpg
    image.jpg
    60.3 KB · Views: 411
With both pieces of paper transposed onto my plate using the center shaft dot as the common point, and a few hours drilling later, this is what I have ended up with!
 

Attachments

  • image.jpg
    image.jpg
    126.9 KB · Views: 403
would you be able to show some photos of how the gear linkage is done on these. Thanks.

Sure. Here's a pic of the exhaust I've made up, which shows the lower part of the linkage. The only thing I changed was the lever position. It moved forward 100mm to suit the 101s driving position.. Everything else worked!
 

Attachments

  • image.jpg
    image.jpg
    217 KB · Views: 613
Ok, here's the view from the other side of the conversion plate. The recessed part is to allow the back of the ZF box sit as close to the LT230 as possible. The ZF rear seal housing sits thru the center hole, so the seal face is flush with the other side of this plate. Both seals end up back to back, and running on the original ZF output shaft seal track. :)
 

Attachments

  • image.jpg
    image.jpg
    72.5 KB · Views: 495
Here's the first attempt at fitting... Overhead beam and pulley block for the engine, and the FEL for the gearbox. It fitted... Just... With the engine and box roughly in place I was able to settle on its final resting position.
 

Attachments

  • image.jpg
    image.jpg
    343.3 KB · Views: 730
With the engine in, and final position settled upon, I was able to make mounts etc.. Here's the two engine mounts, and smaller gearbox mounts. I've sat the engine 100mm back from the radiator (still in its original position, but with larger inlets and outlets fitted to suit the Cummins). This left me enough room to fit a large engine driven fan so Im guaranteed decent cooling.
 

Attachments

  • image.jpg
    image.jpg
    77 KB · Views: 411
With the engine in place, I'm able to loosely fit the transfer box, make props to suit the new engine/trans... Make intercooler pipes, and fit an intercooler, manufacture and fit a new air inlet manifold cover plate that is 50mm lower than the original, plan, position and manufacture the 3" exhaust. I thought about 4" but, there is a limit!! ;)
 

Attachments

  • image.jpg
    image.jpg
    258 KB · Views: 451
Never try and fit a large intercooler to a 101.... There ain't a lot of room in there!!!! Handbrake had to move slightly, there was some intricate bracketry involved, and it only just clears the steering arm when on full lock!!
 

Attachments

  • image.jpg
    image.jpg
    236.2 KB · Views: 495
With all the little bits around the engine done accept scalloping the sump out for front prop clearance, it was time for the engine to come out for paint etc. With the engine out and on stands, I was able to remove the sump and remove a little bit of it for front shaft clearance.
 

Attachments

  • image.jpg
    image.jpg
    297.4 KB · Views: 535
So, with the engine now painted, it was time for a final fit... As most of the fab work had been done, this bit took shape quickly.. Intercooler pipes went in, inlet pipe to turbo, inc compressor supply. The now modified rad was refitted, and hoses connected up. A week was spent playing with wiring... Running a 12v vehicle with a 24v engine involved a few simple circuits. A 12v IGN circuit that also switched the 24v fuel shut off on, and supplied a 24v to the alternator to excite it. This circuit also supplied a feed to the starter relay.
 

Attachments

  • image.jpg
    image.jpg
    180.9 KB · Views: 512
Back
Top