My new (old) Defender .. ;)

This site contains affiliate links for which LandyZone may be compensated if you make a purchase.
Getting it ready for a proper test in two weeks like it

Definitely mate.

Tim gave me some wire for the winch, 70mm, threaded through ready to have crimps and fitted, got a couple of battery isolators as well .. 250 A continuous and 2000 A momentary .. should be OK! The solenoid pack survived the swim with no ill effects, so all's good so far.

My brother has a cb I can have, and I'm seriously considering the welded diff options we were chatting about .. ;)

Bring it on ..
 
Further to the Dickie seats …

So, the parts that weren’t needed, well a couple of bits are! The small tie bars need removing, bending and twisting as this ..
smaller002_zps8ad302e8.jpg

They then bolt to the hinge part of the back and bolt through the seat area of the Tub, washer and nut in the wheel well area. The seat needs a bit of plastic trimming .. roughly in this pic! Actually, it don’t get any better .. :)
smaller001_zpseb829576.jpg

smaller004_zps304b06ae.jpg

smaller003_zps0fa7d093.jpg

And that’s it, a pair of Disco Dickie seats in the rear of a Defender. Since found out side-facing seats don’t need seatbelts, so that’s good. Will add some later, maybe, but not a necessity so not for now!
smaller006_zps72fc544d.jpg

smaller009_zps4bfbe3e2.jpg

smaller012_zps641db7bb.jpg


The seats don't need the 'foot' folding down, the hinge bracket sits far enough back that the front of the base rests on the tub wheel well, in fact the foot doesn't touch the floor! The hinge is a tight fit, so it feels like they don't need anything to hold them up either.

I like .. :)
 
So to the winch ..

Most of this is planning and making sure stuff fits, will work and is almost ready for wiring in.
The solenoid pack is mounted on an aluminium ‘class 2’ door sign, rivnutted holes and bolted in. Looks a bit naff, but fits. I aim to make a sturdier bracket sometime.

I also plan to make a baffle of some kind, to divert any water away from the solenoid pack, it'll never be totally free of water, but I know the unit itself is waterproof!! The baffle will also serve to 'hide' the wiring from prying eyes.

smaller013_zpsd91288ef.jpg


Decent size Isolator, 250A constant, 2500 5 sec .. :)

smaller018_zpsc03153b6.jpg

smaller021_zpsc72b0c6f.jpg


And that’s it ..
smaller017_zpsc1b3bb9f.jpg


The winch is in .. not wired yet, but that’s another story for tomorrow ..

I mentioned prying eyes earlier, a little tip that I've used before, to make sure, or at least help, to keep your winch and bumpers on the vehicle and not be an easily removed present to any passing turd.

Square tubing, cut to about 1" long, weld over the bolt head/nuts .. one on each side for the bumper, and both rear bolts for the winch ..

smaller014_zpsb200c4b6.jpg


smaller016_zpsdaaee667.jpg


It does mean you have to grind them off when you need to work on them, but it's easy at home and I'd rather that than let some scrote nick it all .. :)
 
After the fettling yesterday .. How it looks now ..

All lights, winches, 'stuff' working .. ;)

003_zpsc596dd54.jpg
 
The weekend and this evening I are mostly been making stuff, can't afford to buy it ...

A dog guard, not for dogs but to stop flying 'stuff' when it all goes T!ts up, or arse over tit. It's bolted in top and bottom, rivnuts are ace! and won't move whatever hits it I hope .. Ignore the colours, they're a combination of red oxide primer under matt black, to prevent rust and to cover the welding of the table/frame and green from the fence panel I cut up .. it ain't gonna change anytime soon .. ;)

Moved the fire extinguisher to the roof channel in the middle of the cab where we can both reach it easily, ish. Also moved speakers to further behind us rather than directly behind our heads .. Juliet banged her crust a couple of times in the Lakes .. :)

smaller002_zps0a580f87.jpg


smaller001_zpsa85e7d67.jpg


smaller003_zpsa4a27728.jpg
 
Cheers, I made it. Table being thrown out from work, (School), cut down to suit and welded together with brackets for bolting in, then a piece of security fencing also cut down, welded on top and bottom, then trimmed and fettled to fit. Bit of primer and then paint on the welded ends, easy as .. just takes time and a few fittings and it's still a bit wrong .. ;)
 
So, finishing off the snorkel .. and it still ain't finished!!

But it ain't far away either. It's been a right b'stard of a job, all minor issues on their own, but it's basically taken about 4 solid days of work, spread over a three week time period.

Nothing is sealed yet, and the snorkel mounts on the windscreen frame need a liner to tighten them up! But that'll all happen tomorrow morning, ready for North Yorks tomorrow evening .. :)

How it looks now, not cleaned up or totally solid, but it would work as is for a weekend at least ..

smaller001_zps3323ab71.jpg


How I've done it. Basically moved the air filter housing to the offside, removed the air inlet tubing from the nearside wing, but it wouldn't fit to the offside so I used the Disco/Southdown tubing. Still got to make a mount for the housing which will raise it about an inch, and an aluminium heat shield for the hose, though I'm not sure it needs it.

smaller005_zpsbe7b5096.jpg


Snorkel entry to the wing with a piece of split rubber hosing to minimise any potential vibration between the tube and wing..

smaller004_zps89ab27a5.jpg


How it fits and where the tubing goes on the offside. Still needs the air filter housing base moving, and a suitable bracket making/welding, but that shouldn't take long! I'll seal all the joints tomorrow, inside the tubes then re-tighten the jubilee clips, they're loose at the mo.

smaller002_zpsd3f51ba7.jpg


The newer inlet tube also currently just touches the steering shaft, so needs shortening slightly so it doesn't droop as much, but the bracket will also have a support to also lift it enough for a good few inches of movement. The hose is flexible, of course, so needs to be kept away from the shaft whilst off-roading and bouncing along the lanes .. I have an idea for a solid cradle sort of thing to make sure it can't possibly touch. Some time in the future I intend to make it out of steel/stainless tube so it's all pretty solid. I also have an idea that a smaller air filter and housing might be better .. :)

Mind, I might also be putting the 300Tdi engine in later this year ... so those ideas might change again!! ;)
 
Bluddy ell! You've done most the stuff I want to do and I've had my fender a few years now. I wish I was that productive! All the bits are just sitting there haha. Nice thread and nice work.
 
Bluddy ell! You've done most the stuff I want to do and I've had my fender a few years now. I wish I was that productive! All the bits are just sitting there haha. Nice thread and nice work.

Heheh, thanks, but it was really a case of needs must ..

With my Disco being fecked up with most of the bits bought for or already on that, it was decided we needed a Defender, so when we bought the 90 I wanted it going reliably to go to Lake District and swapped axles with the suspension mods ready done, just about. Then again I needed the winch and snorkel for a blast into North Yorks forests this weekend, which I couldn't go on in the end!

Still lots to do, but it's now all details and additions when I can afford them.

As I do more stuff I'll post it up .. ;)
 
Heheh, thanks, but it was really a case of needs must ..


With my Disco being fecked up with most of the bits bought for or already on that, it was decided we needed a Defender, so when we bought the 90 I wanted it going reliably to go to Lake District and swapped axles with the suspension mods ready done, just about. Then again I needed the winch and snorkel for a blast into North Yorks forests this weekend, which I couldn't go on in the end!


Still lots to do, but it's now all details and additions when I can afford them.


As I do more stuff I'll post it up .. ;)


It's always the way isn't it, get the motor prepped and then something pops up. I look forward to seeing the outcome. Perhaps it will give me some inspiration.
 
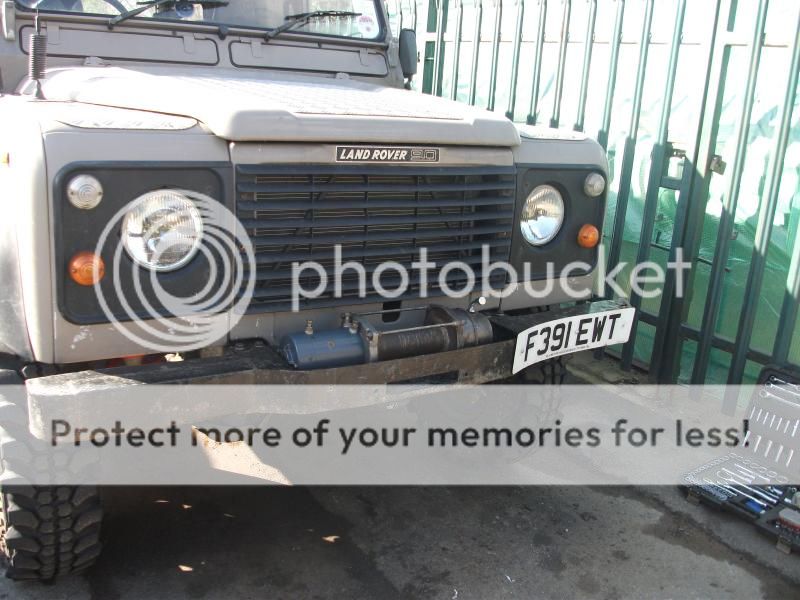
Started to re-work the winch bumper, kindly donated to me by Westwood8055, cheers mate.

Originally looked like this ..

009_zps653671bf.jpg


The number plate is there to cover the gaping rust holes on the nearside ..

So, nearside 'wing' chopped out and 6mm steel plate in place ready for welding ..

DSC_0005_zpsf3236c0d.jpg


Welded up, but left as is for now 'cos I need to add some recovery points and a fill-in to the front. I'm going to grind the corners off a bit so they're rounded a tad more, but I'm liking how it looks now.

DSC_0005_zps645cbfd3.jpg


I've had tubular bumpers before and don't like them or how they look on my Disco and I certainly think a round bumper looks out of place on a 90.

More to come this evening after work .. ;)
 
Back
Top