You are using an out of date browser. It may not display this or other websites correctly.
You should upgrade or use an alternative browser.
You should upgrade or use an alternative browser.
My new Galv Chassis'
- Thread starter Dopey
- Start date
This site contains affiliate links for which LandyZone may be compensated if you make a purchase.
- Posts
- 21,177
- Location
- In the next Glen
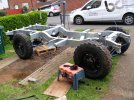
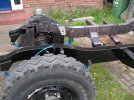
Had a delivery today, and we got stuck in, well my son did lol
View attachment 286376
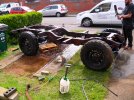
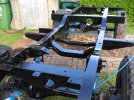
View attachment 286377
Very posh
 Wolf wheels too hope youve fitted longer studs.
 Yes and blank nuts, and I have a P38 plate on it for power steeringVery posh
- Posts
- 21,177
- Location
- In the next Glen
Yes and blank nuts, and I have a P38 plate on it for power steering
Nice to see a new project coming together, best of luck with it.
Yes all that, the one thing I am not looking forward to is doing the power steering, I am going to put the original banjo steering wheel in with the different splines, it's a whole different set up, but If I can do it, it will look a lot better than a disco wheel
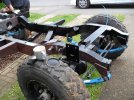
- Is that a Richards Chassis, GB parabolics and poly bushes? It'll quickly come together now. Fitting the relay tightly in the chassis, be interesting to see your solution.
brianp38dse
Well-Known Member
- Posts
- 19,588
- Location
- heathrow
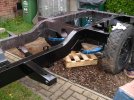
I pasted the the van with about 6 six chassis on the back as i was on my way out to the motorway and said to my son there landrover chassis bet thats going to your place seams i was right, looks good and great progress
I would take the time now to prepare and paint the chassis. It is not something I did when I fitted mine to the 110 and is something I regret. It not only removes the shiny steal me look of a galv chassis but it doe also add an extra layer of protection. I know my 110 gets heavy use and high mileage but on rebuilding it after the fire recently (about 10 years after fitting the chassis) there is surface rust beginning to from in all of the usual places. I am sure if it was standard it would have rotted through by now, but while access is easy with nothing fitted I would definitely paint it.
I would take the time now to prepare and paint the chassis. It is not something I did when I fitted mine to the 110 and is something I regret. It not only removes the shiny steal me look of a galv chassis but it doe also add an extra layer of protection. I know my 110 gets heavy use and high mileage but on rebuilding it after the fire recently (about 10 years after fitting the chassis) there is surface rust beginning to from in all of the usual places. I am sure if it was standard it would have rotted through by now, but while access is easy with nothing fitted I would definitely paint it.
Yea I get what you're saying, you are not the first to say this to me, so I am taking the advice, so first I was it down with Mordant T wash solution (alkaline cleaning solution) then a primer, then paint
Yes that is it. I would recommend a nice hard tractor/machine enamel but other would say a chassis paint. I would also suggest that just because it is painted does not mean you don’t need to wax underseal (dinitrol/lanoguard/etc) I know it sounds like a lot of effort and overkill but if you are going to the effort of putting a new chassis on it you are already doing the work.Yea I get what you're saying, you are not the first to say this to me, so I am taking the advice, so first I was it down with Mordant T wash solution (alkaline cleaning solution) then a primer, then paint
Wildefalcon
Well-Known Member
- Posts
- 1,450
Epoxy 2k zinc phosphate as a first coat, followed by mastic epoxy and a top coat
Treat it as mild steel then it will last a very long time..
Treat it as mild steel then it will last a very long time..
Wildefalcon
Well-Known Member
- Posts
- 1,450
Oh. And soak the interior with cavity wax. It's possible that there's ash and such like left in there from the dip process.
Bobsticle
De Villes Advocaat
- Posts
- 26,360
- Location
- Manchester
I cut off my rear cross member today. Replaced it from the original about 7 ish years ago. Simply fell to bits from the inside. Looking at the rest of it makes me think I’ll be replacing the whole thing sooner rather than later. At least the third one is galvanised. Just need to find a good bit to weld it to.
Made more progress today
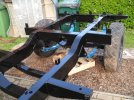
1st Mordant T wash solution on the galv chassis Turns from silver to copper colour
2ND Galve primer paint
3rd Polyurethane paint
1st Mordant T wash solution on the galv chassis Turns from silver to copper colour
2ND Galve primer paint
3rd Polyurethane paint
Attachments
Bobsticle
De Villes Advocaat
- Posts
- 26,360
- Location
- Manchester
This crossmember I’m doing is probably more faffing than a full replacement. It’s taken two days just to hack the old one off and get the stubs ready. I’ve still got to chop the new one about to go round the spring hangers and electrics.
Tape stiff garden wire to the loom and draw the loom forwards via the access hole in the engine bay, weld chassis, pull stiff wire to the rear.This crossmember I’m doing is probably more faffing than a full replacement. It’s taken two days just to hack the old one off and get the stubs ready. I’ve still got to chop the new one about to go round the spring hangers and electrics.
Bobsticle
De Villes Advocaat
- Posts
- 26,360
- Location
- Manchester
No. Discover the looms are basically one big lump of snot from previous owners patching and purchase some heavy duty trailer cable ready for the re wire.Tape stiff garden wire to the loom and draw the loom forwards via the access hole in the engine bay, weld chassis, pull stiff wire to the rear.
32amp cooker cable works best!No. Discover the looms are basically one big lump of snot from previous owners patching and purchase some heavy duty trailer cable ready for the re wire.
Tape stiff garden wire to the loom and draw the loom forwards via the access hole in the engine bay, weld chassis, pull stiff wire to the rear.
No. Discover the looms are basically one big lump of snot from previous owners patching and purchase some heavy duty trailer cable ready for the re wire.
Completely agree with making a new loom from HD trailer wire, but don't feed it back through the chassis. Put in in some conduit and feed it along the top edge. Makes future access for repairs to either the loom or the vehicle far easier and is no less protected than being inside. Both the 110 and the series have this setup and no issue on many years of abuse!
Similar threads
- Replies
- 5
- Views
- 958