Missing reverse

This site contains affiliate links for which LandyZone may be compensated if you make a purchase.

tottot

Well-Known Member
Posts
7,463
Location
west wales coast
The reverse gear on my 1977 series 3 farm runabout has gone AWOL. Have had box out and split from transfer. After much crud removal can not find it's suffix. Been some 35 years since I last did a series box, help please.
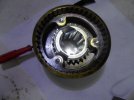
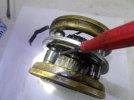
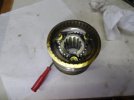
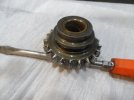
Have removed box top and selectors and can see teeth on reverse idler are mush. Poor thing did have much abuse on trials at one time.
 
Have you looked in the bread bin. 🤔

I feel for you. The witchcraft of the gearbox is way above my pay grade. Probably why mine leaks like a sieve. 😩
 
1700745985728.png
 
Nothing on mine, and a pic of the issue. Looks like it was never adjusted to fully engage, ends of teeth chewed off. Had been jumping out of reverse some time. Rest of internals look good. Only bush in gear so not a later box which had bearing, so likely A or B perhaps C suffix but which and does it matter for this part.
 

Attachments

  • lrg2.JPG
    lrg2.JPG
    339.7 KB · Views: 68
  • lrg1.JPG
    lrg1.JPG
    188.1 KB · Views: 68
Nothing on mine, and a pic of the issue. Looks like it was never adjusted to fully engage, ends of teeth chewed off. Had been jumping out of reverse some time. Rest of internals look good. Only bush in gear so not a later box which had bearing, so likely A or B perhaps C suffix but which and does it matter for this part.

Didnt @BikerB rebuilt his recently and searched around for suffix and possible interchangeability of NOS parts he may have have some info?

J
 
HA! Found it thanks to my local parts supplier :vb-tup: 
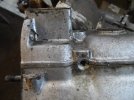
Recon only Land Rover would put the gearbox suffix on the top front edge of the transfer box:rolleyes: An A suffix box anyway. I had already split the box's before looking for number. It would be difficult if transfer had been swapped at some time. Hope not.
 
Should have pressed send last night😇
Think the suffix number stamped on top of transfer box where it mates with gearbox

the reverse gear on yours looks like 576707 if you look at the pics online
which would be suffix A
IMG_3110.png
 
Recon you are correct there. The rest of the internals look in pretty good order. Could you please post up the pic of the main shaft gear cluster. I would like to order some shims as there is some slop, likely cause of jumping out of second gear on over run now and then. Thanks.
 
Have you looked in the bread bin. 🤔

I feel for you. The witchcraft of the gearbox is way above my pay grade. Probably why mine leaks like a sieve. 😩
Does the reverse run via an idler gear of first? (That's what happened with my old '68 Midget, lost reverse and 1st got really noisy - my one and only foray into Gearboxes but I was young , dumb and scared of nothing now I'm just old and dumb!

Rebuilt the MG box and lost 3rd gear within a week - leaned that you really shouldn't re-use circlips - engine and gearbox out again
 
Thanks for that steve2286w.
Joker, there is an idler gear that runs from the layshaft and then engages with the straight teeth on the first/ second syncro unit seen in pic above.
 
Had the parts needed from John Craddock, nice the individual shims have their part numbers written on the packet. Now for fun with that horrible clip that retains gears on the main shaft.
 
Getting back to sorting my gearbox after a run in with the Covid the last six weeks, still find I quickly get tired.
Sorted the clearances for the bronze bush and gears and got that horrible circlip [ new ] back in. Good stuff on you tube covering this.
Putting up some pics of 3/4 syncro detent spring replacement as I found little on tube except for one chap doing this in situ.
I did this myself many moons ago, what a faff but perhaps worth it if no other issues.
First pic shows the 3rd spring [ hardest to get in ]partially in place, the spine carrier is tilted for this.
Pic 2. Small screw driver is inserted under the end of spring, this lifts the end over a step spline carrier still tilted.
Pic 3 Ready to press spring in by lifting out ward and pushing inward [ protection for thumbs good idea] until spring is almost in.
Pic 4 At this point with spring in most the way in and the spline carrier has leveled up with the cones, now remove screwdriver and press spring the last bit until it hooks the carrier.
Well that was my method, hope it helps.
 

Attachments

  • lrg3.JPG
    lrg3.JPG
    204.8 KB · Views: 33
  • lrg4.JPG
    lrg4.JPG
    162.8 KB · Views: 30
  • lrg5.JPG
    lrg5.JPG
    204.8 KB · Views: 28
  • lrg6.JPG
    lrg6.JPG
    171 KB · Views: 27
Back
Top