I have bought a station wagon

This site contains affiliate links for which LandyZone may be compensated if you make a purchase.

dag019

Well-Known Member
Posts
5,486
Location
Warwick
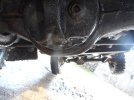
I have bought this station wagon (LINK) I have another thread asking about trying to get a v5 for it here (LINK) but the v5 is a secondary issue and not my primary reason for buying it. I picked it up on Monday and although I have not yet fully inspected everything on a cursory look it is fairly well complete and original, but the bulkhead is virtually non existent and the chassis probably needs replacing. The 19J does run as it was started as I walked into the yard, however it does not drive as there is currently no clutch (seems to be hydraulic and have not tried starting in gear). I have not tired the brakes but they appear to be binding as it doe snot roll freely. None of the above is really of concern to me at this point, as I have a plan listed below which also explains why I was happy to buy it blind with no v5.

CA34B8C8-B4CA-4C2D-BB66-8F47AA1D62F8.jpeg


As I have mentioned in my previous threads regarding my search for a station wagon I have my first child due in December and have had to admit that my hardtop is not the most child car seat friendly of vehicles. After considering the options I decided it will be cheaper and quicker to turn my already rebuilt 110 hard top into a station wagon rather than buy a station wagon and rebuild it to the same standard or buy one that has already been rebuilt.

My plan moving forward is:
1) try and get a v5
While working on/waiting for a v5
2) rebuild the station wagon body
3) paint the station wagon body to match my 110
4) fit the freshly painted and rebuilt station wagon body onto my 110 and fit the hardtop body to this
5) if I get a v5 at some point in the future rebuild this onto a galv chassis with a galv bulkhead and 200tdi. (I have a 200tdi engine and reasonable bulkhead that was in the fire I plan to rebuild, galv, and fit to this). This is a future plan that in reality is probably many years down the line.

At this point my question is around point 2 of my plan. What is involved in a station wagon body rebuild. so far from my limited research and general knowledge I plan to:
Rebuild the seat box with panels from YRM (have already done the one in my hardtop)
Replace the capping with galv ones (have already done the one in my hardtop)
Replace the chassis crossmember with a galv one (i know you can get them from the galv chassis suppliers)
Replace sills/B&C pillar with galv (yrm again)
Replace the rear doors with hopefully ali topped early 110 versions (have already done the one in my hardtop)

All of the above is things I have already done on my hardtop other than the B/C pillar. Is there anything else I am missing or other parts unique to a station wagon body that would need to be rebuilt or is a common failure point?
 
Is there any extra chassis brackets for the 2nd seat base to bolt to? Think that’s the only difference
Is that not the chassis cross member I mentioned? Apologies if my description was not clear, but from my knowledge there is an additional central crossmember to support the seats: LINK
Or is there another set of brackets? My knowledge of station wagons is not great as have only ever dealt with hardtops.
Unsure myself… I only know hicaps
 
Unsure myself… I only know hicaps
Indeed. It will all be a bit of a learning curve.

Best bet would be ring YRM and ask, they will be very helpful!
Many thanks I will start by looking at the panels/parts they offer for a station wagon. It is just trying to get a list of the parts that tend to fail so I can inspect and if needed replace now while it isn’t on the road and has no effect to the use of the vehicle.
 
Bit of an update having now had time to have a little more of a look over it. the general condition of the vehicle is poor. The chassis may be salvageable but the bulkhead is probably beyond easy repair.

51E18A95-F2D4-4BDD-B262-61DF20424C3A.jpeg


FA90659D-C24F-442B-8CBD-DF46BA6C513C.jpeg


The drivers door top hinge not being attached to the bulkhead is an annoyance but I have a spare bulkhead corner I may badly weld into place with some flat strap to give it some strength just so the door is usable! However at this point I am not to worried about these issues as that is future me's problem if I manage to sort the paperwork out. Short term all I am bothered about is the rear body which is also in poor condition.

1645C1FA-4FA6-4D39-9FB3-195A8ABE7846.jpeg


The cappings on each side need to be replaced but I know you can get galv versions of these (LINK) and I have replaced caping before on my 110 so that is an easy all be it time consuming job.

806B5034-7F83-4FA7-9D8D-5D01C0797A08.jpeg

CABDCF6E-87CD-43D3-8DC1-B6E08B58D5CA.jpeg


The sills/B+C pillar need to be replaced. I may not know much about station wagons but again I know this is a common area for them to rot away and you can get complete galv sections for these from YRM (LINK) all be it they are rather pricey. Does anyone have any experience replacing these or is aware of any good guides/videos online?

760BECA7-C0F0-4215-A961-C9564266F474.jpeg


The station wagon crossmember we have discussed above has seen better days similar to the rest of the chassis but I know you can get galv versions of these from either yrm or the galv chassis suppliers so when I come to swap them over I will fit a new galv second row crossmember as well.

A859A40F-F3E7-4185-9F3D-7E400E282C1A.jpeg

1699974516461.png


Looking on the yrm website other than racking up an enormously expensive shopping bill most of the parts I need look to be available there. but I am struggling to work out what seatbelt fittings i need. YRM look to offer the part circled but not numbered below (LINK) but it does not immediately look to match what I have currently and I am struggling to work out how it is fitted? Is it rivetted in place from below and therefore the bent and riveted panel I have in mine is an attempt at a repair or do I have something different?
 
My overall plan is to tackle this in small stages completely replacing and refitting a part before moving onto the next so I do not end up with a complete mess of disassembled parts and panels strewn across everywhere.

My suggested order so far is:
1) Bodge repair the bulkhead so I can open the drivers door
2) replace cappings
3) replace one side sill
4) replace other side sill
5) rebuild drivers seatbox
6) rear seats/seatbelts
7) replace rear doors with split door style

Concurrent activity which is weather dependant while waiting for parts etc:
Fully sand down all exterior rear body panels, prime, and paint
Remove rear window signage and check and replace seals as needed
Fit 300tdi light units (have just done that to my tub as part of my rebuild)
 
A little update on this I now have a V5!!

Despite the horror stories of the chap who sold about arguing with the dvla and giving up and selling without a v5, my experience was nothing but positive. It consisted of a phone call with the dvla which informed me I needed to complete the import form, a sorn form, and include a cover letter explaining why I did not have export paperwork from another country to accompany the import forms. Also because it still existed in the dvla system there would not be an import charge.
Having completed this and sent it off at the beginning of December I revived my v5 in the post today!

IMG_3905.jpegIMG_3906.jpeg

It is registered as an estate so a proper station wagon. And I don’t know if that still makes a difference with the lez zones but know it did when they first came in. Although by the time have finished rebuilding and it back on the road I will probably be historic!
 
I have also bought some ali split door tops this is the ebay LINK, although I bought off facebook for less than this!

I plan to paint and then rebuild these followed by getting the and building up the door bottoms with locks, cappings etc. Does anyone know where/if you can get door cards for the rear split doors? I have the military split doors at the front and have military door cards fitted to them but I am not hopeful there is an equivalent second row door version.

The above will happen concurrently with getting the rear tub cappings replaced and while the side is removed to do this renovating the side, removing the window stickers and painting. How does the interior trim panel come off? it is plastic and I do not want to break it during removal as although I am not convinced I will refit it I want to at least have the option.
 
I fitted the first “new” part to the project this morning. I fitted the diff guard to it this morning (coating the diff in waxoil before fitting) for no other reason than I was fed up of kicking it in the garage! But noticed the large dent at the bottom while fitting.

IMG_3994.jpegIMG_3995.jpeg

How dented can the front axle diff pan be before it starts to cause issues? Is there any way of telling without removing the diff?
 
In fitting the diff guard and laying under the front of it looking at more bits unfortunately I think the chassis is Definitly beyond repair. I was hopeful that a crossmember and a couple of outriggers was all it would need. But the front crossmember has also rusted through and that is before any more investigation. So have resigned myself to the need for a new chassis in time when I get to that stage.


IMG_3993.jpeg
 
I fitted the first “new” part to the project this morning. I fitted the diff guard to it this morning (coating the diff in waxoil before fitting) for no other reason than I was fed up of kicking it in the garage! But noticed the large dent at the bottom while fitting.

IMG_3994.jpegIMG_3995.jpeg

How dented can the front axle diff pan be before it starts to cause issues? Is there any way of telling without removing the diff?
That's nowt to worry about, have a look at mine. Met a few hard rocks, went to fit a guard some years ago and pan was so distorted it would not go on. Still the same now.
 

Attachments

  • LR6.JPG
    LR6.JPG
    256.3 KB · Views: 32
That's nowt to worry about, have a look at mine. Met a few hard rocks, went to fit a guard some years ago and pan was so distorted it would not go on. Still the same now.
That makes me feel better. It certainly does not look as bad as yours so if you have no issues I shouldn’t have. The diff guard just slotted straight on so can’t have been that bad.
 
I fitted the first “new” part to the project this morning. I fitted the diff guard to it this morning (coating the diff in waxoil before fitting) for no other reason than I was fed up of kicking it in the garage! But noticed the large dent at the bottom while fitting.

IMG_3994.jpegIMG_3995.jpeg

How dented can the front axle diff pan be before it starts to cause issues? Is there any way of telling without removing the diff?
Change the diff oil. If there has been any grinding going on inside, the resulting metal filings will be visible in the old oil.
But I doubt there will be any, if it isn't leaking the damage won't be that severe.
 
I’d be more concerned about it leaking. I take it you’ve checked the levels.
I haven’t yet but it is on the list to check and top up for storage. A newborn arriving early just before Christmas put the storage prep on hold somewhat even if it will eventually be for him! But the diff was dry so unless it’s completely empty (not impossible) then I don’t think it is leaking.
 
May be a little premature as it needs a lot of rebuilding first but couldn’t turn these tree slider steps down when they came up for sale (thank you @bluehaze). Although they will certainly need to come off again fitting them is the easiest way to store them so they are not cluttering up the garage.

IMG_5427.jpeg
 
On more sensible work towards refurbishing the station wagon body to swap onto one I have now finished rebuilding and painting the second row door tops. These were bought fully stripped so thankfully all the parts were there to put back together after painting. New felt runners and they are good to go. Just need to get some door bottoms now to fit them to.

IMG_5399.jpeg
 
Back
Top