Dom's 109" (re)build

This site contains affiliate links for which LandyZone may be compensated if you make a purchase.

dominicbeesley

Well-Known Member
Posts
1,701
Location
Hebden Bridge, West Yorkshire
Hello all,

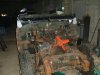
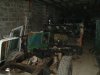
I've finally done "some" work on Matcal's old motor - admittedly not much as I've had other stuff on.

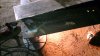
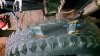
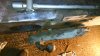
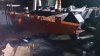
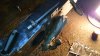
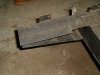
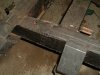
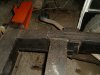
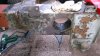
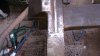
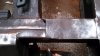
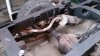
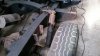
Anyway here's a few pics of where I'm starting - at the back.

The plan is to remove tetroseal (****ting stuff) with blow torch then dress with flap disc and paint up with red-oxide and chassis black. Then a thick layer of tetroseal or waxoyl. I thought about galv but to be honest I'd never make the money back and this one is supposed to be worth more than I put into it!

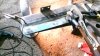
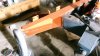
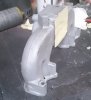
Anyway, first question: the driver's side back member has been patched with a sliver of 2mm. As can be seen it sticks out by about 1/2" and is not true. So seeing as its in bits I'm going to cut it out and do it again. Are the little bracers acceptable or should I get a bit of 2mm bent up like on the other side of the motor...if I do are they spot welded in or just seamed?

Cheers

D

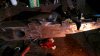
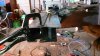
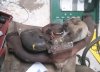
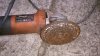
PS: The white funnel on the carb was to fill it with fuel....well first thing I had to do was get the bugger started!
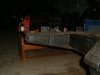
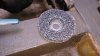
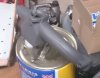
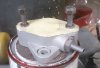
 

Attachments

  • DSCF0170-s.JPG
    DSCF0170-s.JPG
    90.9 KB · Views: 450
  • DSCF0171-s.JPG
    DSCF0171-s.JPG
    81.7 KB · Views: 365
  • DSCF0172-s.JPG
    DSCF0172-s.JPG
    69.3 KB · Views: 383
  • DSCF0173-s.JPG
    DSCF0173-s.JPG
    103.2 KB · Views: 374
  • DSCF0174-s.JPG
    DSCF0174-s.JPG
    121.9 KB · Views: 397
  • DSCF0175-s.JPG
    DSCF0175-s.JPG
    112.3 KB · Views: 351
It doesn't look bad I don't think, it's not like a major stress area, towing balls pull in the middle, what loads are really out there anyway?
 
I tried to get a bit more done today. As usual I spent more time fannying around buying stuff than working. I got some paint and rust removing pads for the angle grinder...as can be seen at best part of a tenner each it looks like they are effective but expensive way of doing things so I've decided to go the nitromors route...I hate the stuff but it works.

Did a bit of (**** poor) welding, the tops of the rear cross member weren't welded to the chassis so welded them in...now time for some booze...
 

Attachments

  • DSC_0016-s.jpg
    DSC_0016-s.jpg
    142.6 KB · Views: 371
  • DSC_0015-s.jpg
    DSC_0015-s.jpg
    118.8 KB · Views: 375
  • DSC_0014-s.jpg
    DSC_0014-s.jpg
    102.1 KB · Views: 393
  • DSC_0013-s.jpg
    DSC_0013-s.jpg
    114 KB · Views: 360
  • DSC_0012-s.jpg
    DSC_0012-s.jpg
    119.3 KB · Views: 385
  • DSC_0011-s.jpg
    DSC_0011-s.jpg
    106.5 KB · Views: 366
  • DSC_0017-s.jpg
    DSC_0017-s.jpg
    139.4 KB · Views: 342
It might be worth having a look behind the tow ball. Its where I found quite a bit of corrosion on the rear crossmember where water had got between the drop plate and the chassis.

Its looking good :)
 
Yes, next job is to try and get that off...looks like it will require a bit of swinging on to shift those nuts. The big plate is almost rotted through and theres a lot of crap behind it so will no doubt need a good big patch making...hopefully will get up there tomorrow. Too many bottles of wine and good food last night to stray too far from the ****ter today
 
glad to see it getting the attention it deserves dom

and about them rear crossmember tops i told mat to weld them in before he puts anything on the fekker ( admitently it did look to me like hed done it by the next time i got there )

and if memory serves me right theres no bush in the drivers side front spring rear hanger ( mr moneybags wouldnt fork out for one )

but the wiring loom should be spot on as i stripped atleast 3 older more fooked looms out of it and god knows how many miles of household cable out of it to bring whats there now to a good basic standard loom as per the haynes manual for a series 3 109

the only thing wrong with the wiring as far as i got with it is the indicator stalk is absolutely frigged and the indicator flash unit is fried and the rear lighting part of the loom is gone as it was butchered beyond repair by someone else
 
Thanks Johnny, for the pointers. I suspect there's quite a lot of x-members like that where people can't be bothered removing the body...Thanks for the heads up on the wiring I'm usually pretty ok with electrics so wasn't too worried about it but nice to know what to expect and what to look out for.

As to springs hangers I think I might go for polybushes on this one (the softer ones) and see what they're like....the springs don't look too great to me and I'm debating whether to keep them, swap them for new or swap for parabolics. I'm trying to keep this to a budget...

Thanks Joe, I've not been much better today but it was beer and bad food yesterday...

when i say basic loom i mean basic

no fog lights no hazzards and no fekkin hidden extras like that silly half cooked floodlight circuit that was there

if yer want the poly bushes ive seen the orange ones used ( budget priced things from parkers ) wich seem pretty good fer the softness just a little more robust than the yellow ones fer deffenders
 
Ta,

I'm going to try and pull a towing loom through too instead of clipping it to the outside and try and terminate it properly at the front...But I might give it a miss if its too difficult.

I've seend some blue polys somewhere that are meant to be soft, but I can't remember where...
 
I managed to get a few more hours worth done tonight. Spent most time trying to get the sealer off and cleaning up.

Tow bar came off fairly easily and apart from a bit of corrosion behind the plates it actually looks fairly sound so I'll just paint that bit.

As for the suspect welding on the cross-member I decided to cut the top out and redo it as it wasn't straight and needed trimming anyway. I'm glad I did the two spacer bars were "welded" to the powder-coat on the bottom plate. It came off with light finger pressure. The bottom plate seems to be welded in fairly well so I'll bend up a new back plate and weld that in when I next get up there....

Given it all a coat of red-oxide on the inside and out no doubt I'll end up scraping half it off when I weld it...
 

Attachments

  • DSC_0030-s.jpg
    DSC_0030-s.jpg
    65.6 KB · Views: 268
  • DSC_0028-s.jpg
    DSC_0028-s.jpg
    92.6 KB · Views: 282
  • DSC_0027-s.jpg
    DSC_0027-s.jpg
    94.2 KB · Views: 325
  • DSC_0026-s.jpg
    DSC_0026-s.jpg
    104 KB · Views: 288
  • DSC_0025-s.jpg
    DSC_0025-s.jpg
    94.1 KB · Views: 295
  • DSC_0023-s.jpg
    DSC_0023-s.jpg
    108.1 KB · Views: 323
  • DSC_0022-s.jpg
    DSC_0022-s.jpg
    80.9 KB · Views: 294
  • DSC_0021-s.jpg
    DSC_0021-s.jpg
    103.7 KB · Views: 301
  • DSC_0020-s.jpg
    DSC_0020-s.jpg
    100.8 KB · Views: 305
Well, I can't believe that it's nearly a year since I updated this thread. I've not done a huge amount but its coming together slowly...or should that be its coming to pieces?

It's been a bit slow due to cold, work and getting bored of trying to remove underseal **** from the chassis. Now I've got a grit-blaster gun and a compressor this has become a lot easier!

So far I've removed and rebuilt and cleaned:
- steering box
- manifolds
- wiper motor and bits and bobs
- dashboard panels (some more welding and fabricating to finish off)
- one brake back plate, hub etc

Started on cleaning and removing the engine and ancillaries and got the bits together to rebuild the carb this week.

I've also started on the bulkhead which is in a worse state than I'd thought wit quite a lot of filer present. I've started to blast it to see what's what but think I need to get it blasted professionally as my grit blaster isn't really up to the job!

I've also found a few worrying bits of welding that I think I'll have to redo and the front dumb irons look like they'll need rebuilding / replacing. I'll get some photos up soon and see what everyone thinks.

Here's a few pics of what I've been doing this weekend...

I've also been trying to clean / degrease the engine. I've tried Halfords degreaser (useless), a steam cleaner (useless), brake cleaner aerosol - excellent but expensive. What do you guys use to get 30 years of built up **** off an engine and gearbox?
 

Attachments

  • DSC_0030-s.jpg
    DSC_0030-s.jpg
    65.6 KB · Views: 207
  • DSC_0028-s.jpg
    DSC_0028-s.jpg
    92.6 KB · Views: 207
  • DSC_0027-s.jpg
    DSC_0027-s.jpg
    94.2 KB · Views: 204
  • DSC_0026-s.jpg
    DSC_0026-s.jpg
    104 KB · Views: 183
  • DSC_0025-s.jpg
    DSC_0025-s.jpg
    94.1 KB · Views: 194
  • DSC_0023-s.jpg
    DSC_0023-s.jpg
    108.1 KB · Views: 215
  • DSC_0022-s.jpg
    DSC_0022-s.jpg
    80.9 KB · Views: 211
  • DSC_0021-s.jpg
    DSC_0021-s.jpg
    103.7 KB · Views: 223
  • DSC_0020-s.jpg
    DSC_0020-s.jpg
    100.8 KB · Views: 206
Last edited:
Thanks James,

Any recommendations on a steam cleaner - I tried my mate's Karcher thing but it didn't really seem to do much...I'm not sure if it is just knackered though as it just seemed to emit a fairly weak jet of steam that didn't do much.

I also tried an ultrasonic cleaner thing on my carb which did a bit but I think that's gonna need more elbow grease and a toothbrush to get all the muck off...I've sand blasted and painted the manifolds (hi-temp paint on exhaust and a run over with lacquer on the inlet) - I'm not normally one for making things pretty but experience of my other Landy shows that the manifolds tend to get dosed up with oil when topping up...

I'm going to stick with the 36iv carb at first. The one on there looks original and in reasonable nick, not warped or knackered but I've got a rebuild kit anyway. I'll probably pop the head off and give it a clean out as there looks to be a bit of rust in one of the exhaust holes - probably nothing other than being stood but might as well while its out. The engine fired first time when I tried it and sounded fairly sweet but it'll need to be 100% to keep up with traffic...
 

Attachments

  • DSC_0218-s.jpg
    DSC_0218-s.jpg
    293.1 KB · Views: 217
  • DSC_0216-s.jpg
    DSC_0216-s.jpg
    89.6 KB · Views: 241
  • DSC_0215-s.jpg
    DSC_0215-s.jpg
    163.6 KB · Views: 215
  • DSC_0212-s.jpg
    DSC_0212-s.jpg
    152.3 KB · Views: 215
  • DSC_0211-s.jpg
    DSC_0211-s.jpg
    211.9 KB · Views: 240
  • DSC_0219-s.jpg
    DSC_0219-s.jpg
    136.1 KB · Views: 220
Looks better than mine, I took the bulk head off three years ago
an it's still sitting where I left it. I kept nicking parts to rebuild a 88
an it all just got a little out of hand.
 
Back
Top