Brendan Glanfield
New Member
- Posts
- 4
The blowerr Heater motor under the dash has been making a odd audiable squeak when running slowly. The job took 30 minutes "once you have done it once". First time allow 60min.
This task is not complicated, BUT it is not easy either,If you are patient you will be fine the dificult part is carefully removing the covers and I have done my best to carefully explane how this is done.
Firstly you need to remove the bonnet opening catch. Its a star head screw

Next remove the panel below the glove box. Start by removing two black screws from the panel then remove a couple of plastic star shaped lugs that you need to manipulate the plastic strip over the top of,
 "Don't yet try and remove it completely yet".
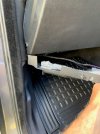
Then go to the foot well cover (covered in carpet) and if you put your fingers up under here you will feel a clip. YOu need to push up against the clip carfully, You can also get your other had on top of the clip and push down to assist.
View attachment 311006
 The clip is a spring clip, see photo.
This is the hardest part once you have this off the rest is simple.
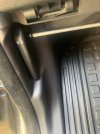
Pull the right side of the loose panel outwards and down a little and once it is clear you will need to manuipulate the left side up over the outside plastic foot well cover and then forward to slip it out sideways
 .
.
Now you can drop the glove box by opening then pushing down on the side stays. A little pressure down on the glove box and it will drop. You need to remove a white plastic plug from the bottom of the opening. NOw you can easily manipulate the blanck air vent down slightly then forawrd while rotating you will see it come away from its connection on the rigth side.
Close the glove box.

Under the foot well you will see the fan unit held by three screws. unclip the electrics first then unscrew and remove the fan unit. This bit is very simple.
Once I had the unit out I removed the internal guts by pushing in on three clips ariound the plastic armature. They are rubber and once pushed the top come off carefully.
 You cant remove the top commpletely due to the electrics BUT you can get access to the bottom bearing where all the moisture goes. Yes it was a bit corroded and so I blew this out whiped off the corrosion then I used a CRC product that is sticky so it adheres to things like bearings. Squirt that into the bearing while manipulating it. Dont use "half a can" its not needed just enough. Place the fan upside down so the CRC goes into the bearing. I also drilled a hole in the fan so that i couild get CRC into the top bearing. After a few squarts I used hot glue to seal it again.

Reinstall everything ebing carful of the covers. It seams the covers cost more than the fan unit if you break them.
I ended up doing the process twice as the first time i reinstated things I did not repair the hole with hot glue and after that I started to worry about moisture ingress into the unit. Secound time l did this it took me about 15 minutes out adn back in so it is not complex once you know.
Result.
Fan runs silently again.
This task is not complicated, BUT it is not easy either,If you are patient you will be fine the dificult part is carefully removing the covers and I have done my best to carefully explane how this is done.
Firstly you need to remove the bonnet opening catch. Its a star head screw
Next remove the panel below the glove box. Start by removing two black screws from the panel then remove a couple of plastic star shaped lugs that you need to manipulate the plastic strip over the top of,
Then go to the foot well cover (covered in carpet) and if you put your fingers up under here you will feel a clip. YOu need to push up against the clip carfully, You can also get your other had on top of the clip and push down to assist.
View attachment 311006
This is the hardest part once you have this off the rest is simple.
Pull the right side of the loose panel outwards and down a little and once it is clear you will need to manuipulate the left side up over the outside plastic foot well cover and then forward to slip it out sideways
.Now you can drop the glove box by opening then pushing down on the side stays. A little pressure down on the glove box and it will drop. You need to remove a white plastic plug from the bottom of the opening. NOw you can easily manipulate the blanck air vent down slightly then forawrd while rotating you will see it come away from its connection on the rigth side.
Close the glove box.
Under the foot well you will see the fan unit held by three screws. unclip the electrics first then unscrew and remove the fan unit. This bit is very simple.
Once I had the unit out I removed the internal guts by pushing in on three clips ariound the plastic armature. They are rubber and once pushed the top come off carefully.
You cant remove the top commpletely due to the electrics BUT you can get access to the bottom bearing where all the moisture goes. Yes it was a bit corroded and so I blew this out whiped off the corrosion then I used a CRC product that is sticky so it adheres to things like bearings. Squirt that into the bearing while manipulating it. Dont use "half a can" its not needed just enough. Place the fan upside down so the CRC goes into the bearing. I also drilled a hole in the fan so that i couild get CRC into the top bearing. After a few squarts I used hot glue to seal it again.Reinstall everything ebing carful of the covers. It seams the covers cost more than the fan unit if you break them.
I ended up doing the process twice as the first time i reinstated things I did not repair the hole with hot glue and after that I started to worry about moisture ingress into the unit. Secound time l did this it took me about 15 minutes out adn back in so it is not complex once you know.
Result.
Fan runs silently again.