Bit of a Problem Chassis Bushes

This site contains affiliate links for which LandyZone may be compensated if you make a purchase.

border

Well-Known Member
Posts
3,517
Location
North East. UK
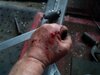
Well thought it was to good to be true, started changing bushes in springs, used the old scissor jack method, works great by the way.
Anyway done all 4 springs, old bushes pushed out and new pushed in.

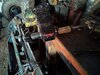
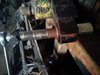
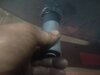
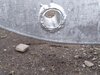
Now I knew that Id forgot to remove the ones in chassis before it went to Galvanisers, but when it came back I thought thats very good of them they have done it for me. So went to try new bushes and I know they should be tight but they seem to big . At first my thoughts were the Galve has thickened the holes a bit and just needs reaming off or something, but after looking closer it looks like the outer metal ring of old bush is still in there.
Now thinking all I can do of is the hacksaw blade through the hole and try that way but not sure if it will work with Galve on it. ran out of blades anyway so will give it a go tomorrow, unless there is another way.
 

Attachments

  • IMG_20210915_172741.jpg
    IMG_20210915_172741.jpg
    243.1 KB · Views: 141
  • IMG_20210915_173654.jpg
    IMG_20210915_173654.jpg
    173.8 KB · Views: 117
  • IMG_20210915_192901.jpg
    IMG_20210915_192901.jpg
    93.5 KB · Views: 122
  • IMG_20210909_162955.jpg
    IMG_20210909_162955.jpg
    441.1 KB · Views: 123
Small screwdriver down the outside to bend the metal ring inwards:

radius bush removal1.JPG


Then bigger blade to split the ring:

radius bush removal 3.JPG


Galve may make it a bit harder to get started, but should still work.
:)
 
Small screwdriver down the outside to bend the metal ring inwards:

View attachment 248142

Then bigger blade to split the ring:

View attachment 248143

Galve may make it a bit harder to get started, but should still work.
:)

That does not look like chassis bush to me...
@border I've just done all bushes on a S2 chassis last week apart from the one youv'e pictured my method is good quality blades cut from both sides then collapse with cold chisle then use my electric hammer drill with chisel blade to remove the outer metal tube sometimes two cuts from the front helps you hammer out tube...these are the long bushes are they not at rear of front leaf springs...

And stick those bushes in the freezer overnight and then silicon spray and grease chassis tube before you fit...
Thanks, Yes these are the rear of front springs, but the rear chassis bush holes are the same, they take same size bushes as springs so got all 4 to do.
Need to get myself a decent hacksaw and blades.
 
Will post some pics tomorrow...but def good quality blades as the tubes work harden and as you cut through the blade jams I found you cant cut through from one side you have to swap around I've done rear ones we have the bush tool kit in the garage but realy only works on replacement as it takes ages to get them out my method now only 15mins...
 
Will post some pics tomorrow...but def good quality blades as the tubes work harden and as you cut through the blade jams I found you cant cut through from one side you have to swap around I've done rear ones we have the bush tool kit in the garage but realy only works on replacement as it takes ages to get them out my method now only 15mins...
Thanks will have a go tomorrow night , dont have a hammer drill though but will try my best with chisel
 
Took me bloody 2 and half hours to get one out , only 3 to go :eek: know what Im up against now though, could only cut with saw on top edge, had to use a tinish chisel which I kept sharpening, but got there in the end.
Missed with the hammer a few times too, wont feel the pain till tomorrow.:)
 

Attachments

  • IMG_20210916_190319.jpg
    IMG_20210916_190319.jpg
    144 KB · Views: 141
Took me bloody 2 and half hours to get one out , only 3 to go :eek: know what Im up against now though, could only cut with saw on top edge, had to use a tinish chisel which I kept sharpening, but got there in the end.
Missed with the hammer a few times too, wont feel the pain till tomorrow.:)

Oooops I have an air chisel for these jobs, bought it when I worked in garage life. :)
 
Do not know what saw you have been using but I just use a standard hacksaw, remove blade and place in hole then replace the blade in the saw with the teeth facing the bar and the saw hanging underneath the chassis, easy then to get a nice even cut across the bush outer. I find an old screwdriver that has a shank all the way up the handle best for freeing the bush remains.
 
Do not know what saw you have been using but I just use a standard hacksaw, remove blade and place in hole then replace the blade in the saw with the teeth facing the bar and the saw hanging underneath the chassis, easy then to get a nice even cut across the bush outer. I find an old screwdriver that has a shank all the way up the handle best for freeing the bush remains.
Just odinary hack saw set up as you say, can only get a cut on the top but I need a good chisel to get them moving.
Just done the 2 rears bit easier then front, just one more at front now.
 
Back
Top