2.25 petrol valves / head

This site contains affiliate links for which LandyZone may be compensated if you make a purchase.

Gun7354

Active Member
Posts
275
Location
Notts
Hi knowledgable folk,

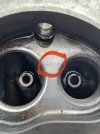
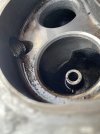
So whipped the head off and after borrowing 2 x valve spring compressors (both bent) I've order a decent one. So....are 2.25 valve springs a pain to compress? Also I've noticed one of my exhaust valve spring is sitting higher than the rest (please see pic). Does anyone know what could cause this before a remove the valve? The valve is seated the same as the remaining ones in the head but the spring is slightly higher.

Thank you all

Rich
IMG_1354.jpg
 
Last edited:
Probably best to remove them and know for sure what the issue is, are the collets seated properly .
i use a hammer and socket to remove them quick tap and collets pop out take care not to lose them.

the manual has the spring free length for inners and outers and also what length when compressd under load also dims on valves etc.
 
Last edited:
Amazing what you find when you start digging. So hitting the collets with a hammer worked perfectly Steve, thank you.

Before I begin the world of grinding and cleaning I have a small crack across the valves (see photo). They don’t go any further so I’m thinking to leave well alone. The truck was running well but needed to change the valve stem seals.

Any thoughts greatly appreciated

Rich
 

Attachments

  • IMG_1359.jpeg
    IMG_1359.jpeg
    808.8 KB · Views: 82
  • IMG_1361.jpeg
    IMG_1361.jpeg
    240.9 KB · Views: 75
thats a shame, If It was ok before I’d be tempted to reuse with the cost from turner engineering £900 , one on eBay for £120 but condition unknown, you could post in the sales and wanted on the forum, someone may have a spare.
most likely between The valves would be a water passage and if it went all the way through would cause issues, might be the time to consider some new valve seats in for unleaded fuel?
you might be able to get it pressure tested which would confirm if ok or not
 
Gonna reuse Steve. Was fine before so will lap the valves in and see how it goes. Robust cast iron 😁

Thanks mate

Rich
 
Amazing what you find when you start digging. So hitting the collets with a hammer worked perfectly Steve, thank you.

Before I begin the world of grinding and cleaning I have a small crack across the valves (see photo). They don’t go any further so I’m thinking to leave well alone. The truck was running well but needed to change the valve stem seals.

Any thoughts greatly appreciated

Rich
That looks like a crack to me. A fine one, but still a crack. It is in the usual place that those heads crack.
If it hasn't gone into the waterways, it might be fine for a while.
 
Thanks Turboman - I’m gonna leave for now and if it goes….it’ll be time to get a new unleaded head 😁.

Just on the theme of cylinder heads and gaskets one of the waterways was blocked off on the gasket (photo). My new comp gasket is the same with the hole omitted

You’ll have to zoom in on the photo, it’s circled in green.

Thanks

Rich
 

Attachments

  • IMG_1346.jpeg
    IMG_1346.jpeg
    183.7 KB · Views: 61
No, it’s likely with the higher pressure/ cooler flow from water pump at the front of engine which is generally cooler the gasket can restrict the flow with the smaller hole and the larger holes towards the back of engine where it will be hotter.
 
Last edited:
Thanks Turboman - I’m gonna leave for now and if it goes….it’ll be time to get a new unleaded head 😁.

Just on the theme of cylinder heads and gaskets one of the waterways was blocked off on the gasket (photo). My new comp gasket is the same with the hole omitted

You’ll have to zoom in on the photo, it’s circled in green.

Thanks

Rich
They are all like that.
 
Thank you for all your help. As an update - head back on, new fuel pump and all back together. Turned it over a few times to fill up the oil filter etc. Put the HT lead on and it started first turn which was great, nice and smooth, got it to working temp and about to turn off then a horrible tappet noise.

Rocker back off and one of the Tappets was way off (I’d adjusted them and double checked). So thinking I’d adjusted it whilst it wasn’t seated in the cup correctly! Anyway all checked again then fired the Landy up. This time it was missing. So…pulled off the leads one by one until I touched No 1 which gave me a shock. Fitted a spare, all fixed.

So…was worth taking the head off and giving it a dig out. Been on a road test tonight and it pulls better and ticks over beautifully.

Think I’ll have to re-adjust the tappets after 100 miles or so. It’s funny (read annoying) how a landy can throw a curve ball in when you think all is well 😁
 

Attachments

  • IMG_1417.jpeg
    IMG_1417.jpeg
    403.3 KB · Views: 62
Last edited:
Looks good, well done, it’s a sinking feeling when you get it together and doesn’t sound as you hoped it would followed by the best feeling when you sort the simple error

did you find the cause of the valve spring higher that others
 
Yes Steve I did mate - sorry for not following that up but it was the valve cap. I ordered a NOS from JCs and it fitted perfect. Funny how only one was so worn it made the collets sit deeper in the cap. Could have been lack of oil in its previous life.

Rich
 
Hi all - all is going well at the moment - 100 miles in and running well. Quick question - do I need to re-torque the head down after a period of mileage? Im thinking 500 miles then check tappets and head bolts.

Thank you all 👍🏻

Rich
 
Hi all - all is going well at the moment - 100 miles in and running well. Quick question - do I need to re-torque the head down after a period of mileage? Im thinking 500 miles then check tappets and head bolts.

Thank you all 👍🏻

Rich
I only checked tappets
Unsure what the book says(if anything)
 
Back
Top