Dinitrol application - what am I doing wrong?

This site contains affiliate links for which LandyZone may be compensated if you make a purchase.
As promised here is the spray nozzel after a bit of clean where you can see the vent hole. and also a better picture of the spec of what I actually have.

View attachment 256189 View attachment 256188 View attachment 256187


@flat gets a cookie!

Having heated the dintrol in a very dangerous fashion (mess tin of water on a little gas camping stove with the dintrol tin in the water) I did manage to get it to spray from the direct nozzle but still would not spray from the tube. I cut the tube to a shorter length and it then worked with that as well.

View attachment 256190

I got about a liter of dinitrol into the a pillars and some of the cross box sections using the compressor and spray gun. I then got another 0.5l of aerosol into the cross box sections. Does that sound like it is likely to be enough? I know it is better than nothing but want it to last as long as possible. I go enough into it that is was oozing out of the holes at the bottom.

View attachment 256191 View attachment 256192
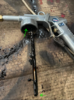
Looks like I'm not alone. I bought the dinitrol tins and the spray attachment with the long tube for the chassis all together. It worked great straight off the bat and I cleaned everything spotlessly after. When I came to reapply some more at a later date, I could not get it to work. Like you, the can pressurised and leaked everywhere. I was hoping someone here would have worked out what was going on.
 
Maybe heat the dinitrol can in some hot water to thin it down?
My Fil used to use a paraffin sprayer to apply waxoyl.
 
There is some sort of resistance past the trigger, either the restrictor valve is closed or there is a blockage. Have you tried it with the valve further unscrewed? With it disconnected from the tin does it fire air through the discharge tube or down the pick up pipe?
 
Maybe heat the dinitrol can in some hot water to thin it down?
My Fil used to use a paraffin sprayer to apply waxoyl.

plus 1 , also warmed the aerosols and larger cans in warm water

with the aerosols if there was paint left inside , i would turn the aerosols upside down, spray a bit out the clear the aerosol nozzle

think I also saw somewhere that when attaching the wand to tighten the back nut up otherwise the can will leak , was on a video , I’ll see if I can find it
 
There is some sort of resistance past the trigger, either the restrictor valve is closed or there is a blockage. Have you tried it with the valve further unscrewed? With it disconnected from the tin does it fire air through the discharge tube or down the pick up pipe?

u saying that , when I first bought my gun I placed the pick up tube into a container with some gun cleaner , it wouldn’t spray at first then after pushing the trigger abit more it worked fine, I wonder if there was some rubbish in there and just needed cleaning out

was fine after that with the 1 x litre Dinitrol cans , plus done up the back nut on the Lance , also saw that mentioned somewhere

seems strange why the cans are leaking , did also put them in some hot water for 10-15 x mins , also wonder if different Psi settings need to be adjusted on different paints , I mainly used ML around 90-95 Psi
 
Well I am back again to complain that I cannot get the dinitrol to spray down the lance into the chassis and thought I would add to this thread rather than start a new one. A little back ground and update on the progress made since last posting.
I am using dinitrol 3125HS for the inside cavities on things, and am using Dinitrol 4941 for the externals, both are heated in a pan of boiling water before using.
I have the cheap no name spray gun shown earlier in this thread and also bought the expensive Sealey Air Operated Wax Injector Kit SG18 (link) on the recommendations of someone on the forum here.
@freelance was correct above that with the cheap gun I had there was not enough of a vacuum being created with the lance fitted to actually work but it worked quite happily with the nozzle straight out of the gun and worked well for the external chassis applications that I have used it for so far.

upload_2023-3-15_10-30-3.png
upload_2023-3-15_10-30-19.png


I am now trying and once again failing to get the dinitol to spray as I would expect using the injections lance for body cavities. I may just be expecting too much and am quite happy to be told what it is doing I correct and it is just a much longer and more laborious process than I was expecting.

Firstly the Sealy gun is blowing air from both the little hole in the top cap and also out of the long tube (green arrows). I may have misunderstood how this unit is supposed to work but I thought it was supposed to pressurize the canister by blowing air out of the little hole and then the fluid was forced up the long tube and out the nozzle by this pressure. If both are connected surely it can bypass and not pressurize the canister which is possibly one of the problems I have?

upload_2023-3-15_10-40-10.png


This is what I am currently getting with about 4 feet of tube. As mentioned above I was expecting this to come virtually flooding out of here but if this is correct than I will temper my expectations and hide my disappointment. If this is correct and it does not give the full fan spray that I was expecting is there a trick to ensuring that you get a good coverage inside the chassis rails when you cannot see it and the range of spray is fairly short? Secondly I was planning on putting 2-3 litres into each rail and at the rate is it currently spraying that is probably going to be about 8ish hours of work, is that correct?

I am aware that this is the wrong time of year to be doing this but I am working inside. I have been applying the dinitol warm to thin it down, and it has flowed into the canister quite freely when poured form the containers. It was definitely a liquid rather than a wax/tar however does it need to be actively hot to thin right down for the application to work or do I need to thin it down with some form of solvent?

Any help at this point would be appreciated. I have once again wasted half a day not achieving something I was expecting to be fairly easy (especially after my success with the externals after the help on here) and thought I had bought the correct, relatively expensive, tool for the job.
 

Attachments

  • upload_2023-3-15_10-35-59.png
    upload_2023-3-15_10-35-59.png
    296.3 KB · Views: 57
I haven't used dinitrol brand or an extension lance but have had a similar-ish issue with a standard nozzle. In my case I was using a 5m airline with 1/4 ID, and changing to the same but 3/8 ID fixed it. I guessed at the time that it was an airflow issue rather than a pressure one that was stopping the venturi effect working as intended
 
@dag019 , I use an electric air fed Apollo 1500 HVLP unit here for spraying, same with applying Dinitrol and type products with their Schultz type gun [appreciate this may not help at this stage as your painting is complete] but it works very well, same when spraying, spraying Raptor et al. Plus, have you spoken with Dinitrol directly? They may have experience of other customers the same this issue...

here re Apollo jobby https://sprayguns.co.uk/collections/hvlp-spray-systems/products/apollo-prospray-1500-3-230v
 
Hi @dag019

sorry to see ur having issues , apologises asking but what size compressor are u using please , did see the specs of ur sealed gun are


MODEL NO:........................................................... SG18.V3
Air Consumption: .........................................................
15cfm Air Inlet Size:............................................................
.1/4”BSP Recommended Air Pressure: ................................... 60-90psi

also ref The minimum hose bore should be 10mm and fittings must have similar inside dimensions

When I got my 50 x litre air compressor I also increased it to 3/8 , fitting new larger outlet valves , combined regulator / dryer , one inlet for air guns etc that needed oil and the other one with the combined regulator / dryer unit for spray guns / tyre inflators , plus a larger 3/8 hose, finally a drain out the bottom of the tank

Think I’ve still got the specs for the gun I used, will try and find it for u as a comparison

upload_2023-3-15_11-30-6.jpeg
 
Also just found this , I used ML which is thinner than the 3125 , maybe that’s why I didn’t have any issues spraying it

just looked and says u shouldn’t thin it down , ref 3125HS To clean use white spirit or solvent and elbow grease. Not recommended to thin it down with anything.

https://www.frost.co.uk/dinitrol-3125-hs-cavity-wax-1-litre-2/

wonder if the dinitrol gun have a bigger nozzle or bigger dip tube ??

sorry that’s not much help to u


Dinitrol ML cavity wax
This is a very thin, low viscosity brown cavity wax that is ideal for spraying into the chassis, box sections and hard to reach areas. Dinitrol ML is an all year round product and doesn't need warming prior to application.

Applied in conjunction with an underbody wax ( Dinitrol 4941) it acts as an adhesion promotor and can be used over previously applied rust prevention applications.

Dinitrol ML contains rust inhibitors and will help stop ongoing corrosion by forming a soft, wear resistant film that effectively eliminates dampness.

Dinitrol 3125HS cavity wax
In many respects Dinitrol 3125HS has similar properties and uses as Dinitrol ML. The main difference between them is that Dinitrol 3125HS has a high viscosity. This means that it is very thick and will require warming prior to use.

This product is better suited to warm weather and can be used as a thin underbody coating where high abrasion is unlikely.

For improved performance on more corroded surfaces, Dinitrol ML can be used as a pre-treatment to Dinitrol 3125HS.

Dinitrol 3125 HS penetrates rust and dirt preventing further corrosion. Even damp and dirty surfaces will not affect its superb performance.
 
Last edited:
Try shortening the tube you poke in the chassis , I had the same issue so Halved the tube and just drilled a couple extra holes in the chassis. I was using a no name gun and a smaller sealey compressor.

I also managed to blow up a schutz canister, Jesus that was a mess…..
 
Try shortening the tube you poke in the chassis , I had the same issue so Halved the tube and just drilled a couple extra holes in the chassis. I was using a no name gun and a smaller sealey compressor.

I also managed to blow up a schutz canister, Jesus that was a mess…..
that was on my list of things to try and see if it improves along with getting it hot rather than just warm. I do not really want to drill more access holes in my nice galv chassis. Others seem to manage to get the full length of the chassis so it must be possible I am just trying to work out how. I thought the Sealey gun was the answer from the feedback I got previously.
 
Those guns work by venturi, so the air flow has to be high enough to "suck" the goo out :eek:

If the wand is providing too much back pressure, the venturi doesn't work.

I don't know about other brands, but Wurth do an (expensive) UBS gun that can be adjusted for different jobs and textures, much like a proper spraygun for paint.

3M also do long wands for aerosol cavity wax, which I used on all the sills in my Disco 1. It could be a go for chassis rails too.
 
@dag019
I have the Sealey gun that you have. It sprays no problem no matter the hose length, if the product is thin enough. Either by heat or thinned down. The other gun (apologies if this has been said before) is a Shutz Gun and is only suitable for surface application, not for injection. I think the Sealey gun is a great bit of kit and I have used it extensively. It needs to be clean though.
I know (now) that the original gun is only good for external use and the issues with it that is why I purchased the sealey one. I will try heating it to be hot and very thin rather than just warm and thin. If that doesn't work I assume thinning it with a little white spirit and heating to hot should get it thin enough to then make it easy and usable. I will try again and report back on the results, but by all accounts the sealey gun is a good piece of kit which is why it was the one I chose.

What do you mean by needs to be clean, which part particularly or all of it and what level of clean? This experience was the first time I have used it so it was spotless, and although I have cleaned it out it you can now tell it has been used.
The brass nozzles and connectors. I have also on occasion wound up the plastic tubes and dropped them into hot water to soften the remnants of the product left in from its last use. To be honest, I’ve never really had any major issues getting good coverage with all of the attachments. I do run it at high pressure though.
 
Hi @dag019

hope u don’t mind me asking but just wondering have u got euro air line fittings plse as I found out after fitting a pressure gauge / regulator directly at the gun that the air flow gauge would really drop quite a bit, then after fitting the euro fittings it hardly dropped and really improved the air flow , plus I replaced my air line with a 3/8 one

did read that gun has an Air consumption of ... 15cfm and air line hose has to be a minimum interior diameter of 10mm so just wondered if the euro fittings may give u a bit extra

hope u get it resolved mate and didn’t mine me mentioning it
 
Last edited:
Hi @dag019

hope u don’t mind me asking but just wondering have u got euro air line fittings plse as I found out after fitting a pressure gauge / regulator directly at the gun that the air flow gauge would really drop quite a bit, then after fitting the euro fittings it hardly dropped and really improved the air flow , plus I replaced my air line with a 3/8 one

did read that gun has an Air consumption of ... 15cfm and air line hose has to be a minimum interior diameter of 10mm so just wondered if the euro fittings may give u a bit extra

hope u get it resolved mate and didn’t mine me mentioning it
I do not know what I have. As mentioned it is just a cheap Aldi compressor from about 5 years ago. But until now has done everything I have needed it to. I use battery rather than air tools And roller paint rather than spray so it does not get used much. Mainly for tyre changes. I keep looking at better ones but even second hand they are expensive and I just don’t use it enough to justify it. I will check what my airline size is that I am using. I am fairly sure it is using euro fittings.

edit: these are the fittings I am using LINK. I have bought these but they are the same as was supplied with the compressor.
I’ve got the same compressor set up as gstuart, it’s pushed all I ever needed including dinitrol and raptor liner application. I have a Schutz spray gun as well as a cheap SGS spray gun - welcome to borrow compressor and all the kit to see if it helps? I’m local to you so let me know?
 
Back
Top