A-Pillar full of water

This site contains affiliate links for which LandyZone may be compensated if you make a purchase.

Mogman

Member
Posts
64
Location
Scotland
Hi folks,

Slowly I am tracking down the leaks in our 2004 Td5 Discovery. Once again we found the front passenger footwell full of water. The A-pillar is filling up with water!

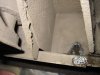
I took the carpet out to let it dry and started looking where the water was coming in. I've sorted the sunroof problems and the A/C drains, it's not those or the plenum leaking. What I found was water flowing out of the cable hole behind the side kick-panel. I thought it was water running down the inside of the A-pillar and trickling in but it turned out to be water filling up the A-pillar and overflowing back into the footwell!

There is no proper drainage at the bottom of the A-pillar so water getting in is stuck there except for a very slow leak out of the weld seams at the bottom. (I drained it by removing the bottom wing bolt on the outside of the A-pillar.)

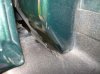
After some very careful hose pipe testing I have found that the water gets into the A-pillar by running off the front end of the roof rain gutter and into the recess where the top corner of the windscreen meets the A-pillar. Covering the small gap with Duct Tape has stopped the problem.

I've not yet taken the A-pillar external trim off to see where the problem is, it could be anywhere down the length of the trim. Before I do has anyone else had a leak into the A-pillar behind the trim strip? Is it a seam fault or a hole that is unsealed? Just need ideas what to look for before I go digging in.

Thanks folks.
 
Hi Mogman, not sure how to explain this.

The A-pillar trim holds another piece of plastic trim in place at the top corner of the screen. Behind that trim is a join in the metal work of the body which has some type of sealant in it. On my car the sealant had disintegrated and so I cleaned it all out and resealed and it sorted out one of my leaks.

Hope that helps

Neil
 
Hi Neil,

That does help, thank you., it's kind of what I suspected. I've been putting off removing the trim strip from the outside of the A-pillar because I have heard it is difficult to put back. Did you have any trouble with it? Any tips?
 
Hi Neil,

That does help, thank you., it's kind of what I suspected. I've been putting off removing the trim strip from the outside of the A-pillar because I have heard it is difficult to put back. Did you have any trouble with it? Any tips?

Have you checked to see if the drain hole at the bottom of the A post is blocked?
 
Hi BigLad,

Thanks for the input about a drain hole at the botton of the A-post. I had a quick look for one and didn't see one. I was even thinking of making one. With the dirt-track use we give the Disco it is probably so caked in mud I missed it! Could you give me an idea where it is located at the bottom? many thanks.

If you open your front door, the hinges are fastened to the A post, follow it down to the bottom and you should fine it there, as it angles in to the sill.
 
Thanks BigLad, I'll take a look as soon as my wife gets back with the Disco.

(I've attached a photo of the new Discovery accessory for leaking A-pillars! Just held on by Duct Tape)
 

Attachments

  • A-pillar-leak catcher.jpg
    A-pillar-leak catcher.jpg
    54 KB · Views: 11,918
Hi Neil,

That does help, thank you., it's kind of what I suspected. I've been putting off removing the trim strip from the outside of the A-pillar because I have heard it is difficult to put back. Did you have any trouble with it? Any tips?

Once you have removed the plastic studs the trims come off quite easily. Someone told me that if I was careful I could save and reuse the studs but they were only pence from the local dealer so I just used new.

There are 3 metal clips holding the trim in place. The trick to putting the trims back on is to put the clips onto the trim and then the trim and clip onto the body. Then it is reasonably straight forward

Neil
 
Hi again BigLad, thanks again. No drain hole on the A-pillar below the hinge bolts on mine. I'll take a look underneath below the sill when it stops raining. At least he Duct Tape fix is still working.
 
Hi Discool,

I checked on our son's 1995 D1 and the drain hole was on the front of the A-pillar as you describe, thanks for the photo really helped. BUT, on our 2004 D2 it is not there. I've now found it, it is at the back of the A-pillar almost at the very base where the pillar comes to a wedge point.

However, although I couldn't get my head in to see the hole I took the photos below (the flash makes the hole look bubbled and rusty but it's actually just wet dirt reflecting). These pics were taken after I dislodged the pile of crud on the ledge blocking the hole and it started to pour trapped water down my sleeve. Then I found that the hole that is supposed to be about a centimeter across is partially blocked by the internal metal fold inside the wedge-end of the pillar. Most of the lower part of the hole is blocked leaving only about 3 or 4 mm of gap at the top of the hole! I poured water in higher up and it slowly came out. The hole needs to be enlarged. I checked the other side, it's the same but dry.

Thanks again.:)
 

Attachments

  • a-pillar-drain-1.jpg
    a-pillar-drain-1.jpg
    90 KB · Views: 2,170
  • a-pillar-drain-2.jpg
    a-pillar-drain-2.jpg
    80.5 KB · Views: 3,482
Hi if you read my post Wet carpets, it show you have to remove the plugs from the "A"post external trim, also watche this video


but notice when he put it back the top corner is not in place , it goes on first, also it wil not get it back on if the clips are on the flange
you need to take them off and put them back on the external trim piece then it goes on very easily, line up the holes inside the dorr them just knock it back on and replace the little plugs

I have also drilled new holes on the "A" post from under the car about 1 inch lower than the exsiting holes
 
Back
Top