RX8 Seats into early/military Defender/Series

This site contains affiliate links for which LandyZone may be compensated if you make a purchase.
Good news, the seats and modified cubby box are installed, tested and fully operational:) Here, installation notes and pics following on from previous posts...
  1. Made 3mm alloy plate bolted to inside rear of cubby box for fuse box and 30A relays - this to provide easy access should anything fail
  2. Installed 2x Carling switches to front of cubby box with seat heater rockers
  3. Ran 4x 30A cables directly from battery +Ve to fuse box i/p [DS seat heater, DS motor supplies, PS seat heater]
  4. Ran all 6x ground cables directly to battery -Ve [this to ensure clean/constant earth :. no faffing about with future earthing issues]
  5. All cables ran in spiral wrap for protection using 30A [yellow] spade connectors for fuse box & relays, and 30A 8mm ring connectors to battery terminals
  6. At install you need to make sure that the wiring is 1. firmly fixed, and 2. kept low level to ensure no fouling on underside of seat. This is achieved by using the rear of seat box plinth with st/st rubber sleeved P clips fitted to the seat box screws - here I've fitted all new fasteners as wanted to re-seal the joint between seat box and plinth
LHS connector plugs to passenger side seat heater plug
note#1: I had already re-wired and replaced proprietary Mazda connectors with new std plugs
note#2: all wiring routed from/to battery box at outer edge to endure no cables catching on underside of seat

20210525_133203.jpg


I planned not to fit the battery box cover plate, this to enable easy access to battery -Ve when seat is slid forward
note#1: electrical tape over top of rails to stop paint scratching during install - you will need to refit the rails a good number of times during install
note#2: seat heater connector seen top left - this is now cable tied to the inner rail
20210525_134149.jpg


Seat heater connector close up sitting below seat lowest position
20210525_135424.jpg


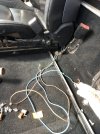
Here pic of passenger seat in forward position, carpet rolled forward and clear access to battery -Ve
20210525_140318.jpg


Seats and cubby box install complete
20210525_141250.jpg


Some additional notes:
  1. Do not underestimate the time it takes to wire in safely/correctly. Done properly, wiring takes time so do not be tempted to rush
  2. Do insulate every terminal & do use either spiral wrap and sleeve to protect all wires
  3. Do use fuses on all supply wires [inline or fuse box], including a 7.5A fuse on the input to the seat heater switches [supply from IGN.SW cct]
  4. Do use 30A relays on the seat heaters - do not be tempted to run these with just a fuse, it will fail at some stage and a seat/wiring fire is not ideal whilst driving
  5. Do wire in the seat heaters from the IGN.Sw [White, WhiteOrange, WhiteYellow] cct
  6. Do not wire from permanent live [Brown] cct as a seat heater accidentally left 'ON' overnight will at best drain your battery flat. At worst things might get a little smokey :eek:
  7. For best practice I have copied the Mazda RX8 seat wiring spec's + improved the wiring load rating
Lastly, do be careful with the seats...they're not light, with the driver's seat weighing in at 25.2kg. This is not a heavy weight but is bloody awkward when hoicking in and out
 
Right guys, I've cocked up...made the drivers side loom too tight/not enough extendable flex and it's snapped the wires from the connector, so the seat is now in a stuck forward position. Am aware one can manually wind the seats but this is a faff. With the wonders of the internet have found this great video showing how to use the Green/Red and White/Green wires to move forward and back. Here, no need to cut into the wires...just insert temporary wires into the connector terminals and use a 12v supply to move fore & aft. Off now to reposition and re-wire power cables :(

 
Right guys, I've cocked up...made the drivers side loom too tight/not enough extendable flex and it's snapped the wires from the connector, so the seat is now in a stuck forward position. Am aware one can manually wind the seats but this is a faff. With the wonders of the internet have found this great video showing how to use the Green/Red and White/Green wires to move forward and back. Here, no need to cut into the wires...just insert temporary wires into the connector terminals and use a 12v supply to move fore & aft. Off now to reposition and re-wire power cables :(


That’s a bummer mate. It is looking brilliant too. Can you post a photo of the actual connector you used at the seat ?? I could use a small piece of connector box, but that stuff looks amateurish.
 
Connectors used were these...but, be careful with the drivers lumbar support wiring as the Mazda wiring is very thin - so upon second fitting I've used blue bullet connectors with the wire stripped long and wire twisted & doubled over on the seat side, and thicker new wire. Then double thick insulating tape [this acts as 1. additional insulation, and 2. additional mechanical rigidity. Then cable tied both ends before spiral wrapping. Same for the thicker Grey & Purple wires...

https://www.autoelectricsupplies.co.uk/product/37/category/7

Importantly, I did not want to use a fixed connector box as the driver's seat next extra wire length to allow full fore/aft movement.
 
@v8250 Thanks for your help on this. Brilliant information. I’m in the middle of rebuilding the drivers footwell and door pillar at the moment and the old seats are out. So fitting these will be the next job.
 
Good work. Contrary to popular belief, these seats can easily be modified for full access to the battery. Simply remove the four M8 bolts on the base of the passenger seat and fit studs and thumb nuts. The front two alone are sufficient to secure the base and are easy to get to. Also worth extending the seat heater wiring to ensure squab can be removed well out of the way.
 
Good work. Contrary to popular belief, these seats can easily be modified for full access to the battery. Simply remove the four M8 bolts on the base of the passenger seat and fit studs and thumb nuts. The front two alone are sufficient to secure the base and are easy to get to. Also worth extending the seat heater wiring to ensure squab can be removed well out of the way.
Id use all 4 fixings in the seat base . If you tried going backwards and forwards with just 2 fixings, it tends to crab along the runners putting strain on the nylon that holds the ball bearings in the runners.
 
Hi,
Very impressed with the standard of this installation. I'm in the process of doing mine now and was intending using 20amp wire with a 15amp fused relay for the heated seats but will upgrade this now.

I have run into a problem though and wonder if you could help. I have posted this question in a couple of places on the site hoping that someone who has done this upgrade could answer what I thought was a simple question. On the passenger seat heater element, what are the brown wires for? I know the Red/Black wires are what I need but I also have a brown wire running alongside each of these. Ideally, I just need someone to say, "connect them to.....", and a photo would be great.

This is what I have got -
20210906_184129[1].jpg
 
Nice work there :) - anything which adds to the "comfort" o_O in a tratter has to be worth doing :)

Our lad had an RX8 for a while, so I know how comfy those seats are - way way way better than LR's bean counter supervised carp IMHO :D
 
Nice work there :) - anything which adds to the "comfort" o_O in a tratter has to be worth doing :)

Our lad had an RX8 for a while, so I know how comfy those seats are - way way way better than LR's bean counter supervised carp IMHO :D

Thanks @Disco1BFG , they're a fine seat upgrade for the Land Rover and very cost effective. The install...crikey, it seems like years ago, now...is quite straight forward but needs planning for a proper installation. And the seats are very, very comfortable...the recent trip to the Alpes was a great proving ground for fitment/comfort/practicality/driving position et al.

I even drove the 90 back some 1103km with a very smashed up left ankle [class3 injury to ligaments, tendons, and Achilles...:eek:] whilst in sports support/still on crutches and the seat gave a comfortable position to rest the foot/ankle without too much discomfort. Though needed the rock/tree sliders to get in and out of the old girl o_O
 
Here, RX8 seat wiring diagrams

Thanks V8250. The wiring diagram took a bit of interpreting but I think I follow it. The +ve / -ve are clear but no reference to the supplementary brown wires I have. Was hoping you could tell me what you did with yours.
 
Confusingly, brown is common relay earths o_O :. as per pts 11-12 in first diag'. Both relay commons can be joined [common] but I would not do this as if future fault on relay common earth, neither heated seats would work. Far better to have separate earths, then if one earth fails you know 1. which seat, and 2. easy to fault find.

And, be sure to test full heated seat ccts before final seat install for 1. correct operation, and 2. to ensure no PO has bodged any of the existing wiring.
 
I have finally got round to fitting my seats. I’m not going to use the heated seats on either of them, and just want the drivers electric adjustment to work. To all me to move it back and forwards for access to the bolts for fixing it down, I’ve temporarily connected the wires you can see in the below photo and connected straight to the battery. But this got me thinking, why can’t I just do this permanently with an in line fuse ?? Any thoughts on the pros and cons of this set up.
 

Attachments

  • IMG_2746.jpeg
    IMG_2746.jpeg
    516.9 KB · Views: 52
But this got me thinking, why can’t I just do this permanently with an in line fuse ?? Any thoughts on the pros and cons of this set up.

Because the Mazda switches are not rated for constant hard 12v switching whilst powering a mid-power/current draw to motor. They are designed to operate 1. with correct sized fuse, and 2. 4pin relay per motor.

Feel free to wire directly but chances are the switches will fail go to constant short and fire up from excess current draw. But hey, it's your arse that's sat on the seat... :eek:


1685898972621.png
 
Because the Mazda switches are not rated for constant hard 12v switching whilst powering a mid-power/current draw to motor. They are designed to operate 1. with correct sized fuse, and 2. 4pin relay per motor.

Feel free to wire directly but chances are the switches will fail go to constant short and fire up from excess current draw. But hey, it's your arse that's sat on the seat... :eek:


View attachment 289861
🤣🤣🤣
 
Because the Mazda switches are not rated for constant hard 12v switching whilst powering a mid-power/current draw to motor. They are designed to operate 1. with correct sized fuse, and 2. 4pin relay per motor.

Feel free to wire directly but chances are the switches will fail go to constant short and fire up from excess current draw. But hey, it's your arse that's sat on the seat... :eek:


View attachment 289861
Ok. I’ve got relays in my electrical drawer in the garage. So where is the best place to mount one, and can you give me the rundown on the wiring for me for the drivers seat adjustment only, for a thicko electrical person. Including what size of cable 😁
 
Back
Top