130 dcpu rebuild

This site contains affiliate links for which LandyZone may be compensated if you make a purchase.
Not to much progress lately as works been mad and other things taking my stair time now weathers nice
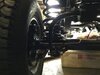
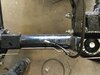
But managed to get axils rebuilt , new brakes all round Oem callipers with performance discs , new swivels Al bearings new , difs rebuilt with Ashcroft lsd’s new swivel balls new drive flanges and stainless brackets for disc guards
Axils were blasted galvernized then painted with 2k paint
I have been questioned why galve but they were quite bad for rust and galve costs me next to nothing as send tonnes for my day job , also means paint job doesn’t need to be quite as good
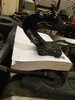
Painted new callipers as well as old ones were terrible for rust

paint chassis is next job when I have a spare day , had it galvernized but road salt eats galve fast so every bit of extra protection helps
321323F0-BA00-4923-A1DD-3DAB323CD3C9.jpeg
96BA3F70-7B19-4B1F-A006-AD3BCE3A958B.jpeg
F8BDA063-FF24-4624-98F5-60BF0559F74F.jpeg
 
Moved on a bit got axils back in place. Tank back in and a new tow bar on
Was struggling with land rover tow bar to keep bolts tight and finished welding stays to tow bar at rear cross member end as just would not stay tight ,why they need slotted holes is beyond me , also had bolts into the ball come lose so got a 4 bolt type this time to try
24B144B6-3B94-44D4-9F95-AF0E4C4ACCA4.jpeg
B8BB84C7-0D88-4A56-84D0-4762FD1DBB2B.jpeg
B54D94BD-0512-4A67-B331-2169FE0A6988.jpeg
B4CF38C7-BF25-4BBC-AC6F-D3316A275D20.jpeg

60775F21-D36C-4ACD-9106-AA100398CD48.jpeg

B12DF068-3B42-4086-832D-041F10AAE7FC.jpeg

Started on engine , exhaust manifold had done the mandatory and sheared 5 off got lucky with one and screwed out with pliers but rest took a bit more skill , build up with tig welder down the hole until it’s long enough to weld a nut on
I get a few jobs like this from local garages on turbos etc have a ne’er 100% success rate think the heat from welding helps
73267E03-6079-447F-BC25-24EDA6EE8858.jpeg
9BBE31DA-125C-4243-872F-CD565D8BA3A5.jpeg
And the offending studs
3C59B1D8-78EE-49D0-9E08-07F7ECC49778.jpeg
and the stud removal tool
1DF31D0F-7CF0-4C3A-AA83-1D7CB0D49870.jpeg
 

Attachments

  • E72A8125-6006-42B9-A4E6-651502C72037.jpeg
    E72A8125-6006-42B9-A4E6-651502C72037.jpeg
    329.5 KB · Views: 141
  • 41135D41-DE3E-424A-BD97-740ED69B760B.jpeg
    41135D41-DE3E-424A-BD97-740ED69B760B.jpeg
    275.6 KB · Views: 139
  • 1238FEE8-289C-49A1-8EA5-5115E7BD4443.jpeg
    1238FEE8-289C-49A1-8EA5-5115E7BD4443.jpeg
    275.6 KB · Views: 169
@Cps can I just ask why is it so important to stop the galv getting on the mating faces? I would of thought it would be fine. Is it because the galv can chip or is a rougher finish or something?
 
@Cps can I just ask why is it so important to stop the galv getting on the mating faces? I would of thought it would be fine. Is it because the galv can chip or is a rougher finish or something?
2 reasons
1st with it being axils need to keep mating surfaces true as are a machined face
2nd in high load situations galve is soft and can cause a connection to come lose if its under constant vibration , learnt this with trailers if wheel rims are galve studs need checking every time you use if for first few times as keep working lose until they have shaped the galve to the correct shape as galve is never even , that or re machine the mating surfaces to ensure good contact

Ah, makes sense! Cheers! :)
 
Moved on a bit got axils back in place. Tank back in and a new tow bar on
Was struggling with land rover tow bar to keep bolts tight and finished welding stays to tow bar at rear cross member end as just would not stay tight ,why they need slotted holes is beyond me , also had bolts into the ball come lose so got a 4 bolt type this time to try View attachment 214357View attachment 214358 View attachment 214359 View attachment 214361
View attachment 214369
View attachment 214371
Started on engine , exhaust manifold had done the mandatory and sheared 5 off got lucky with one and screwed out with pliers but rest took a bit more skill , build up with tig welder down the hole until it’s long enough to weld a nut on
I get a few jobs like this from local garages on turbos etc have a ne’er 100% success rate think the heat from welding helps View attachment 214364View attachment 214365 And the offending studs View attachment 214366 and the stud removal tool
View attachment 214372

What do you think of the small Jasic TIG? I was looking at getting a 200A digital, but haven’t seen much in terms of reviews for them. Would you recommend yours?
 
What do you think of the small Jasic TIG? I was looking at getting a 200A digital, but haven’t seen much in terms of reviews for them. Would you recommend yours?
normally we buy all high end ewm or miller but had a contract a a food plant for 4 lads so needed another 110v as only had 3 and couldn't justify the 2k for a ewm , the jasic is superb and been flawless that one is the 110/240 v one and was around £600 we also have a 240 only one which was a lot less its also been flawless, they light up at very low amps and a very smooth almost as good as the miller dynasty
only thing we did was bought a nicer torch for it as we run ck torches on most sets ( cost half as much as the dam set )
imported by by Wilkinson star whos after sales is excellent

Thanks very much for the reply, I appreciate it.

It makes me more likely to get one similar to yours now. The one I was looking at was just over £1K, but not sure I would need 200A anyway.
 
Bit of brake pipe work this weekend
30E85B3E-80B4-4D71-9555-119FF0CA2A88.jpeg
pic of pipe straightener I made a while ago , pet hate is wiggly brake and fuel lines
7B82FFC9-C65E-4B65-BF42-ECDFEA167E3A.jpeg
Pic of old and new rear nearp side , much easier when pipe you start with is straight and not all curly
E64D4251-0A00-4B43-9F60-FCF47064B7D7.jpeg
F51C396A-43C8-4023-85AC-A6D65FD0BCA1.jpeg
Turned out quite nice fit , off side was bit more guess work as one I had to copy was local garage made as was to busy to do it myself when it broke , looked like they don’t have a straighter or a bender of any sorts
Engine work next before I drop it back in , mandatory oil leaks to try cure
 

Attachments

  • 49AB5EE5-8661-455E-B4AA-09C5037F6375.jpeg
    49AB5EE5-8661-455E-B4AA-09C5037F6375.jpeg
    283.5 KB · Views: 185
  • 18A26277-DB24-4397-90DA-FAB1D18323B1.jpeg
    18A26277-DB24-4397-90DA-FAB1D18323B1.jpeg
    330.1 KB · Views: 163
Starteđ the exhaust last week or two when ive had abit of time hear abd there
All 70 mm ss with 3inch mid and back box
Started with a box of mandrel bends and a bit î head scratching
I did have the origanal to go off as a pattern though
20200929_213013.jpg
20200929_213021.jpg
20200929_213047.jpg
20200929_213106.jpg
all fit quite well. I wasnt brave enuf to weld it all befor a trial fit althogh would have been ok
Still git from the small back box to the rear x member to do but thought i would get fron and mid bits welded an on first
 
how can you tell :) yes new phone but also some pics with ipad as well
winter's is on its way so progress will pick up again now only taken 3 years to get this far
It's surprising how long it takes. I thought I'd get mine done in a year, but it took 2 yrs 3 months. All done on the drive at weekends and summer evenings. All dependent on the weather, so rainy weekends were a nightmare. I wrapped it up over the two winters as it was far too cold to work on it. First winter I tried thermal German tank operative all in one suite and ski gloves with the finger tips cut out, but I still couldn't feel if I was holding a nut and bolt or not :eek: Give driveway winter working up after that :)
It'll be helpful if your job gives you a little more time over the winter! Plus, you're on the shiny side of the rebuild now which is a great stage to be at. :)
 
day job wont give me any more spare time winter or summer but weekend tend to be more free as er in doors dosent want to drag me off places so much in winter
i know what you mean about working outside ive done it for 33 years as run an engineering and welding business, cold has never bothered be to much that said im in the uk and hardly gets to freezing in daylight last few years
I had an indoor job, so I've probably gone soft. :D Even though I do live in the North :rolleyes:
 
Bit more exhaust work
20201003_133133.jpg
20201003_130929.jpg
20201003_130939.jpg
usd this to do the expanshon for the joints
20201003_131020.jpg
20201003_131003.jpg
its a bit slow and needs a good impact gun to make it work but seems ok
Silencer was a bit harder tp weld as i could only get 3inch and couldent get the 70 mn tube to expand thst far so eaxpanded it to fit inside of 3inch tube then welded over the lot
 
Managed to get a bit done today
Bulkhead into primer and b posts
Even got the chuckel brothers on the job . There 16 in a few weeks and are starting to wory it wont be done for when there 17 as they think they might get to drive it . Dream on boys
20201212_111401.jpg
child labour brought in for the sanding work
Might get bulkhead into colour nrxt day or two with a bit of luck .
Although im a bit nervious as havent painted anything car related for 20 years and eyes arent what used to be .
 
Back
Top