Scott's Series 2A

This site contains affiliate links for which LandyZone may be compensated if you make a purchase.
I've been keeping busy with low-cost jobs while I %&$£ about with different alternators, lengths of fan belt and tension brackets.. $%^£!@! :mad:(thanks for the help all.. I'm getting there)

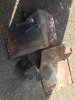
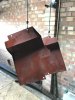
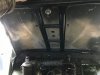
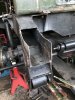
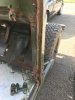
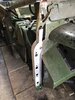
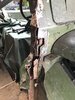
I was pressure washing the wings and other bits in the garden and the underside of the bonnet came up so nicely and showed all the original overspray that I decided I could touch up the black paint on the steel frame of it too.

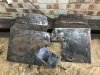
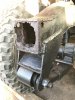
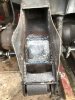
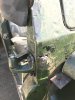
I've included some original shots (after the cup brush) to show the green overspray originally went as far as covering the two horizontal parts of the frame, including the small bracket the spring-latch is threaded into. I haven't re-produced that when I've painted the steel frame, but if and when I spray the bonnet as part of a re-spray in the future I will!

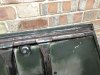
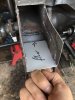
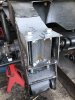
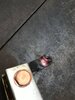
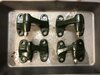
I also took the spring latch apart and degreased that and straightened it out so the bonnet latches nice and tight now too.

I've also cleaned up and am painting the mudshields but I'll just show those when the wings eventually go back on. They looked such a mess to start with I wondered why I was bothering but they're all sound if not a bit corroded and are looking tidy now the green is going on. I also like straightening bent **** out with a hammer. Don't know why. :D

Next job is my other dumb iron rebuild. I THINK I've got a quarter tank of gas which should be more than enough. Famous last words. :D

Hope you're all safe and keeping busy.
 

Attachments

  • IMG_1362.jpg
    IMG_1362.jpg
    588.7 KB · Views: 147
  • IMG_1363.jpg
    IMG_1363.jpg
    415 KB · Views: 153
  • IMG_1365.jpg
    IMG_1365.jpg
    263.1 KB · Views: 157
  • IMG_1373.jpg
    IMG_1373.jpg
    348.8 KB · Views: 145
  • IMG_1380.jpg
    IMG_1380.jpg
    162.4 KB · Views: 161
This week I are mostly been finishing my other dumb iron. I'd write more but I've had a few beers with dinner.. ;)
 

Attachments

  • IMG_1414.jpg
    IMG_1414.jpg
    346.8 KB · Views: 170
  • IMG_1432.jpg
    IMG_1432.jpg
    294.7 KB · Views: 159
  • IMG_1437.jpg
    IMG_1437.jpg
    213.9 KB · Views: 146
  • IMG_1441.jpg
    IMG_1441.jpg
    340.3 KB · Views: 154
  • IMG_1443.jpg
    IMG_1443.jpg
    338 KB · Views: 144
  • IMG_1447.jpg
    IMG_1447.jpg
    246.6 KB · Views: 150
  • IMG_1448.jpg
    IMG_1448.jpg
    228.6 KB · Views: 174
That's a lovely job! I wish I had opened mine up like that when I did them. I chickened out and did smaller areas. Yours is definitely better.

Cheers Steve. It's certainly better than it was. :) I don't know what the original holes on the side were for so I haven't drilled those.. any idea?
 
Second that nice job, was the stiffener in on original too?
I thought the holes might have Been for jate rings but it looks on mine no clear hole when bumper on
Perhaps used in manufacture for slinging the chassis or dipping
 
The original stiffeners were tubes that the bumper bolts went though. You could just make it out from the remains inside..

The other dumb iron had those holes too and I replaced one of them like I have drain holes after chassis repairs but then thought "these aren't drain holes, what are they why am I doing this?.." and stopped. So now I have just the one hole on the N/S to confuse the next owner- likely my son in twenty years will wonder why it's there. :D
 
Started on the next job at lunchtime. O/S door pillar and foot is completely shot, plus bulkhead corner around top hinge. Never done anything on the bulkhead so far but I'll just take it one step at a time I'm sure I'll enjoy it once I'm into it and learning something. o_O worst case scenario I save up for a year and it gets a new bulkead. :p I've got the new pillar, foot, and corner repair piece from bearmach this morning. The footwell is largely ok except on the side there where it meets the pillar. I'll need to sort something out to replace that side if I can. Unknown territory for now I'm past the chassis. If anyone who knows better looks at the pictures and what I'm saying my plan is and thinks I'll be lucky please speak up! :)
 

Attachments

  • IMG_1465.jpg
    IMG_1465.jpg
    410.3 KB · Views: 176
  • IMG_1466.jpg
    IMG_1466.jpg
    314.2 KB · Views: 154
Started on the next job at lunchtime. O/S door pillar and foot is completely shot, plus bulkhead corner around top hinge. Never done anything on the bulkhead so far but I'll just take it one step at a time I'm sure I'll enjoy it once I'm into it and learning something. o_O worst case scenario I save up for a year and it gets a new bulkead. :p I've got the new pillar, foot, and corner repair piece from bearmach this morning. The footwell is largely ok except on the side there where it meets the pillar. I'll need to sort something out to replace that side if I can. Unknown territory for now I'm past the chassis. If anyone who knows better looks at the pictures and what I'm saying my plan is and thinks I'll be lucky please speak up! :)
I'm watching with interest. This is my next job and to be honest i'm getting the jitters about it. I'm going to loosely reassemble everything (roof, windscreen, doors, seatbox, floors the lot) and keep jiggling stuff till it all fits then weld it up quick before it knows whats happened. It will be good to see how a skilled bloke goes about it though. Good luck mate.
 
I've started on my driver's door pillar, foot, and bulkhead corner replacement now. I've cut out the rot and found the internal stiffener by the upper door hinge has long since rotted away. So I need to make something up to put some strength back in there before welding the new pillar and corner piece in. I've made up some new captive nut plates to replace the old ones and am thinking about how best to secure them in the new pillar so they can move a bit as intended but not fall down.

This is all a big job for me compared to what little welding and fab I've done so far but I'm enjoying it. As I couldn't find anything start to finish for it on youtube I thought I'd have a go at making something myself as I go and part 1 is uploading to my channel now.
 

Attachments

  • IMG_1694.jpg
    IMG_1694.jpg
    343 KB · Views: 139
  • IMG_1624.jpg
    IMG_1624.jpg
    329.1 KB · Views: 155
  • IMG_1677.jpg
    IMG_1677.jpg
    300.6 KB · Views: 153
Tidied up my door hinges for some light relief. Also continuing to eyeball the new door pillar and check everything 8 times before I start tacking in. :D
 

Attachments

  • IMG_1743.jpg
    IMG_1743.jpg
    358.5 KB · Views: 129
  • aligningpillar.jpg
    aligningpillar.jpg
    249.3 KB · Views: 142
Tidied up my door hinges for some light relief. Also continuing to eyeball the new door pillar and check everything 8 times before I start tacking in. :D
Glad to see it's not only me and @joe_m chucking cash and knuckle skin at old 2a's:p
I replaced footwells, vent panels, door pillars and top corners on my bulkhead and I'm now having trouble getting the doors back on as the hinge holes don't line up properly :oops: Either the holes are out on the panels or on the new doors I've bought.... I'm not using captive nuts welded on the back of the pillars though so that's making adjustments easier.

I hear you. As I've never done this before I'm proceeding carefully and offering everything up over and over as I go. It'll probably all seem fine until it's welded and then it won't fit. :D Good luck with getting things lined up!
 
Glad to see it's not only me and @joe_m chucking cash and knuckle skin at old 2a's:p
I replaced footwells, vent panels, door pillars and top corners on my bulkhead and I'm now having trouble getting the doors back on as the hinge holes don't line up properly :oops: Either the holes are out on the panels or on the new doors I've bought.... I'm not using captive nuts welded on the back of the pillars though so that's making adjustments easier.

Now then lads, all looking good. Rob, I found I had the same problems. I think the sh*tpart pillar hinge holes are out. Hence why I was doing so much head scratching before I got started on it. I ended up enlarging the top hinge holes with the die grinder to aid fitment. It’s amazing what 1-2mm more movement at the hinge gives you over the door.
 
Just work to the rear tub and your measurements and you’ll be fine. I used a string line tied somewhere to the back of the Landy, then pulled it taught along the top of the curve (that runs the length) of the rear tub. This really helped getting the hight of the new pillar.
 
What do you fellas consider to be a good door gap? I am at the same stage at the moment and had 5mm front and rear or as near as I can get, then see how it's looking top and bottom. Or is it just a case of getting it to look nice by eye?
 
Back
Top