Hi, I am a new member of the forum and about 3 months ago I bought a 1976 series 3 in marine blue with a sand canvas hood.I have had other 'classic cars' but I have always liked Land Rovers and am over the moon with this one.The car is generally in very good condition and it has a 200di engine fitted.I have changed all of the obvious fluids axles, transfer box etc and now I have moved on the the shocks as they were looking very tired.The first shock to come off was the rear drivers side.The lower connection was a threaded bolt with an allen key hole rather than a normal bolt head or split pin.This bolt head has sheared off which means I need to drill out the shank which remains in position.Can anyone tell me the part number of the sheared bolt please? and where I can pick four up? I have an idea the others may do the same, if not I think i'll replace them any way, thanks, Dean.
You are using an out of date browser. It may not display this or other websites correctly.
You should upgrade or use an alternative browser.
You should upgrade or use an alternative browser.
Series 3 rear shock fixing
- Thread starter DeanDS
- Start date
This site contains affiliate links for which LandyZone may be compensated if you make a purchase.
swisstoe
Well-Known Member
- Posts
- 655
- Location
- Lancashire
The lower shock mounts on a series vehicle are held in place with a split pin...
swisstoe
Well-Known Member
- Posts
- 655
- Location
- Lancashire
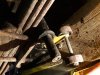
That is not standard, someone has drilled the end and probably used a big washer to hold the shocks in place.
The correct fixing is with a large washer and a split pin that goes through that solid shaft near to the end...
The correct fixing is with a large washer and a split pin that goes through that solid shaft near to the end...
Clean up the shaft with a wire brush and see if you can find the original split pin holes.... Chances are the pins still in them if so drill right through the whole thing and replace it.
It's not always the easiest thing to do if you have new shock bushes and takes a bit of fiddling about till you get the knack.
It's not always the easiest thing to do if you have new shock bushes and takes a bit of fiddling about till you get the knack.
Hi, yes, that was my thought too.Presumably the pin went from top to bottom on the shaft? so should (in theory) be fairly easy to locate.I can't see why the pins weren't used in the first place as the tapping etc must have taken time on all four wheels.
I'll get back to it over the next few days and let you know how I get on, thanks
I'll get back to it over the next few days and let you know how I get on, thanks
tottot
Well-Known Member
- Posts
- 7,452
- Location
- west wales coast
The pin's went through front to back. It is possible someone has sleeved a badly worn pin [ common problem ] and then welded a small bolt on the end or drilled and tapped the pin as a retainer.
My fix was to remove the plate get it on the bench and cut away all of the old pin and replace [ weld on ] with a large bolt the right size to fit the bush. With a nylock nut it is easy to fit the shock/damper and adjust to take in any wear in the bush and keep the MOT guy happy.
My fix was to remove the plate get it on the bench and cut away all of the old pin and replace [ weld on ] with a large bolt the right size to fit the bush. With a nylock nut it is easy to fit the shock/damper and adjust to take in any wear in the bush and keep the MOT guy happy.
The bottom plate and pin for the shocker are done for and need replacement. All the parts numbers are in the workshop parts manual. The plate and pin are so corroded that there’s a risk of failure. If the pin failed it’s not catastrophic but if the holes where the U clamps are and they allow the clamps to slip through it’ll result in a potential crash when driving cos the whole axle will collapse. The bottom plate if renewed will last for years but the shocks corrode and depending on use usually last about 3-5 years maximum. When you’re changing the shocker cut the corroded split line with a hacksaw, smooth the pin with a file and the shocker will come off easily. The top bolt in the chassis should unscrew easily (reuse). Once the old shocker is off drill out the split pin with a 6mm drill. Getting the new shocker on is easy at the top but a total bastard at the bottom. Ideally you need a crows foot tool to compress the rubber bush and new washer far enough in to get the new split pin in. I speak from bitter experience with this last part- right tool for the job! If you don’t have a parts list try Craddocks web site.
Ideally you need a crows foot tool to compress the rubber bush and new washer far enough in to get the new split pin in. I speak from bitter experience with this last part- right tool for the job! If you don’t have a parts list try Craddocks web site.
I use a “custom” spacial tool. I cut two slots out of a large cheap socket and then use this over the end of the pin against the washer and compress it all with a g-clamp. The slot cut on each side allow for the split pin to be put in place.
Last edited:
The common fix is to cut the pin arrangement off and weld a bolt of correct diameter with its head cut off in its place which allows you to compress the bushes with the nut.
Paddocks do not have any stock of new PA Blanchard do but quite expensive.
https://pablanchard.co.uk/index.php?route=checkout/cart
Paddocks do not have any stock of new PA Blanchard do but quite expensive.
https://pablanchard.co.uk/index.php?route=checkout/cart
TheMegaMan
Well-Known Member
- Posts
- 516
- Location
- Cambridge
I use a “custom” spacial tool. I cut two slots out of a large cheap socket and then use this over the end of the pin against the washer and compress it all with a g-clamp. The slot cut on each side allow for the split pin to be put in place.
A special tool would have been luxury! I did all mine without any special tools...
Press the washer back over one end of the hole, just enough to get the longer tail of the split pit into it, then twist the pin around through 180 degrees. It acts as a cam and pushes the washer further back, enough to allow the whole pin to be pushed into the hole. Tap it all the way through and push the washer back again at the other side just enough to allow the longer tail of the pin to emerge. Then twist the pin again, which will again act as a cam and push the washer right back allowing the whole pin to be tapped through. The twist one more time through 90 degrees to allow the pin tails to be spread.
It was pretty easy and quick when you get the technique.
Adam
Bu
you’ve still got to get the compression of the bush to achieve that . A crows foot is a bespoke tool that does the job in minutes.You can do that or just put a punch through the hole first and knock it back out with the split pin.......
LOL.. Dextrous use of a hammer achieves that.Bu
you’ve still got to get the compression of the bush to achieve that . A crows foot is a bespoke tool that does the job in minutes.
minecab
Active Member
- Posts
- 156
- Location
- milton keynes
I use a valve spring compressor
Land Raver
Well-Known Member
- Posts
- 2,015
- Location
- In the dog house
The corrosion doesn’t look that bad to me- some bed wetting going on in here ")
I replaced all mine and it was one of the more straight forward jobs. Compressing the bushes is fairly straight forward by just using a G clamp or valve spring compressor. I also gave the bushes a coating of red rubber grease to hopefully prolong their life.
I replaced all mine and it was one of the more straight forward jobs. Compressing the bushes is fairly straight forward by just using a G clamp or valve spring compressor. I also gave the bushes a coating of red rubber grease to hopefully prolong their life.
Good morning all, I removed the spring plate and it was very solid.It just needs a wire brush and a re-paint.I have new U-bolts on the way.I am going to either drill out the sheared bolt shaft or, if unsuccessful, grind off and replace
the small pipe section and replace it with a solid pipe and drilled hole for a split pin.The other three lower bolts on the other three corners came out with a little patience, WD40 and heat.The main problem with the allen key set up is that
because the hole for the key is so shallow the socket just wants to twist out as soon as you try to put any force on the ratchet/bar.Ideally the bolt would have had a conventional head on it and a spanner
would have done the trick as it did on the top bolts, cheers, Dean