frog hopper
Well-Known Member
- Posts
- 4,708
- Location
- france
Fair play to you for even attempting that, I'm still plucking up the courage to make a start on making and fitting an uprated headlight loom on both my RRC and 200Tdi 90, a la M H Man.

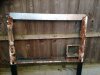
I gave my swing away wheel carrier to an LZ member after my rebuild. Didn't want the spare banging my new door to bits. Haven't had a puncture ever in the Landy....12 years+ Going to fit a standard wheel carrier, make a false wheel out of ply or something and put a cover on it.I may have said in the past that I actually want a top / bottom opening tailgate setup on this one day (think Range Rover) but Parts supply and cost have put that on hold for a while. Tired of wiring for a bit, I have ripped the crusty bottom skin section off the original rear door to inspect the frame. I was just going to slap a coat of paint on it but now it's going to hang around I thought I'd do a better job.
Skin removed
View attachment 141712
Few holes in the bottom
View attachment 141713
Cracks from slamming shut
View attachment 141714
That bracket almost fell off
View attachment 141715
This was also not attached any more, such was the rot.
View attachment 141716
Ive been at it with the grinder, qnd got the bottom section tacked in, more pics to come tomorrow.
Also realised that I don't want my spare on this door as it's a h/d / wolf steel and weighs a fair bit, looks like I'll have to make / buy a separate carrier for that too.......
She's happy enough about it. She only has about a 14 mile journey to work. If she gets a puncture, it'll be easy enough to get it off the roadThat's it - your good lady will be ringing you tomorrow, 'Al, I've got a puncture, where's the spare?'
If I make one I'll have it go across the door and latch on the tub, so it doesn't touch the door at all, futureproof for if I ever fit a drop down gate.
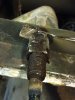
Removal of the wiper motor, no amount of penetrating oil would have shifted this;
View attachment 141766
Bottom tack on
View attachment 141767
View attachment 141768
And this came in the post today, bought on eBay for 99p plus postage. Brand new but about 25 years old judging by the car (Passat?) on the box.
View attachment 141769
View attachment 141770
Looks good quality but will research it before fitting.
she can then give me a bell and I can stick the spare in the back of the Mondeo. If we go further away, it'll just in the back. Just in case. I fitted a Hawk one. Works fine and was cheap, but not 99p Welcome To LandyZone, the Land Rover Forums!
Here at LandyZone we have plenty of very knowledgable members so if you have any questions about your Land Rover or just want to connect with other Landy owners, you're in the right place.
Registering is free and easy just click here, we hope to see you on the forums soon!