Sandy Landy will be rebuilt, just to make her new again.

This site contains affiliate links for which LandyZone may be compensated if you make a purchase.
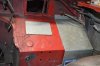
Hi Mates and Dates, hope you guys doing well. I have been neglecting my landy a bit so got cracking on her again.
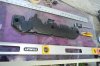
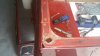
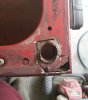
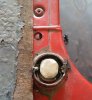
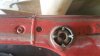
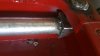
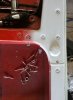
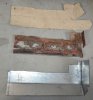
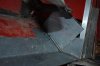
My Landy has minimal rust, but where it did rust badly was on the floor where the floor panels sit. The previous owner used to surf so I guess salt water lodged there and rusted that part out badly.

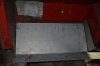
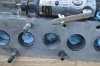
His amazing body work guy used paper thin ready made panels to cover the rust up.
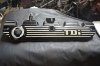
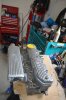
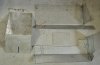
I ripped all out, cut the rust out, tack welded the rusted parts to get angles etc and to make templates.

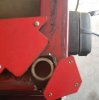
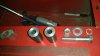
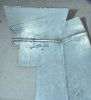
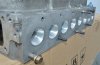
I tediously made up templates and have all the very well fitted and strong 2mm thick galvanized replacement panels to go in.
 

Attachments

  • 2mm thick panels3.jpg
    2mm thick panels3.jpg
    117.6 KB · Views: 90
  • 2mm thick panels2.jpg
    2mm thick panels2.jpg
    112.1 KB · Views: 123
  • 2mm thick panels.jpg
    2mm thick panels.jpg
    91.5 KB · Views: 95
  • 2mm panel fit3.jpg
    2mm panel fit3.jpg
    82.5 KB · Views: 92
  • 2mm panel fit2.jpg
    2mm panel fit2.jpg
    68.8 KB · Views: 75
  • 2mm panel fit.jpg
    2mm panel fit.jpg
    99.8 KB · Views: 102
Last edited:
I have rebored the block to 40 thou and rebuilt it with all new pistons, rings, all bearings etc.

I have redone the head completely, skimmed, new valve seals, guides, grounded and seated valves..complete rebuild.

Started to port the head, enhance ramp angles and polish ports needing it. Have to use carbide cutters and be careful when doing this.. Very time consuming to do it perfectly well..lots of continuous measurements as you port and ramp.
Carbide RPM and cutting pressure has to be good and use to cutting fluid a must

I have ported the head to match the gasket, there as a 2-3mm lip all the way around which would create a ridge and disrupt the charge air from the turbo. Cant believe it was as much as 3 mil in many areas.
.


.
 

Attachments

  • before and after..jpg
    before and after..jpg
    52.9 KB · Views: 90
  • Porting and polish.jpg
    Porting and polish.jpg
    98.1 KB · Views: 101
  • Porting and polish2.jpg
    Porting and polish2.jpg
    63.2 KB · Views: 96
  • Ported and posihed front.jpg
    Ported and posihed front.jpg
    39 KB · Views: 97
  • Ported and posihed side.jpg
    Ported and posihed side.jpg
    68.9 KB · Views: 100
Last edited:
Ported my intake manifold to exactly line up and mate the ports on the head with no ridges.
After it was all done, I used my inspection camera to go down inside the ports to look at how well they lined up. I am happy that they are all dead on with no restrictive ridges on the head....all the hard and time consuming work paid off.
.
 

Attachments

  • Perfectly mated.jpg
    Perfectly mated.jpg
    78.7 KB · Views: 90
  • Perfectly mated2.jpg
    Perfectly mated2.jpg
    83.6 KB · Views: 77
  • Intake Ported2.jpg
    Intake Ported2.jpg
    43.4 KB · Views: 100
  • Intake mani half ported.jpg
    Intake mani half ported.jpg
    56.4 KB · Views: 89
  • Intake Ported.jpg
    Intake Ported.jpg
    51.4 KB · Views: 116
  • Intake Ported3.jpg
    Intake Ported3.jpg
    30.4 KB · Views: 109
Last edited:
Valve cover and intake cleaned and ready, primed, masked and two sequences of painting to get what I wanted :)
.
Intake and valve cover painted.jpg
 

Attachments

  • Covers small.jpg
    Covers small.jpg
    88.6 KB · Views: 113
  • Covers small1.jpg
    Covers small1.jpg
    34.2 KB · Views: 111
  • Covers small2.jpg
    Covers small2.jpg
    45.4 KB · Views: 89
Last edited:
No idea what you have done to the head but sounds very good;). Would it not been easier to replace the complete foot plate instead of all that work cutting in bits.? Keep it up though.

Mick, what I did was called porting and gasket matching, which means opening up the intake and exhaust ports to the size of the gasket. With a new gasket you can measure how much of a lip or protrusion exists between the dia or the gasket and the ports on the head and on the intake and exhaust ports.

On this engine, not only were the intake ports about 2 to 3 mm smaller and offset with reference to 3 gaskets, but the ports also did not line up between the intake and exhaust to the head.
The circumferential 2 -3 mm lips or ridges hinders flow of charge air from the turbo and exhaust gases out thus reducing power and efficiency. Picture having water from a hose going into a pipe with a 3 mm high ridge or lip, as you go higher with water pressure, the more will water hit the lip spray upwards or towards you depending on pressure. You want air to flow freely into and exhaust gases out of engines easily, with boosted engines its even more critical for better performance.

I will be installing a VVT on this engine pushing more boost too, so better flow is a must for me. Hope you understand a bit better now what I did to the head and manifolds.

Cheers.

.
 
Its been almost 3 years since I bought this Landy and working on it off and on. I ordered a lot of stuff for it both from the UK and US so getting back to it almost full time now. I have decided to pull off the top and windows, found some rust spots which I repaired using heavier gauge material and machines some of the parts.

Since I had all of this off, I modified the rear bulkhead so that the seats can recline a bit more and I made up a nice bulk head brace..it feels so good now. I am waiting for the guys to head over to sand the roof, prep and paint it. I have to see how I can chisel the old putty in the roof drains, its all cracked and useless now, have to replace and spray paint.
Some of the work done, sand blasted pedal boxes, gas tank filler, mud guard brackets, steering components, had steering box rebuilt, modified quite a bit of stuff too.

.
20170928_132406.jpg
 

Attachments

  • 20170928_135201.jpg
    20170928_135201.jpg
    39.8 KB · Views: 76
  • 20171008_135726.jpg
    20171008_135726.jpg
    42.4 KB · Views: 95
  • 20171012_093134.jpg
    20171012_093134.jpg
    58 KB · Views: 153
  • 20171012_100825.jpg
    20171012_100825.jpg
    45.2 KB · Views: 91
  • 20171012_145013.jpg
    20171012_145013.jpg
    61.2 KB · Views: 103
  • 20171013_095953.jpg
    20171013_095953.jpg
    31.8 KB · Views: 137
Here is the bulk head mod I did. Right behind the support for the widow frame was another hole I am guessing for the single cab cap option. I used this to fabricate a bulk head support since I cut part of the rear bulkhead for more seating room. The rusting looking stuff on the left is my welding spark guard..a dust pan lol and the rusty looking spots on the body is actually the window frame glue. I have to take more pics of the finished job.
.
 

Attachments

  • 20171016_140909.jpg
    20171016_140909.jpg
    40.4 KB · Views: 116
  • 20171017_112053.jpg
    20171017_112053.jpg
    76.2 KB · Views: 138
  • 20171017_122707.jpg
    20171017_122707.jpg
    43.6 KB · Views: 134
  • 20171018_114350.jpg
    20171018_114350.jpg
    38.1 KB · Views: 112
  • 20171018_114400.jpg
    20171018_114400.jpg
    31.8 KB · Views: 105
  • 20171019_152703.jpg
    20171019_152703.jpg
    39.2 KB · Views: 82
  • 20171019_153753.jpg
    20171019_153753.jpg
    48.1 KB · Views: 128
Serviced the ignition switch. I used red Locktite on the ignition clamp bolts.

.
DSC_5289.jpg
 

Attachments

  • DSC_5292.jpg
    DSC_5292.jpg
    72.1 KB · Views: 85
  • DSC_5296.jpg
    DSC_5296.jpg
    66.9 KB · Views: 92
  • DSC_5299.jpg
    DSC_5299.jpg
    48.7 KB · Views: 93
  • 300TDI 57SA Ignition Dia.png
    300TDI 57SA Ignition Dia.png
    15 KB · Views: 426
Posted this is the wrong thread, have to copy and paste then delete the other posts :rolleyes:

Well mates, the time flies by so fast, Jan 20th 2019 will make it 4 years since I bought this Landy, drove it to my garage to be rebuilt. After spending tens of thousands here along of importing parts and accessories from the UK, I have done a bit since then, this includes tons of accessories, wheels, electronics etc. I should have been updating this thread all along.

I have rebuilt the engine entirely, bored it it to 40 thou, ported and polished the head along with other modifications.
.
My block small.jpg
Head small.jpg
head gasket sealant small.jpg
My piston protrusion measurement small.jpg
Engine small.jpg
 
Last edited:
I decided to use a MB variable vein turbo. This meant that I had to machine an adapter to convert from a T2 to the the GT2256V type. This took quite a bit of time and test fitting to get it right, ie., weeks.

.
t2 small2.jpg
gt2256 flange small.jpg
adaptor small.jpg
Adaptor1.jpg
 
I made my own turbo gaskets from 1.8mm copper sheet. I will be running higher than stock boost so I think that the greater surface area, thickness and the thermal tolerance of the copper gaskets should hold up better than the OEM ones.

.
2256v gasket small.jpg
My copper Gaskets small.jpg
My copper Gaskets smal 2.jpg
 
I sand blasted the turbo manifold, primed and painted it with 2000 deg F rating. I then wrapped the manifold with fiber glass turbo wrap and then sealed that with the high temperature sealant meant for it. I also drilled and tapped the manifold for two references for 2 EGT gauges. The center one is a good quality Innovate EGT gauge and the I will also install a cheaper digital one for reference and comparison.

.
DSC_8848.jpg
DSC_8857.jpg

DSC_8866.jpg
DSC_8904.jpg
 
Took them to they tire shop, called ahead to make sure they have the right equipment so the tire mounting tool does not scratch the lips of my rims. Well the idiot did that part well, only to then damage ALL of them by slamming the balancing machine hub onto the rims. I was so pi$$ed, my bro had to sand and all of them all over again, this time it was tougher with the tires mounted.
.
damage3.jpg
resanded.jpg
repainted.jpg
 
Very nice. Enjoyed looking back through this

Very nice. Enjoyed looking back through this

Thanks Payydg, thats encouraging...certainly appreciated.
Your Avatar is striking, seems like it can tell a 1000 stories. Looks like a wild fire with your Landy looking strong and tough close by, very nice pic, hope the fire was not overly destructive.

Cheers Mate.
 
Back
Top