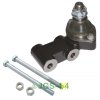
Rear A Frame Ball joint

This site contains affiliate links for which LandyZone may be compensated if you make a purchase.

No1Skelly

Member
Posts
42
Location
Canterbury
I know there are threads for this but I'm reasonable confident I can handle most of it. I've bought the kit so won't need to press in a new ball joint, and I'm sure I'll be able to drift/cut the old bolts out. My only concern is that I don't have a splitter. Will one be neccesary, or will the old lump hammer to the side of the mount suffice ?
 
Ball Joint.jpg
Ball Joint.jpg Ball Joint.jpg Ball Joint.jpg
 
Looks simple doesn't it, no splitter requirement but a big hammer, the nuts are torqued up high, so just remove the split pin then the big nut plus two nuts and bolts, maybe on a hoist but laying on your back with the vehicle on ramps or axle stands maybe not.
Mine had to be replaced just because the shroud had a split it.
 
Last edited:
I'm assuming by "splitter" you mean ball joint tool?
Should be fine without one if you're replacing the ball joint, breaking the taper (hammer on one side and hitting the otherside with another hammer) or just belting t'shite out of the old joint should work, it'll knurl the end of the ball joint though so it'll definitely need replacing ;)

Don't forget to copper grease the new bolts as well when you fit them so they don't corroded inside the bracket and all that.
 
Looks simple doesn't it, no splitter required just remove the split pin then the big nut plus two nuts and bolts, maybe on a hoist but laying on your back with the vehicle on ramps or axle stands maybe not.
Yeah. 'Looks' simple lol Steering ball joints come apart with just a smack with a lump hammer with another on the other side but as this is a bigger BJ I'd thought I didn't want to get into it without checking others' experience first. Doubt I'll do any more than jack the body up from the tow bar mount to take the pressure off the A frame tbh... There's enough room to swing a #1 tool under there ;-)
 
When I did mine i used 2 hammer - I whacked each side a couple of times alternating and it loosened it enough that when I belted the nut bit on the bottom it popped out.

Not a hard job just noisy lol
 
When you've took the nut off push the pin back in so the joint doesn't fly out when it frees. Make sure the axle cannot rotate.
Wheels will be on the ground, chocked at the front. I shall be laying in mud, as I don't have any hard standing, and cursing like an east end barrow boy ( as my grandmother used to say ) :)
 
Wheels will be on the ground, chocked at the front. I shall be laying in mud, as I don't have any hard standing, and cursing like an east end barrow boy ( as my grandmother used to say ) :)

In that case then you may as well check the bushings as well.
 
On my 110 belting the collar with a 2lb lump hammer wouldn't shift it. I had to cut the taper off using an angle grinder. On a salisbury axle the A-frame bracket can unbolt so i used a 20 tonne press to get the stub out.
 
Hammer worked for me.

Came apart easily . Was surprised how easy it was to change to a new "kit" like yours, except I got the adjustable & greaseable unit . ( I did not have a press handy to swap out the ball joint.)

Cheers
 
You're probably going to need a splitter sooner or later - there are so many steering joints. It will make things easier, and buying tools is always good! :)
Hmmmm... tools :) I only needed the #1 tool in the end. Easy peasy lemon squeezy. Unfortunately only one curse when I thumped my head on the chassis crawling out but otherwise a good job jobbed.
Thanks for the assist guys :)
 
Back
Top