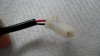
Got these last week, they are so cheap compared to the originals, and the way they are constructed harder to break (you get a brake and it will just by-pass it) they are carbon, but I don't get how it bridges the 2 gaps, I cant see anything that connects them??
You are using an out of date browser. It may not display this or other websites correctly.
You should upgrade or use an alternative browser.
You should upgrade or use an alternative browser.
After market heated seat replacements
- Thread starter Dopey
- Start date
This site contains affiliate links for which LandyZone may be compensated if you make a purchase.


biketeacherdave
Well-Known Member
- Posts
- 4,644
- Location
- south east london
What are you trying to bridge ??? You just need to connect that black and red lead up to the seats existing wires
biketeacherdave
Well-Known Member
- Posts
- 4,644
- Location
- south east london
I can't see what your getting at either repost the photo highlite the bit you mean
Last edited:
Pete The Biker
Active Member
- Posts
- 536
- Location
- Leicestershire
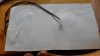
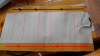
From looking at the pics, the electrickery flows in/out via the main wires, which run under the orange tapes in pic SAM_1517.jpg
The heating elements run between the main wires, and are either the straight lines or the honeycomb mesh pattern. So the honeycomb mesh sections don't need to connect to each other, just to the main wires under the orange tape.
Does that make sense?
Pete
The heating elements run between the main wires, and are either the straight lines or the honeycomb mesh pattern. So the honeycomb mesh sections don't need to connect to each other, just to the main wires under the orange tape.
Does that make sense?
Pete
Pete The Biker
Active Member
- Posts
- 536
- Location
- Leicestershire
biketeacherdave
Well-Known Member
- Posts
- 4,644
- Location
- south east london
Connect it to a battery and check it all heats up im sure your looking for a problem that isnt there
Pete The Biker
Active Member
- Posts
- 536
- Location
- Leicestershire
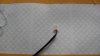
I put this one up to the light so you can see through the tape, do you see any wire under the tape? going the length of the cut? I don't
View attachment 135506
Three possible answers then:-
- it's not a wire but some other form of conductor
- the design and construction is incomplete and it will never work
- it works by witchcraft
What your seeing I think is why these are Superior to the land Rover single wire heaters. Only the ends of the each individual pad is connected as per btds post. This means if one segment breaks the other three still work. Bit like a front heated screen on a p38.
- Posts
- 16,475
If you look at the picture where you held it up to the light - you can see a darker strip that runs through the middle of the orange tape vertically - this is the electrical connection that connects the honeycomb elements to the power source.
The power flows as per Pete's diagram above.
The power flows as per Pete's diagram above.
gold rover
Well-Known Member
- Posts
- 10,132
- Location
- Scotland,
If you look at the picture where you held it up to the light - you can see a darker strip that runs through the middle of the orange tape vertically - this is the electrical connection that connects the honeycomb elements to the power source.
The power flows as per Pete's diagram above.
 I was rooting for the witchcraft option
 tomcat59alan
Well-Known Member
- Posts
- 18,611
- Location
- wirral and triquivijate
Electrickery is witchcraft.
biketeacherdave
Well-Known Member
- Posts
- 4,644
- Location
- south east london
In all fairness this is a pretty simple repair once you have stripped the seat cover off just use a spray contact adhesive and spray over the seat base leave the old heated seat element in place and cover it with the new heated pad connect your new power lead up to the existing feed job done, only thingg i can't see Is how temp is regulated I'm hoping by an internal thermistat somewhere. Cut out the old hog rings out when removing the leather seat base and use cables ties to reattach.
I opted to fix my burnt out elements and upgrade the stat in my p38, iv also just fixed the wife's drivers seat in her disco2 if we have any future problems I will most likley do the same as you and replace with these new types with an extra switch for x2 heat settings but for now I'm all good
I opted to fix my burnt out elements and upgrade the stat in my p38, iv also just fixed the wife's drivers seat in her disco2 if we have any future problems I will most likley do the same as you and replace with these new types with an extra switch for x2 heat settings but for now I'm all good
Last edited:
I'm hoping by an internal thermistat somewhere
Yes I can see what looks like one in the pad
Similar threads
- Replies
- 135
- Views
- 8K
- Replies
- 1
- Views
- 463