Hippo
Lord Hippo
- Posts
- 51,824
Updated 08 April 2015
Fixx
This is the first draft of my coolant level sensor how to guide. It will have additional information added soon (and probably some minor corrections).
This how to guide shows the steps I took to fit a level sensor to my Freelander's coolant reservoir. I got the idea from the mad hat man. He's done the same mod on many other vehicles.
A level sensor is switch controlled by a lever which floats. As the lever moves it opens or closes a switch. The theory is that when the coolant level drops, the lever will drop and the switch will open. When the coolant level is ok the lever is pushed up which closes the switch. My level sensor illuminates an LED on the dash when the level is ok. The LED switches off when the coolant level falls. You could also put a buzzer in the circuit too, wired to make a sound when the coolant level is low. I haven't done this on my Freelander. My LED circuit is only powered when the key is turned. The following guide will show you how I fitted my set-up.
Video = Freelander 1 Coolant Level Sensor - YouTube
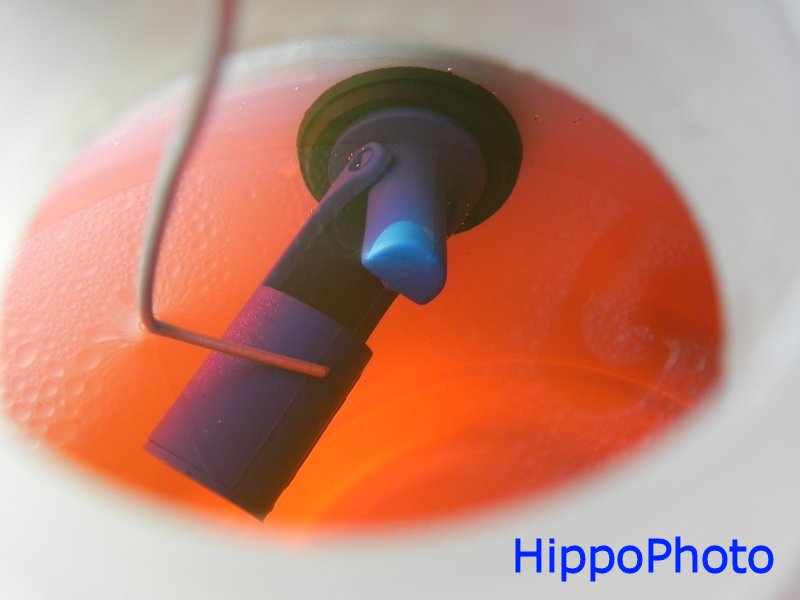
Coolant reservoir lever switch:
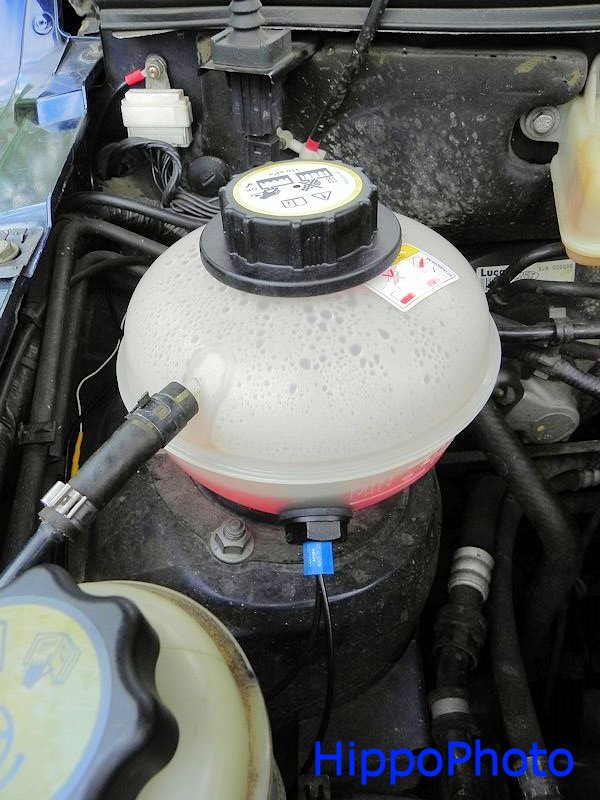
DSCN4125 c7HKbHy
Warning LED on my dash:
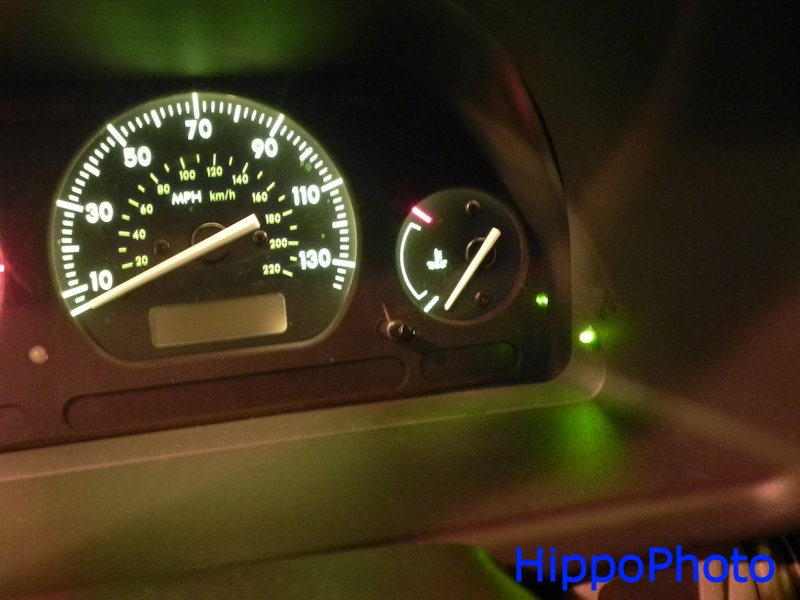
DSCN1956 67kxe45
Required parts are:
LED
LED holder
Thin wire
Heat shrink
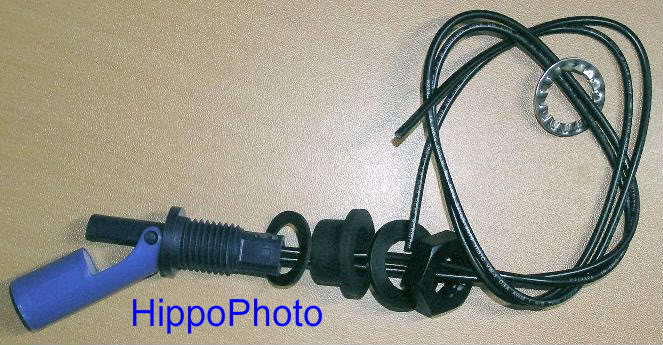
Level sensor
Fuse
Fuse holder
Chock block
Rubber washers
I used this level sensor as it can go to 110 degrees.
Level sensor: Liquid Level Sensor Horizontal Nylon | Rapid Online
Technical spec: http://www.rapidonline.com/pdf/61-1362.pdf
A good test to check your coolant system is pressurised is to squeeze one of the larger coolant pipes at the top of the radiator when it's cold. Compare this to when the engine and pipe is hot. Only squeeze the pipe a bit, not fully. You'll feel more resistance when squeezing a hot pipe as the system will have built up pressure inside its self. If there's no pressure then this is worrying. Be careful not to burn yourself. If the coolant system doesn't pressurise when the engine is hot you need to investigate why. Leaks are a major cause of overheating engines.
WARNING: Only do this work when the engine and coolant are cold.
Unlock yer Freelander 1.
Stitch the engine off.
Disconnect the battery negative.
Remove the coolant level cap.
Remove the coolant from the coolant reservoir and store it in a clean container so you can keep it. I used a 100ml syringe to suck my coolant out. I purchased it online. You only need to remove the coolant in the reservoir, and not the whole coolant system.
Squeeze the metal clips on the 2 pipes connected to the coolant reservoir so you can pull the pipes off the coolant reservoir.
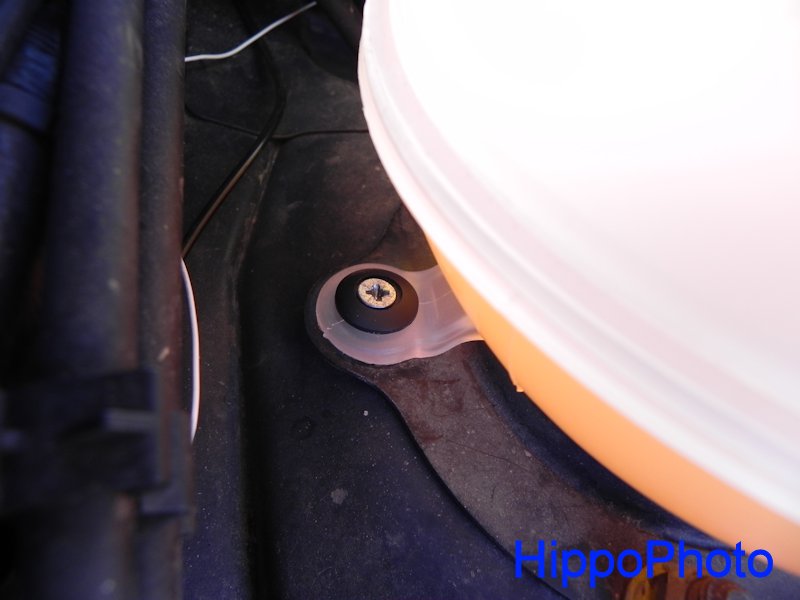
Remove the plastic screw securing the coolant reservoir near the wing. The plastic screw is crap so I drilled mine out with a 3mm drill bit and kept the outer plastic sleeve. (I used a small metal screw as a replacement when refitting the sleeve and coolant reservoir afterwards).
You need to remove the coolant reservoir so you can drill a hole in it. You also need to ensure you don't get any drilling swarf in the coolant system. Hence removing/disconnecting the tank.
If you have an old coolant reservoir and cap you may want to take this opportunity to replace them. As a minimum you should inspect the neck of the reservoir for hairline cracks. The caps can fail to open if the pressure in the coolant system is too high. The coolant reservoirs often crack around the top. This seems to happen with age.
Parts codes are:
Cap = PCD500030 £4.09 + vat
Reservoir = PCF000012 £25.45 +vat
Prices from main dealer in February 2014.
I should point out here that Land Rover produced/fitted their out coolant level sensor on later model Freelander's. The mind boggles as to why it took them so long. The LR coolant sensor sits in the larger of the two pipes connected to the coolant reservoir, below the coolant reservoir. This is the pipe that feeds the engine with coolant. It's a crap place to put a coolant level switch. If your Freelander has one then may I suggest you put another switch in as per this guide, in the coolant reservoir. The LR version is located below the coolant reservoir. Hence the coolant reservoir needs to be totally empty for it to trigger a warning. :doh:
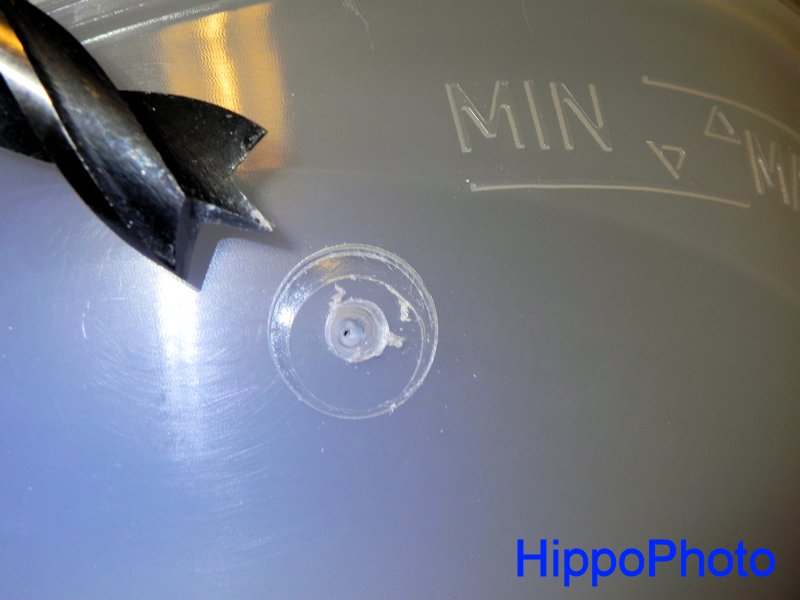
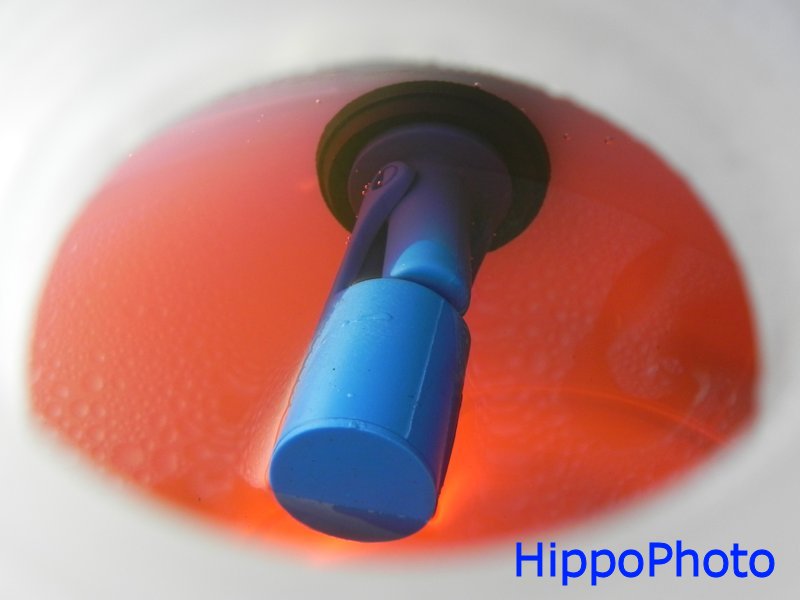
Mark the position of where you want to drill the hole for the level switch. Ideally it would be nice if the tank had a flat side to make it easier to mount the switch. Unfortunately it doesn't, and that's only half the problem. The bottom of the coolant tank is dome shaped. The dome curves into the coolant tank and therefore gets in the way of the level sensor movement. The only way round this is to position the level sensor in the same place as my photo below, whilst turning the level sensor so it move on an angle. I have tested this position on mine and it's a good position for comparison to the max/min lines on the coolant reservoir. When the coolant is at the max level the switch stays closed. When the coolant drops to the min (or near to min) the level switch opens and closes. It's as if the LED on my dash is trying his best to warn me.") When the coolant level drops below min the switch stays open. It is your responsibility to make sure your warning LED and switch are fitted correctly and report correctly. If in doubt lift the bonnet and check the coolant level.
When the coolant level drops below min the switch stays open. It is your responsibility to make sure your warning LED and switch are fitted correctly and report correctly. If in doubt lift the bonnet and check the coolant level.

fixx
Drill a hole in your coolant reservoir. If you use the same switch as I did then the hole will be 16mm diameter. The coolant reservoir is made from a plastic/nylon type material. Be careful not to crack it. Drill carefully and don't let the drill bit bight into the coolant reservoir and split it.
Remove all burrs on the inner and outer edges of the hole. If you don't remove the burrs you will struggle to get a good seal on the rubber washers used to seal the level sensor in the reservoir. I used sand paper wrapped round my finger. Clean the tank out with water to remove drilling swarf. Run your finger over the burrs to check they've been removed. Photo's below have burrs which need removed.
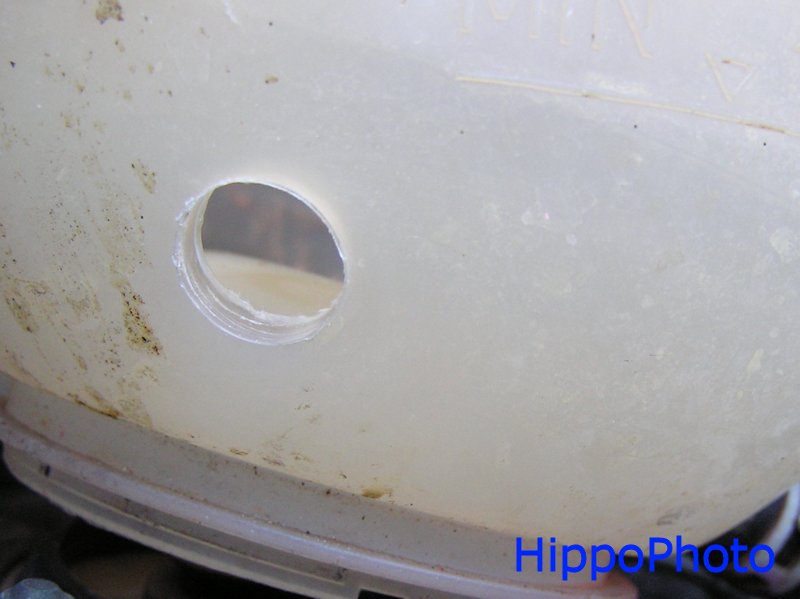
P2111805 8WJKLSe
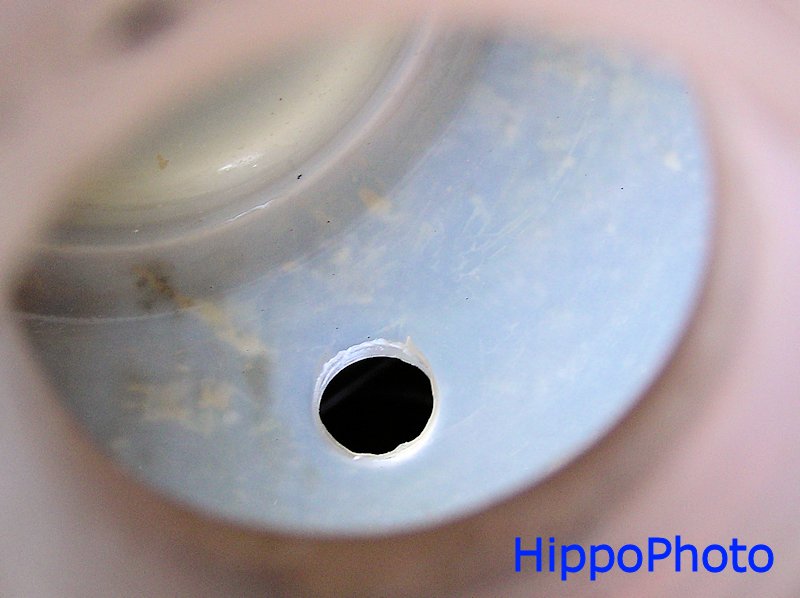
P2111803 eDXxuu2
16mm drill bit I used from BnQ.
DSCN4987 5NHBOMG
The photo below shows the level sensor which comes supplied with several washers. I used these before and they seem to disintegrate. I recently replaced my switch again. This time I purchased some M16 x 3mm rubber washers. I hope they work better. See item M16 16mm Thick Black Rubber Washers Suit M16 Screws Bolts Washer TAP FWS | eBay
P3131799 Si3lHeg
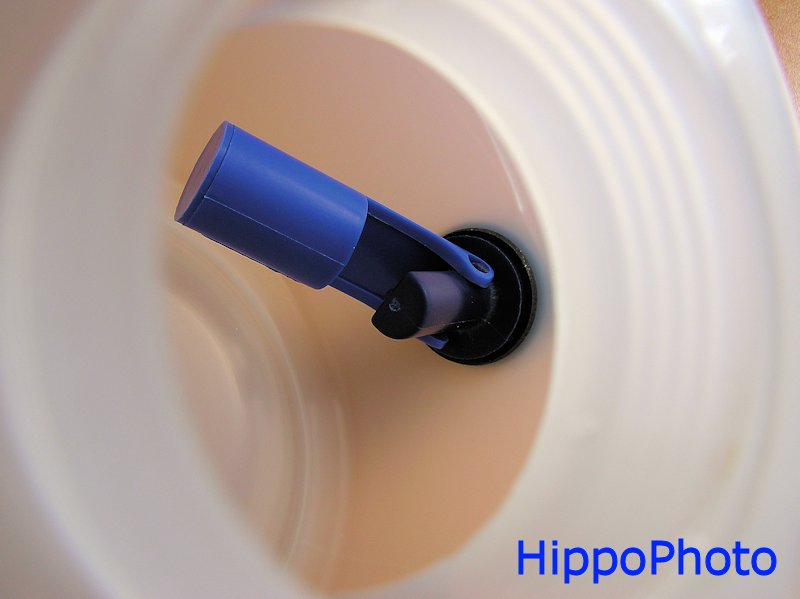
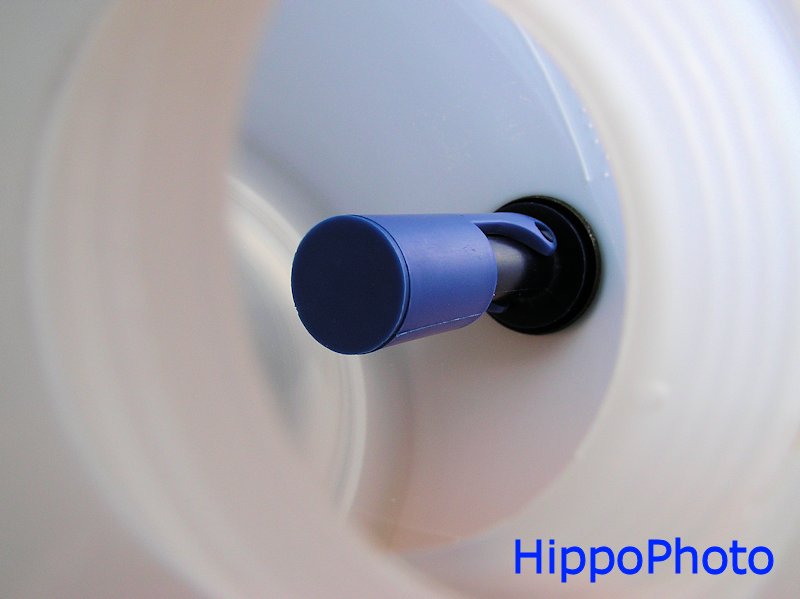
Slide the plastic washer supplied with the lever sensor onto the level sensor cables. Slide an M16 x 3mm rubber washer onto the level sensor cables. Feed both the level sensor cables into the coolant reservoir via the cap hole and out through the hole you drilled. Pull the cable through and allow the level sensor to fit in the hole you drilled. Now slide another M16 x3mm rubber washer onto the level sensor cables. Now feed the plastic nut supplied with the level sensor onto the level sensor cables. Start turning the nut onto the level sensor to keep everything in place. Now turn the level sensor to position it as per the photo below so it opens diagonally when the reservoir is in its normal horizontal position. When positioned correctly tighten the plastic nut. Don't do it too tight or you'll snap the level sensor. The level sensor is plastic.
P3151812 WlKMYuh
P3151813 aQrmwnq
DSCN4139 H66Vwwm
DSCN4140 GGsDfkX
DSCN4122 gWfDNE2
If you do snap the level sensor now or in the future use 2x bath tap washers, 2 metal washers and a nut and bolt to secure the hole. From experience I can confirm it works well.
levelsensorfix pYRTll1
fixx
DSCN4101 hsPe5XE
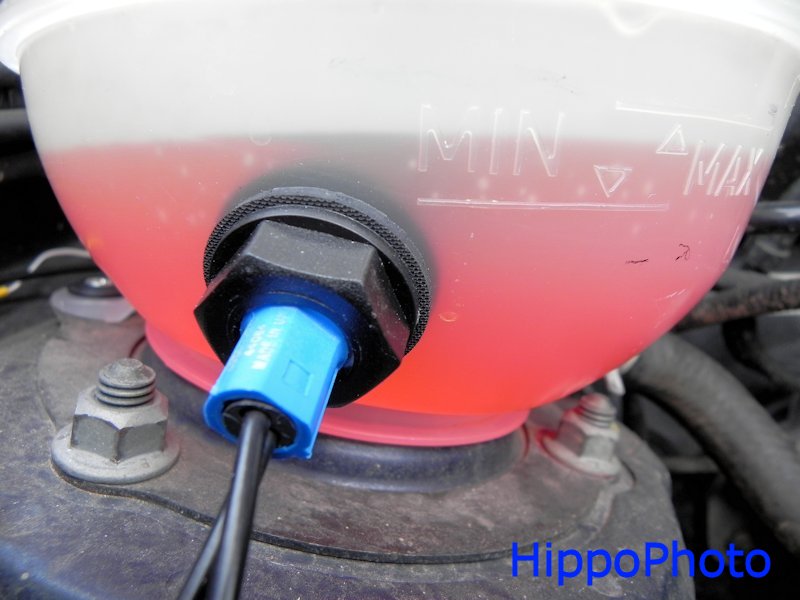
Fit the coolant reservoir back on your Freelander. One side of the base slots into the metal bracket. The other side secures with the plastic sleeve we removed before. I used a metal wood screw instead of the plastic one which is crap. The crew will secure in the sleeve ok.
DSCN4991 uZkyAQS
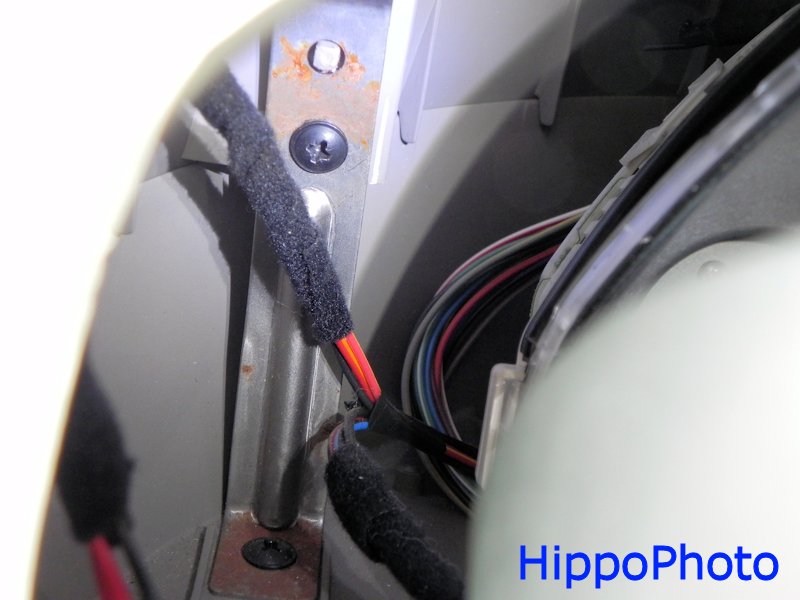
Strip off a small amount of insulation from both level sensor cables.
Crimp an M6 ring crimp onto one of the level sensor cables and attach the crimp to the earth point behind the coolant reservoir. Make sure the cable travels between the reservoir and wing panel to stop it from getting caught in moving parts.
DSCN4124 xYeaUrs
Solder a thin piece of wire to the other level sensor cable. I used single strand cable as it's stronger for poking through the grommet later on. First slide some heat shrink over the cable, then tin both cables, then slide the heat shrink over the soldered join. Use a hot air gun to shrink the heat shrink onto the cable. If you prefer you could use some think tube over the joint and secure in place with e tie wrap. If you don't have a soldering iron then use some connector strip (choc block) and cover the bare connections.
*** photo required ***
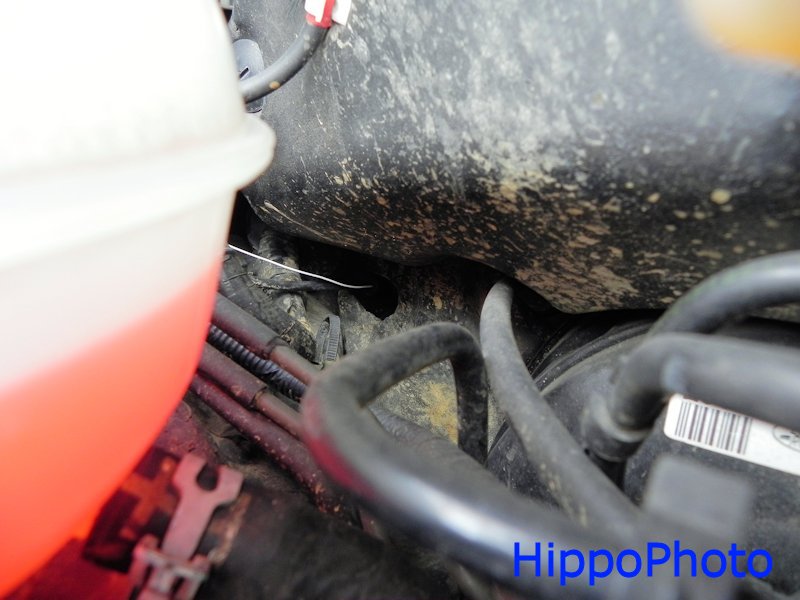
Now feed the think wire between the reservoir and wing panel to wards the bulkhead.
Follow the cable from the bonnet catch from the front of your Freelander past the headlight and along the wing panel. This cable passes through the bulkhead via a grommet. Pus your thin wire though the same grommet carefully. Now look up from the drivers pedals behind the dash with a torch and you should be able to see the cable you pushed through the gromment. Pull it though to take out some of the slack cable by the coolant reservoir.
DSCN4123 O79kALS
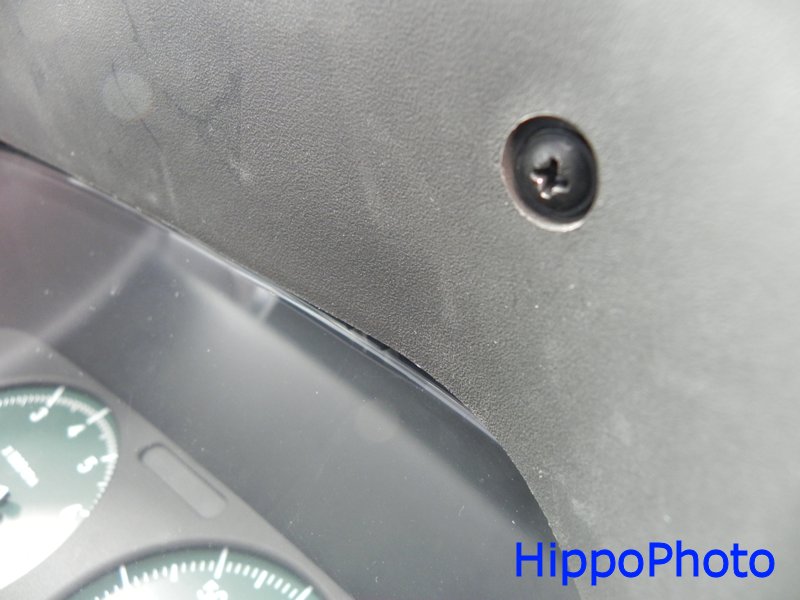
Remove the inner dash display cover by removing 4 screws. 2 screws under the switches at the side and 2 screws above the display.
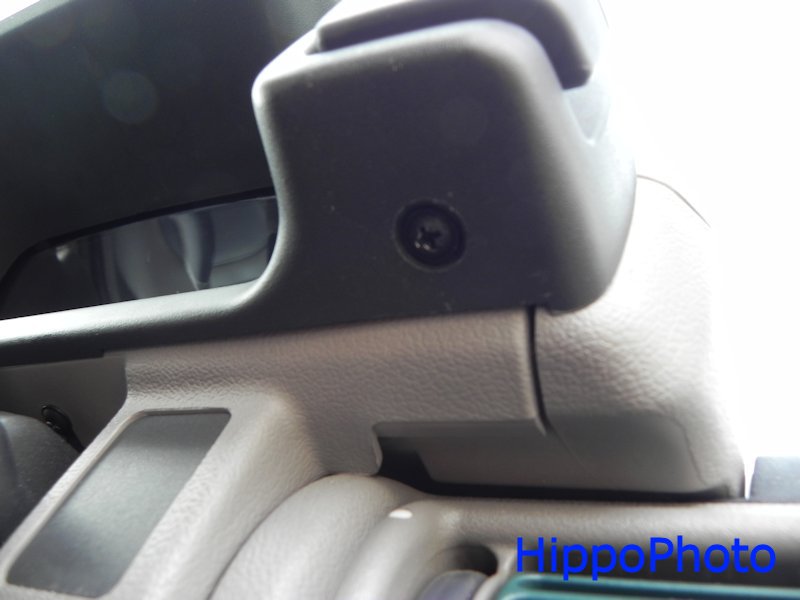
DSCN4100 NbuFHl0
DSCN4101 hsPe5XE
Remove the top dash display cover by removing the 2 screws inside the cover.
DSCN4099 skEEaNf
DSCN4098 OuBBWSq
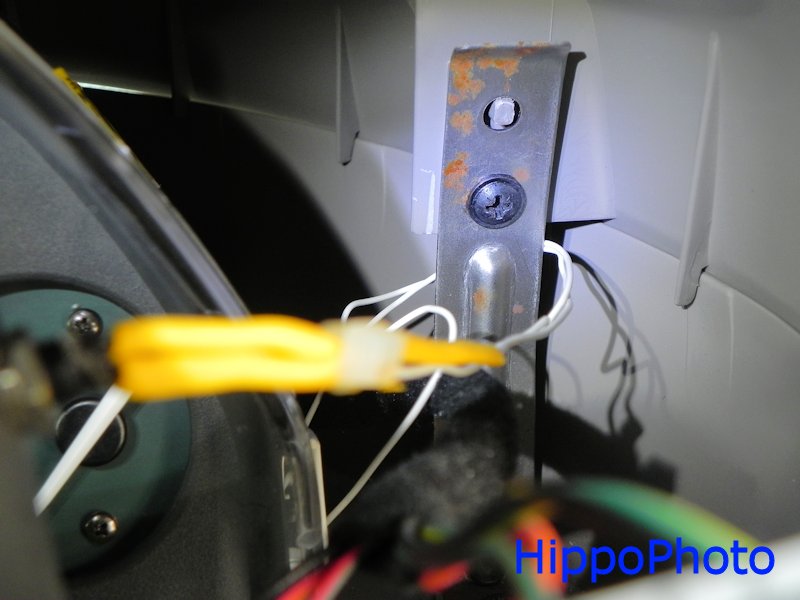
Feed the cable up through the gap into the dash display on the right hand side. You may choose to feed a new piece of cable down through the dash first, tie it to the level sensor cable, then pull the new cable up until the level sensor cable appears.
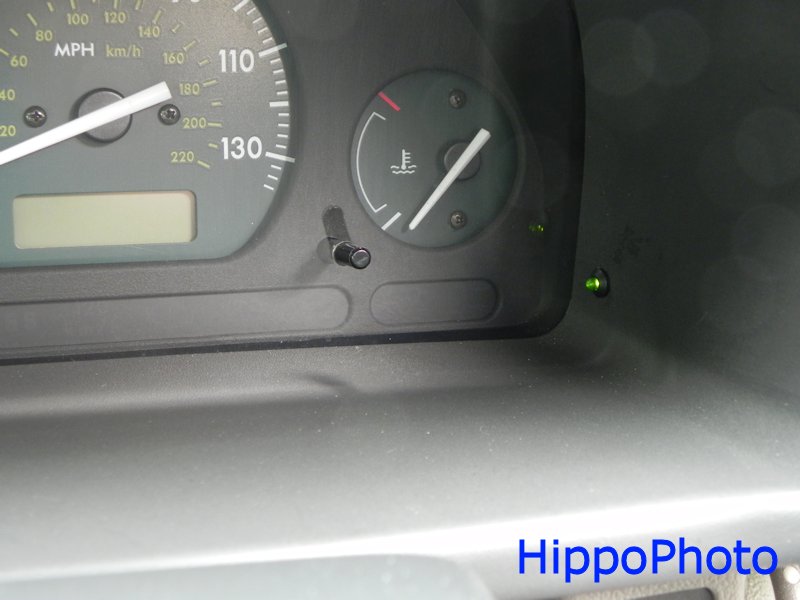
We will now position the LED in the dash display. I chose to put mine as shown in the photo below. It's the green LED on the right.
DSCN4079 KodltXS
Work out the best position for your LED. Drill a small hole for the LED holder to fit through. Push the LED into the LED holder and fit the holder into the drilled hole.
Solder the wire from the level sensor onto the shorter leg (an LED has 2 legs or metal pins sticking out of it) on the LED. Slide some heat shrink or tube over the wire first so you can cover the joint after. You could carefully use terminal block (choc block) here if you don't have a soldering iron.
Now solder a resister onto the longer leg on the LED. I think I used a 4700ohm resistor but need a better photo to check.
Now solder a new piece of wire to the longer other end of the resister. Put some heat shirk on the cable first or tube to use to cover the joints and resister after soldering. Use some terminal block if you don't have a soldering iron.
Make sure all joints and the legs on the LED are covered with heat shrink or tube.
Make sure you leave enough spare cable to allow you to manoeuvre the inner dash cover into position to refit.
*** circuit pic goes here ***
DSCN1946 gINb2bV
DSCN1947 YGpwGtT

DSCN4091 X10pIHq
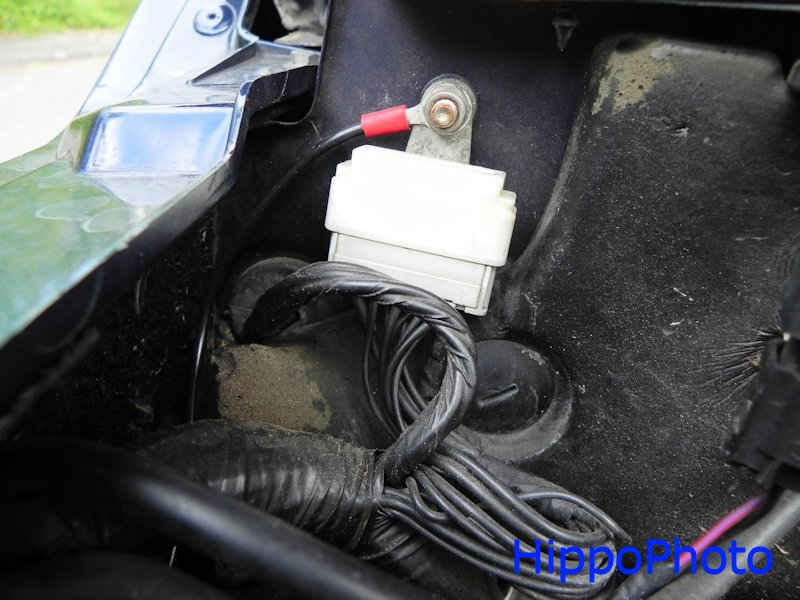
Feed the wired soldered to the resitor through the dash to the fuse box below the steering wheel. We will now connect this wire to a 12 volt supply on your Freelander. You have the choice of many different fused supplies. I choose to use the lighter socket supply for mine. You can connect to this behind the fuse box under the steering wheel or behind the lighter socket. I chose to connect mine behind the fuse box.
Open the storage cover and either lift the 2 side hooks slightly up or down to release them to allow the cover to open fully and drop down out of the way.
Undo the 2 bolts (1 ether side) of the fuse box at the lower edge.
Lift the fuse box up to release the clips at the top. The fuse box should gently pull forward and drop down a little so you can get to the rear.
DSCN1950 nfqfm6s
Connect the wire from the resistor to 1 side of the fuse holder. Connect a new piece of wire to the other side of the fuse holder. Put the 50mA (0.05amps) fuse in the fuse holder and twist the fuse holder to close. Make sure the supplied spring is still inside the fuse holder or it work connect properly. I chose to secure my fuse holder with some tape.
DSCN4093 3ALB2qy
Cut the purple wire with red stripe. This is the 12v feed from fuse 10 in the fuse box to the lighter socket. Crimp both cables and terminate them i n some terminal block to join them together again. Also connect the wire from your fuse holder to the same terminal block.
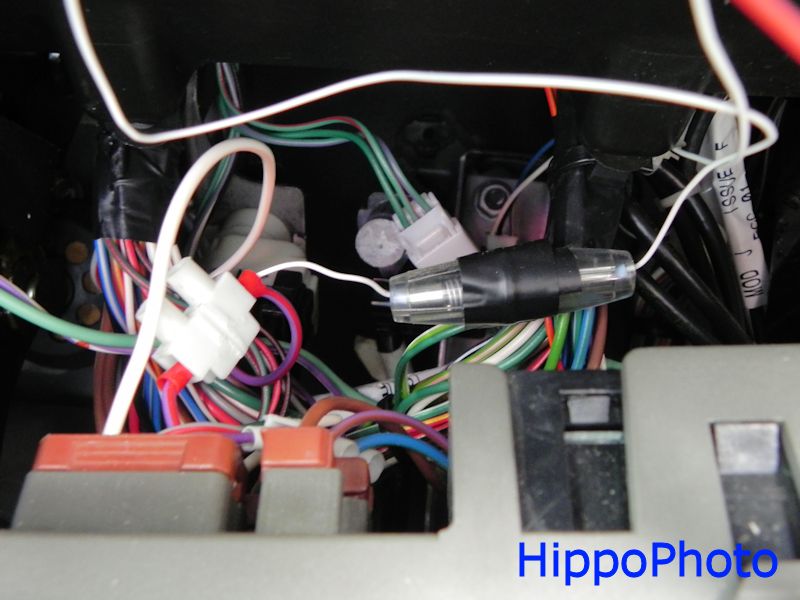
DSCN4096 Rzfn8ZL
Put the fuse box back making sure your careful not to catch the wires.
Put the storage front cover back over the fuse box. Make sure the side hooks fit back in their slots.
Put the inner and outer dash display covers back. Make sure you don't catch the LED connections or wires.
Make sure there's no drilling swarf or muck in the coolant reservoir. Clean it out if there is.
Put the previously removed coolant back in the coolant reservoir. Put just enough in so the coolant it below the min level marker.
Connect the battery earth.
DON'T start the engine.
Turn on the ignition to power the electrics only.
The level sensor LED on the dash should be off.
Use a screw driver or similar to lift the level sensor and confirm the coolant level sensor LED illuminates. If not you have a fault.
After testing remove the screw driver.
If the LED functions as expected fill the coolant reservoir to the max marker (assuming your Freelander is on level ground) and watch for the level sensor LED to illuminate when the level increases.
If these tests pass then your sensor is working ok.
Fit the coolant reservoir cap.
Start the engine and allow the engine/coolant to warm up while checking for leaks. If a leak appears switch the engine off immediately.
Fix the leak and check for leaks again.
DSCN4079 KodltXS
DSCN4125 c7HKbHy
DSCN4122 gWfDNE2
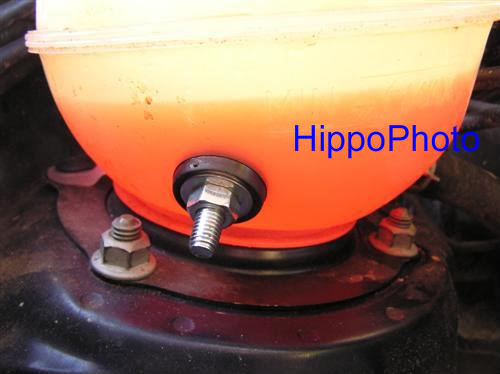
Eggsample cracks appearing in the neck of the reservoir.
DSCN4947 EYHoSrj
Fixx
This is the first draft of my coolant level sensor how to guide. It will have additional information added soon (and probably some minor corrections).
This how to guide shows the steps I took to fit a level sensor to my Freelander's coolant reservoir. I got the idea from the mad hat man. He's done the same mod on many other vehicles.
A level sensor is switch controlled by a lever which floats. As the lever moves it opens or closes a switch. The theory is that when the coolant level drops, the lever will drop and the switch will open. When the coolant level is ok the lever is pushed up which closes the switch. My level sensor illuminates an LED on the dash when the level is ok. The LED switches off when the coolant level falls. You could also put a buzzer in the circuit too, wired to make a sound when the coolant level is low. I haven't done this on my Freelander. My LED circuit is only powered when the key is turned. The following guide will show you how I fitted my set-up.
Video = Freelander 1 Coolant Level Sensor - YouTube
Coolant reservoir lever switch:
DSCN4125 c7HKbHy
Warning LED on my dash:
DSCN1956 67kxe45
Required parts are:
LED
LED holder
Thin wire
Heat shrink
Level sensor
Fuse
Fuse holder
Chock block
Rubber washers
I used this level sensor as it can go to 110 degrees.
Level sensor: Liquid Level Sensor Horizontal Nylon | Rapid Online
Technical spec: http://www.rapidonline.com/pdf/61-1362.pdf
A good test to check your coolant system is pressurised is to squeeze one of the larger coolant pipes at the top of the radiator when it's cold. Compare this to when the engine and pipe is hot. Only squeeze the pipe a bit, not fully. You'll feel more resistance when squeezing a hot pipe as the system will have built up pressure inside its self. If there's no pressure then this is worrying. Be careful not to burn yourself. If the coolant system doesn't pressurise when the engine is hot you need to investigate why. Leaks are a major cause of overheating engines.
WARNING: Only do this work when the engine and coolant are cold.
Unlock yer Freelander 1.
Stitch the engine off.
Disconnect the battery negative.
Remove the coolant level cap.
Remove the coolant from the coolant reservoir and store it in a clean container so you can keep it. I used a 100ml syringe to suck my coolant out. I purchased it online. You only need to remove the coolant in the reservoir, and not the whole coolant system.
Squeeze the metal clips on the 2 pipes connected to the coolant reservoir so you can pull the pipes off the coolant reservoir.
Remove the plastic screw securing the coolant reservoir near the wing. The plastic screw is crap so I drilled mine out with a 3mm drill bit and kept the outer plastic sleeve. (I used a small metal screw as a replacement when refitting the sleeve and coolant reservoir afterwards).
You need to remove the coolant reservoir so you can drill a hole in it. You also need to ensure you don't get any drilling swarf in the coolant system. Hence removing/disconnecting the tank.
If you have an old coolant reservoir and cap you may want to take this opportunity to replace them. As a minimum you should inspect the neck of the reservoir for hairline cracks. The caps can fail to open if the pressure in the coolant system is too high. The coolant reservoirs often crack around the top. This seems to happen with age.
Parts codes are:
Cap = PCD500030 £4.09 + vat
Reservoir = PCF000012 £25.45 +vat
Prices from main dealer in February 2014.
I should point out here that Land Rover produced/fitted their out coolant level sensor on later model Freelander's. The mind boggles as to why it took them so long. The LR coolant sensor sits in the larger of the two pipes connected to the coolant reservoir, below the coolant reservoir. This is the pipe that feeds the engine with coolant. It's a crap place to put a coolant level switch. If your Freelander has one then may I suggest you put another switch in as per this guide, in the coolant reservoir. The LR version is located below the coolant reservoir. Hence the coolant reservoir needs to be totally empty for it to trigger a warning. :doh:
Mark the position of where you want to drill the hole for the level switch. Ideally it would be nice if the tank had a flat side to make it easier to mount the switch. Unfortunately it doesn't, and that's only half the problem. The bottom of the coolant tank is dome shaped. The dome curves into the coolant tank and therefore gets in the way of the level sensor movement. The only way round this is to position the level sensor in the same place as my photo below, whilst turning the level sensor so it move on an angle. I have tested this position on mine and it's a good position for comparison to the max/min lines on the coolant reservoir. When the coolant is at the max level the switch stays closed. When the coolant drops to the min (or near to min) the level switch opens and closes. It's as if the LED on my dash is trying his best to warn me.
When the coolant level drops below min the switch stays open. It is your responsibility to make sure your warning LED and switch are fitted correctly and report correctly. If in doubt lift the bonnet and check the coolant level.
fixx
Drill a hole in your coolant reservoir. If you use the same switch as I did then the hole will be 16mm diameter. The coolant reservoir is made from a plastic/nylon type material. Be careful not to crack it. Drill carefully and don't let the drill bit bight into the coolant reservoir and split it.
Remove all burrs on the inner and outer edges of the hole. If you don't remove the burrs you will struggle to get a good seal on the rubber washers used to seal the level sensor in the reservoir. I used sand paper wrapped round my finger. Clean the tank out with water to remove drilling swarf. Run your finger over the burrs to check they've been removed. Photo's below have burrs which need removed.
P2111805 8WJKLSe
P2111803 eDXxuu2
16mm drill bit I used from BnQ.
DSCN4987 5NHBOMG
The photo below shows the level sensor which comes supplied with several washers. I used these before and they seem to disintegrate. I recently replaced my switch again. This time I purchased some M16 x 3mm rubber washers. I hope they work better. See item M16 16mm Thick Black Rubber Washers Suit M16 Screws Bolts Washer TAP FWS | eBay
P3131799 Si3lHeg
Slide the plastic washer supplied with the lever sensor onto the level sensor cables. Slide an M16 x 3mm rubber washer onto the level sensor cables. Feed both the level sensor cables into the coolant reservoir via the cap hole and out through the hole you drilled. Pull the cable through and allow the level sensor to fit in the hole you drilled. Now slide another M16 x3mm rubber washer onto the level sensor cables. Now feed the plastic nut supplied with the level sensor onto the level sensor cables. Start turning the nut onto the level sensor to keep everything in place. Now turn the level sensor to position it as per the photo below so it opens diagonally when the reservoir is in its normal horizontal position. When positioned correctly tighten the plastic nut. Don't do it too tight or you'll snap the level sensor. The level sensor is plastic.
P3151812 WlKMYuh
P3151813 aQrmwnq
DSCN4139 H66Vwwm
DSCN4140 GGsDfkX
DSCN4122 gWfDNE2
If you do snap the level sensor now or in the future use 2x bath tap washers, 2 metal washers and a nut and bolt to secure the hole. From experience I can confirm it works well.
levelsensorfix pYRTll1
fixx
DSCN4101 hsPe5XE
Fit the coolant reservoir back on your Freelander. One side of the base slots into the metal bracket. The other side secures with the plastic sleeve we removed before. I used a metal wood screw instead of the plastic one which is crap. The crew will secure in the sleeve ok.
DSCN4991 uZkyAQS
Strip off a small amount of insulation from both level sensor cables.
Crimp an M6 ring crimp onto one of the level sensor cables and attach the crimp to the earth point behind the coolant reservoir. Make sure the cable travels between the reservoir and wing panel to stop it from getting caught in moving parts.
DSCN4124 xYeaUrs
Solder a thin piece of wire to the other level sensor cable. I used single strand cable as it's stronger for poking through the grommet later on. First slide some heat shrink over the cable, then tin both cables, then slide the heat shrink over the soldered join. Use a hot air gun to shrink the heat shrink onto the cable. If you prefer you could use some think tube over the joint and secure in place with e tie wrap. If you don't have a soldering iron then use some connector strip (choc block) and cover the bare connections.
*** photo required ***
Now feed the think wire between the reservoir and wing panel to wards the bulkhead.
Follow the cable from the bonnet catch from the front of your Freelander past the headlight and along the wing panel. This cable passes through the bulkhead via a grommet. Pus your thin wire though the same grommet carefully. Now look up from the drivers pedals behind the dash with a torch and you should be able to see the cable you pushed through the gromment. Pull it though to take out some of the slack cable by the coolant reservoir.
DSCN4123 O79kALS
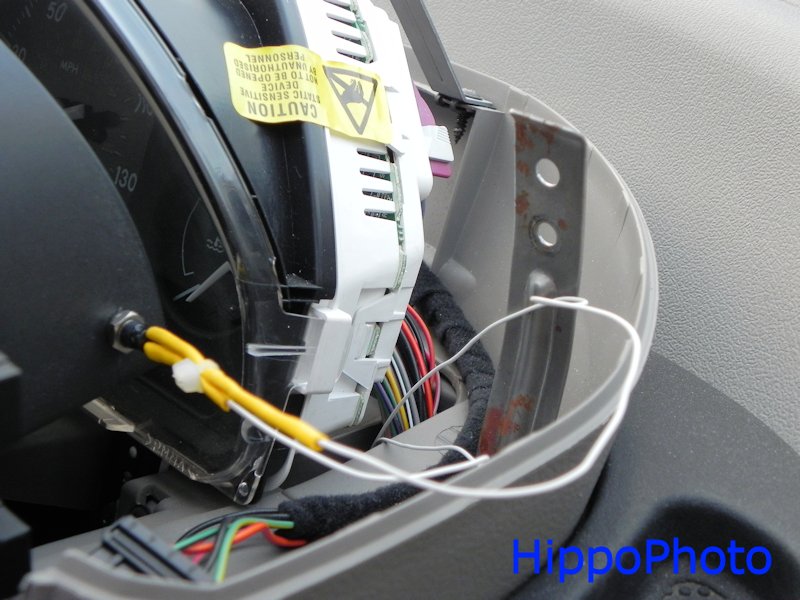
Remove the inner dash display cover by removing 4 screws. 2 screws under the switches at the side and 2 screws above the display.
DSCN4100 NbuFHl0
DSCN4101 hsPe5XE
Remove the top dash display cover by removing the 2 screws inside the cover.
DSCN4099 skEEaNf
DSCN4098 OuBBWSq
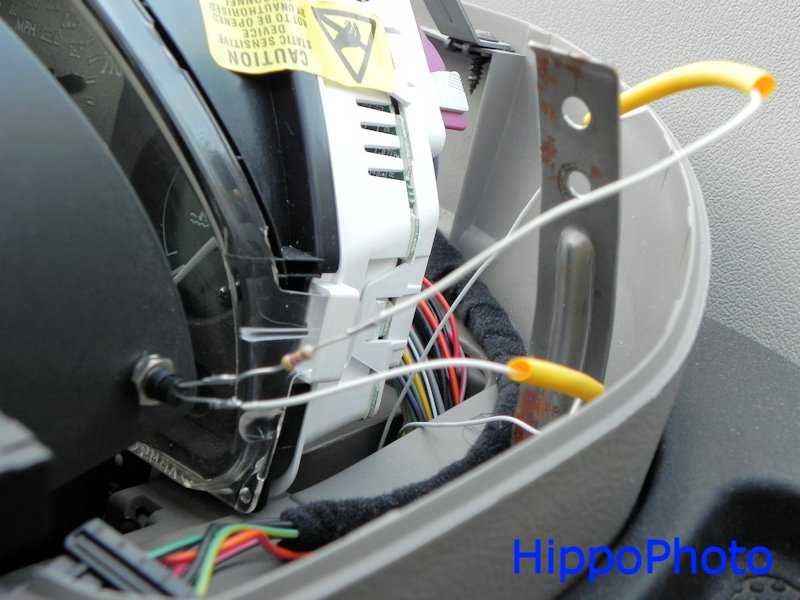
Feed the cable up through the gap into the dash display on the right hand side. You may choose to feed a new piece of cable down through the dash first, tie it to the level sensor cable, then pull the new cable up until the level sensor cable appears.
We will now position the LED in the dash display. I chose to put mine as shown in the photo below. It's the green LED on the right.
DSCN4079 KodltXS
Work out the best position for your LED. Drill a small hole for the LED holder to fit through. Push the LED into the LED holder and fit the holder into the drilled hole.
Solder the wire from the level sensor onto the shorter leg (an LED has 2 legs or metal pins sticking out of it) on the LED. Slide some heat shrink or tube over the wire first so you can cover the joint after. You could carefully use terminal block (choc block) here if you don't have a soldering iron.
Now solder a resister onto the longer leg on the LED. I think I used a 4700ohm resistor but need a better photo to check.
Now solder a new piece of wire to the longer other end of the resister. Put some heat shirk on the cable first or tube to use to cover the joints and resister after soldering. Use some terminal block if you don't have a soldering iron.
Make sure all joints and the legs on the LED are covered with heat shrink or tube.
Make sure you leave enough spare cable to allow you to manoeuvre the inner dash cover into position to refit.
*** circuit pic goes here ***
DSCN1946 gINb2bV
DSCN1947 YGpwGtT
DSCN4091 X10pIHq
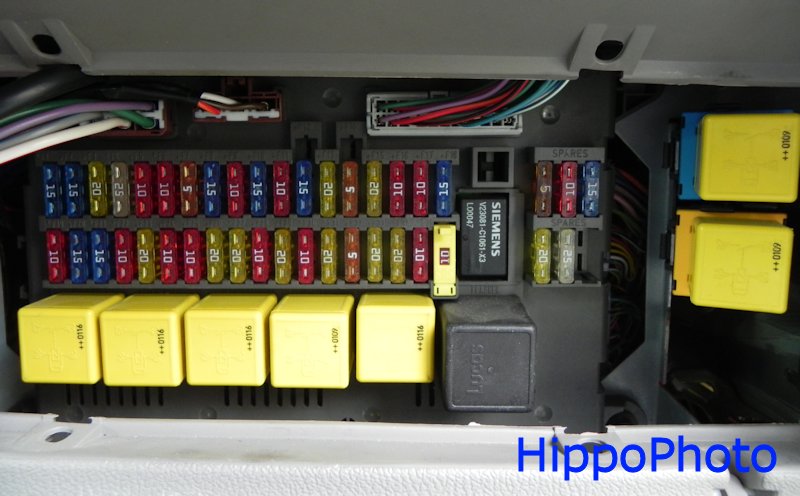
Feed the wired soldered to the resitor through the dash to the fuse box below the steering wheel. We will now connect this wire to a 12 volt supply on your Freelander. You have the choice of many different fused supplies. I choose to use the lighter socket supply for mine. You can connect to this behind the fuse box under the steering wheel or behind the lighter socket. I chose to connect mine behind the fuse box.
Open the storage cover and either lift the 2 side hooks slightly up or down to release them to allow the cover to open fully and drop down out of the way.
Undo the 2 bolts (1 ether side) of the fuse box at the lower edge.
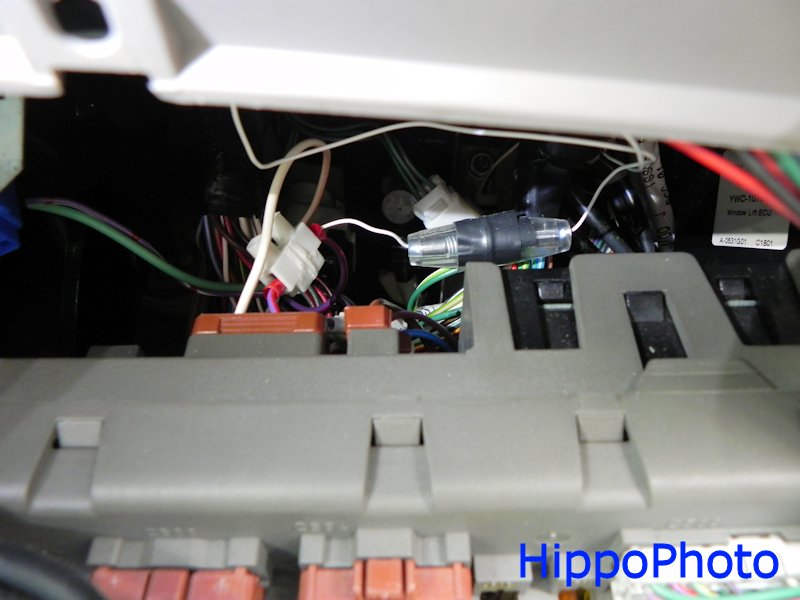
Lift the fuse box up to release the clips at the top. The fuse box should gently pull forward and drop down a little so you can get to the rear.
DSCN1950 nfqfm6s
Connect the wire from the resistor to 1 side of the fuse holder. Connect a new piece of wire to the other side of the fuse holder. Put the 50mA (0.05amps) fuse in the fuse holder and twist the fuse holder to close. Make sure the supplied spring is still inside the fuse holder or it work connect properly. I chose to secure my fuse holder with some tape.
DSCN4093 3ALB2qy
Cut the purple wire with red stripe. This is the 12v feed from fuse 10 in the fuse box to the lighter socket. Crimp both cables and terminate them i n some terminal block to join them together again. Also connect the wire from your fuse holder to the same terminal block.
DSCN4096 Rzfn8ZL
Put the fuse box back making sure your careful not to catch the wires.
Put the storage front cover back over the fuse box. Make sure the side hooks fit back in their slots.
Put the inner and outer dash display covers back. Make sure you don't catch the LED connections or wires.
Make sure there's no drilling swarf or muck in the coolant reservoir. Clean it out if there is.
Put the previously removed coolant back in the coolant reservoir. Put just enough in so the coolant it below the min level marker.
Connect the battery earth.
DON'T start the engine.
Turn on the ignition to power the electrics only.
The level sensor LED on the dash should be off.
Use a screw driver or similar to lift the level sensor and confirm the coolant level sensor LED illuminates. If not you have a fault.
After testing remove the screw driver.
If the LED functions as expected fill the coolant reservoir to the max marker (assuming your Freelander is on level ground) and watch for the level sensor LED to illuminate when the level increases.
If these tests pass then your sensor is working ok.
Fit the coolant reservoir cap.
Start the engine and allow the engine/coolant to warm up while checking for leaks. If a leak appears switch the engine off immediately.
Fix the leak and check for leaks again.
DSCN4079 KodltXS
DSCN4125 c7HKbHy
DSCN4122 gWfDNE2
Eggsample cracks appearing in the neck of the reservoir.
DSCN4947 EYHoSrj
Attachments
Last edited:
