Freelander 1 Td4 engine or gearbox removal?

This site contains affiliate links for which LandyZone may be compensated if you make a purchase.

openfold

Member
Posts
84
Location
Fareham, Hampshire
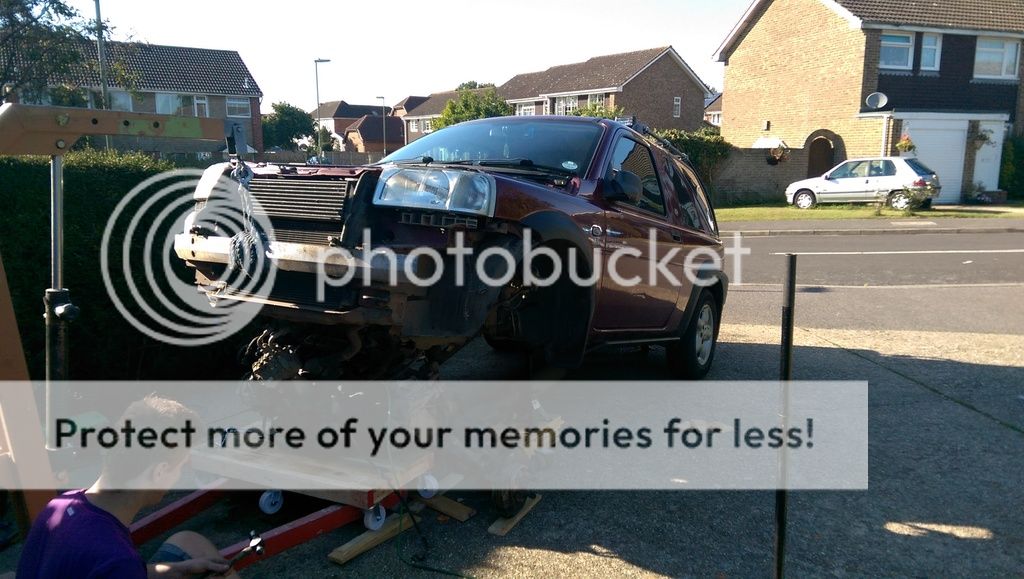
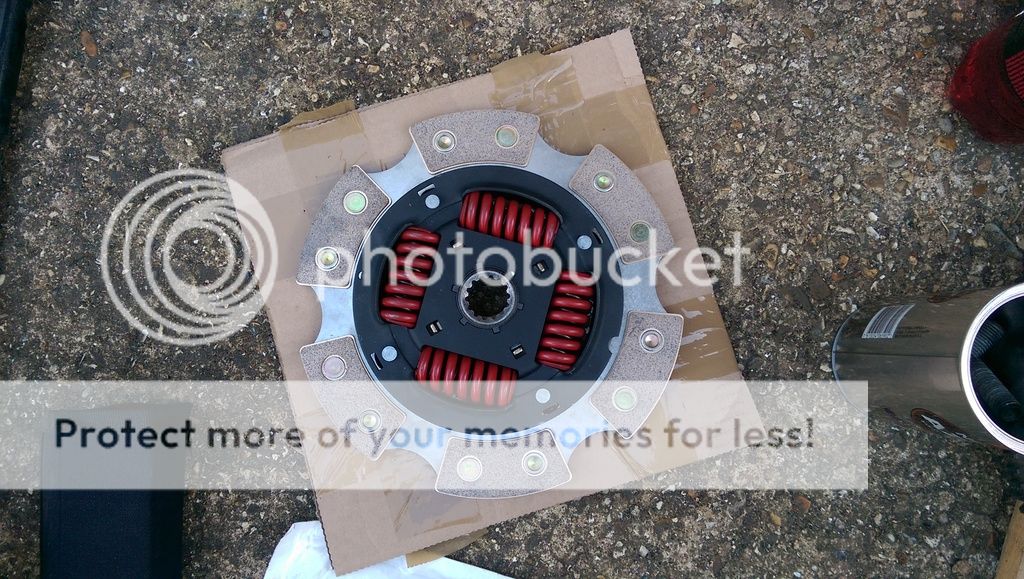
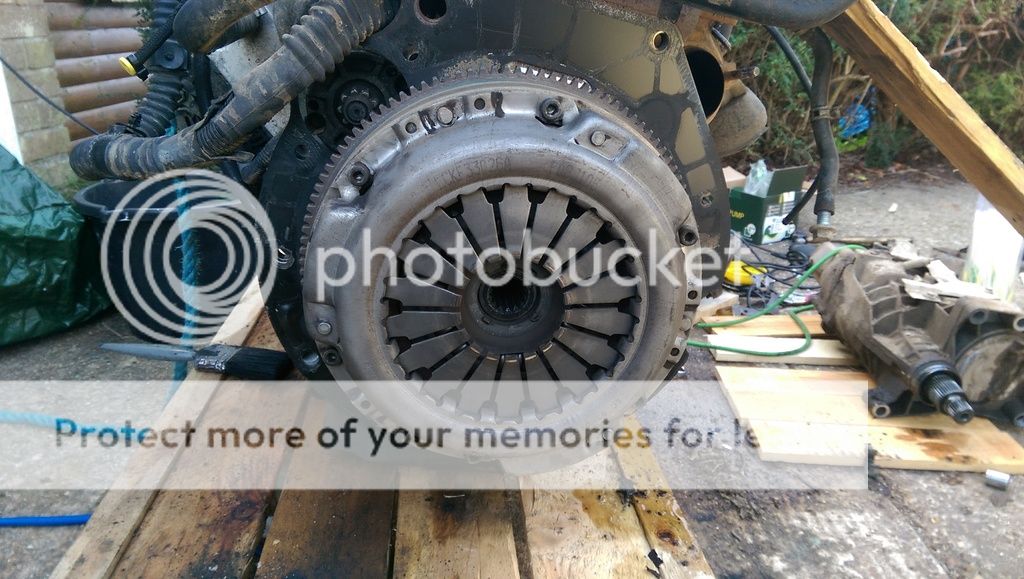
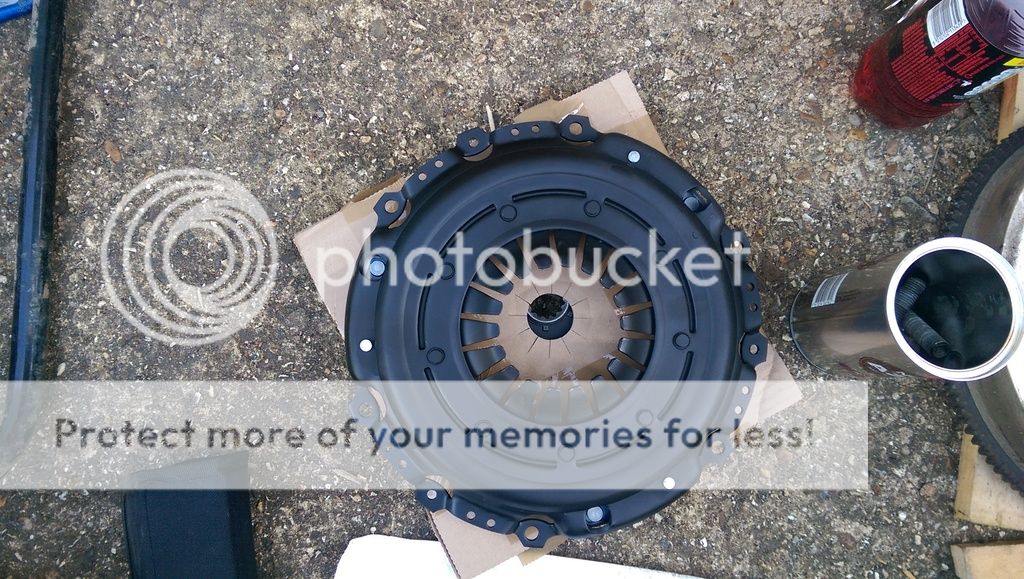
I'm slowly coming to the realisation that my clutch is dying and I'm going to need to replace it.

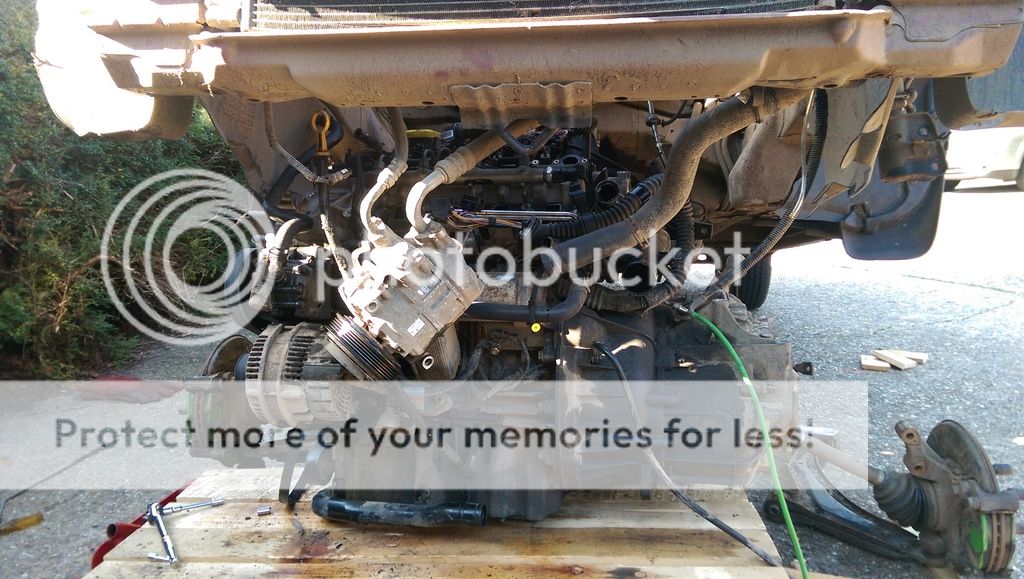
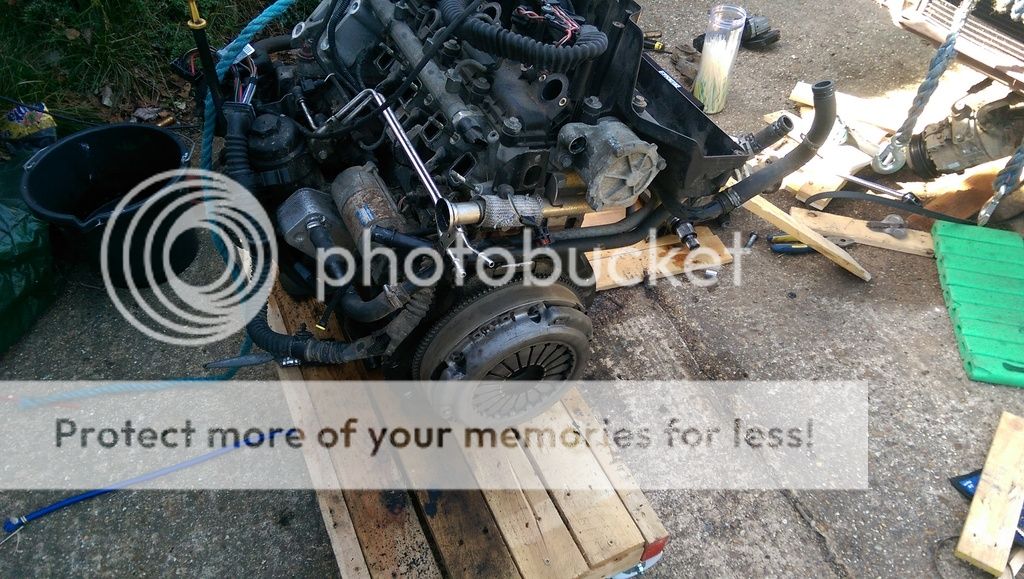
My question is, would it be easier to remove the engine or the gearbox/IRD to change the clutch? Removing the engine has the benefit of being able to get to gaskets, belts, dreaded thermostat and engine mounts as well as the clutch. And while I'm there I'd probably replace the rear main seal just to eliminate any possibility of oil contamination on the new clutch. And I wouldn't have to redo the tracking? But it's obviously much heavier but I have engine stands and stuff so I don't know.

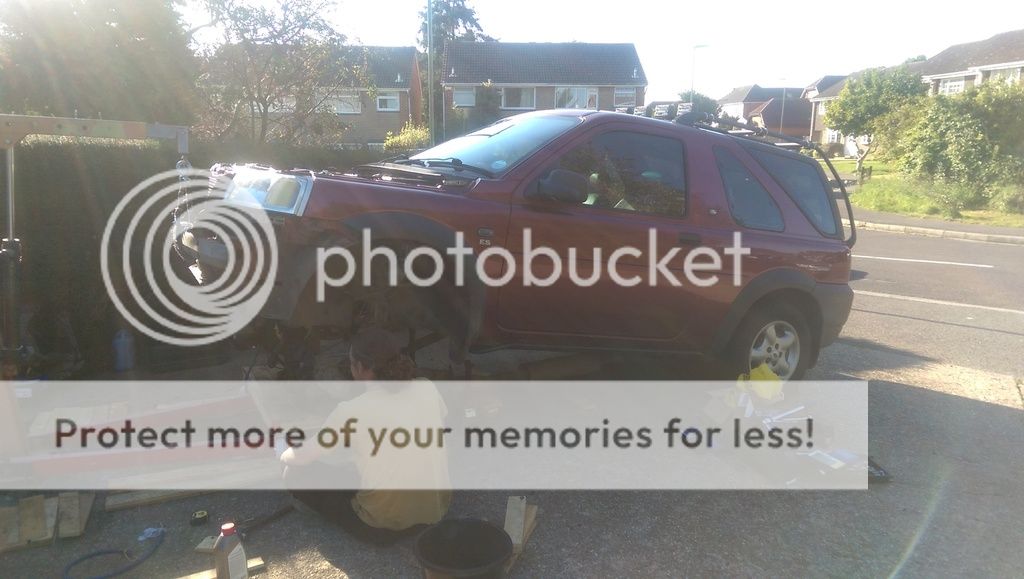
I've been under my car a lot this summer and honestly I don't fancy getting under it for a long period of time again, especially to remove a heavy IRD and especially not in the gorgeous British weather we are having.

What are everyone's thoughts?
 
The IRD isnt particularly heavy. The gearbox is REALLY heavy.
When I did mine I dropped the entire engine / box / ird out the bottom. I could then split off the IRD and gearbox with ease, replaced the clutch in comfort, put it back together easily and lifted it all back up into place.
Much, much easier than ****ing about trying to lift a gearbox up into place from underneath. everything you need to drop the gearbox alone is pretty much 90% of everything that holds the entire engine in place....its just the exhaust, injector wiring, fuel pipes, power steering pipes and a few more coolant hoses to drop the whole powertrain out.

That sounds like a really good idea, can it be done without a two post lift though? I have ramps and I could lower the whole assembly onto a dolly so it can be moved around.

Did you lower it from the top with an engine hoist or lower it with a jack?

How much is the subframe held in by and how long did it take you to do it?
 
I had the front up on axle stands. I lowered the powertrain out using an engine hoist down onto a couple of basic dollys (plywwod boards on casters) I then used the hoist to lift the shell up high enough to roll the engine out.
I split the job over a few days as I had to wait for parts etc, but it should be doable in a weekend.
The subframe is only 4 bolts iirc, however this slowed me down some as one of mine refused to come out and snapped off the captive nut inside the chassis leg. I had to cut the bugger with a hacksaw blade (fortunately it unscrewed a few turns before breaking the nut off so I had room to get the blade in), then once everything was out cut open the chassis rail to weld in a new captive nut then re-weld the chassis.

I have a couple of photos and a description in this thread....
https://www.landyzone.co.uk/land-rover/do-i-need-to-pull-the-slave-cylinder-out.287631/#post-3552996

I see. Think I'll go that route. Is it just ecu wiring, subframe bolts, gear linkage, and hoses and it's out?
 
Let us know how you get on - i did my first clutch change the hard way - box off whilst engine in car

Maybe its worth dropping the engine next time - would certainly make putting the box back a lot easier !!
 
Let us know how you get on - i did my first clutch change the hard way - box off whilst engine in car

Maybe its worth dropping the engine next time - would certainly make putting the box back a lot easier !!

will do, ill make sure i take plenty of pictures and ill post them on here.

I have ordered a custom clutch kit today with a single mass flywheel, thats due in 5 days, and all new clutch hydraulics and various service items like fanbelt and thermostat.
 
Disconnect Battery and Remove Battery Tray
Separate Clutch pipe at quick fitting connector (if GETRAG Box is fitted)
Prop Car up on suitably safe stands / blocks (I use 15 paving blocks on each side)
Drain IRD
Drain Gearbox Oil
Drain Engine Oil
unfasten the hub nuts beforehand lifting and removing wheels though.
remove front wheels
remove the track rod ends, remove the anti roll bar
remove the bottom ball joint
separate exhaust at the 3 bolt flange
LEAVE TOP MOUNTS IN PLACE
remove gearlinkage ball joints
remove bottom engine / gearbox mounting bolts from subframe
remove 3 subframe bolts from either side.
remove subframe (this is when I removed the Driveshafts from either side of the car.)
put trolley under engine, and slowly lower the car so the engine is on the trolley (without wheels)
undo intercooler pipes / vacuum hoses.
disconnect coolant hoses from bulkhead
disconnect coolant pipes from radiator hoses.
disconnect fuel pipes from fuel pipe rail on nearside of engine
open ECU box on NSF and unclip the wiring loom which corresponds to the engine loom.
verify all pipes wires etc are unfastened
unfasten top engine / gearbox mounting bolts.
slowly lift front of car with suitable lifting equipment - (i have a mini digger at home.... guess what I used!!!)
lift car front end to allow the engine and gearbox assy to be pulled free.
support vehicle securely.

I'm guessing i missed some steps.... like removing the underbody pan etc...
but hopefully you will get the idea.
When Dave mentioned he did his on axle stands, I had no excuse to pull my engine and box out.
with the minidigger. it took me 3hours to remove..
I havent refitted it yet, as I am fully re-brake-piping the car and painting the engine bay prior to rebuilding the clutch / engine and gearbox(es).
Also.... download the RAVE Manual.... it really helps.
 
Here are the pictures I managed to get. The whole project ended up being very time consuming due to rusted bolts mainly. With the engine out I replaced the water pump with a bearmach unit, the thermostat, fan or accessory drive belt, clutch and flywheel, all clutch hydraulics, turbo cartridge, and rear engine mount (polyurethane).

The engine came out along with the subframe, hub, lower arm and rotor on the passenger side, and the hub rotor, lower arm and suspension strut on the drivers side. Would have been much easier to take the drive shafts off but oh well. The car had to be lifted high to clear the engine coming out underneath, very scary. I have an exhaust guard on the back and it was an inch and a half off the ground.

The pictures below show the old clutch. It was new last December but my car is used offroad and has more power, and i have plans to make more yet, so I replaced it with a Stage 3 kit with a single mass flywheel from CG Motorsports. Excellent service I might add. My kit was custom made for me and I had it in 5 days. I got a call from one of their technicians a couple of days after my order asking me what my car was used for and what power it was making so they could make sure it would give the best performance. In the end the stage 3 kit was fitted with heavy duty springs to make it more driver friendly and the friction material is ceramic. I have about 200 miles on this kit now and so far it feels perfect. Much nicer than my old one, and doesn't feel like it has bad or worsened road manners at all.

All the hydraulics were replaced as these were what turned out to be at fault. I opened the bleed nipple for the clutch and pumped the pedal and very little fluid came out even though the system was full. I decided to cut the pipe on the master cylinder side of the connection in order to remove the engine as i had replacement parts anyway.

The lower rear engine mount was replaced with a polyurethane unit for peace of mind, as was the turbo cartridge and the accessory belt. The engine feels more solid in the engine bay when its running and taking up drive now.

A couple of problems now though. I forgot to plug the AC compressor back in and the reverse lights don't work now, they were plugged in but there are 2 plugs, front and rear. The front is a multiplug that is connected but the rear just has terminals that connect...any suggestions on that?

I did have an exhaust knock and drone where the rear of the center section was hitting and vibrating on the rear subframe but that was sorted by undoing one of the bolts that bolts the exhaust to the turbo and then getting under the back of the car and pushing the whole system back into place with a foot.

This job was doable but I don't want to have to do it again for quite a while.


IMAG0313_zpswwl4a3cd.jpg
IMAG0315_zpsqoy3ee1w.jpg
IMAG0316_zpsns4q0n5t.jpg
IMAG0320_zpsc6jjxpuu.jpg
IMAG0324_zps1vfz72xc.jpg
IMAG0319_zpsmepxeji9.jpg
IMAG0326_zpsp8azpjp9.jpg
IMAG0322_zpsvneikb0v.jpg
 
A couple of problems now though. I forgot to plug the AC compressor back in and the reverse lights don't work now, they were plugged in but there are 2 plugs, front and rear. The front is a multiplug that is connected but the rear just has terminals that connect...any suggestions on that?
Can't help with the air con. but the green (REVERSE) wires on the GETRAG box connect above the NS CV Joint. (on the Other box, I assume the green wires are fixed to the switch, and need connecting to the terminals behind the ECU on the inner wing.
the front gearbox connectors connectors are for the Hill Decent.
I had a similar problem with it...

https://www.landyzone.co.uk/land-rover/found-a-wire-but-no-place-to-go.287431/

That's what it was then, didn't even consider the HDC would need a switch in the gearbox. Quite silly on my part. I managed to fix the reverse light wiring. When i pulled the engine i didn't disconnect the wiring for it, (I'd already unplugged one switch so i thought that was it, and plus the other is behind a lot of stuff so i just didn't see it), so when the engine came out it pulled the terminals out of the multi plug. Dismantled the plug and put them back in and it all works now.

The air con was easy, i just forgot to plug the compressor back in.

Thanks for the help everyone, the car is running great now and more peace of mind knowing its done.
 
Back
Top