1983 110 SW rebuild

This site contains affiliate links for which LandyZone may be compensated if you make a purchase.

nickliv

Active Member
Posts
113
Location
Aberdeenshire
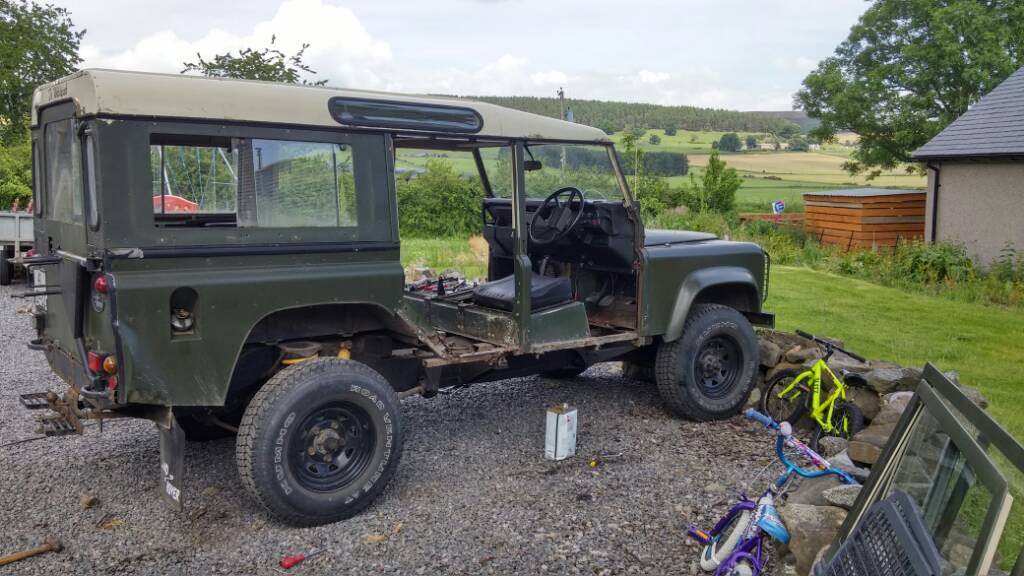
I picked this up the other day, wanted a 110 for ages, but all the ones for sale which I can afford are firmly in the 'will need work in a few years'/category, so when Mrs L (Yes, I have her blessing) found this on Scumtree, just a few miles away I thought AHA! Now I can do all the work now and it'll be hassle free for a good few years. uploadfromtaptalk1435647424342.jpg

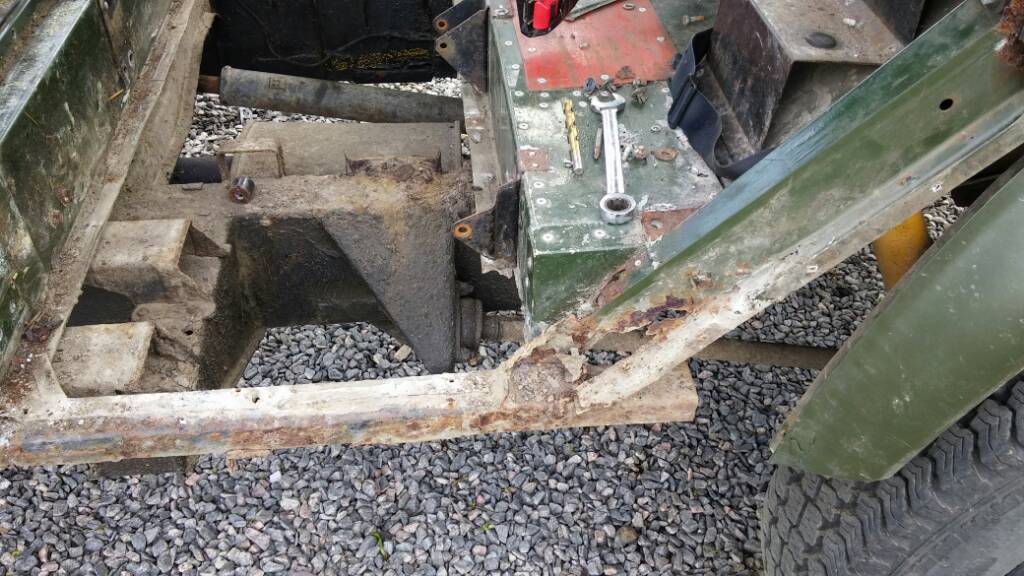
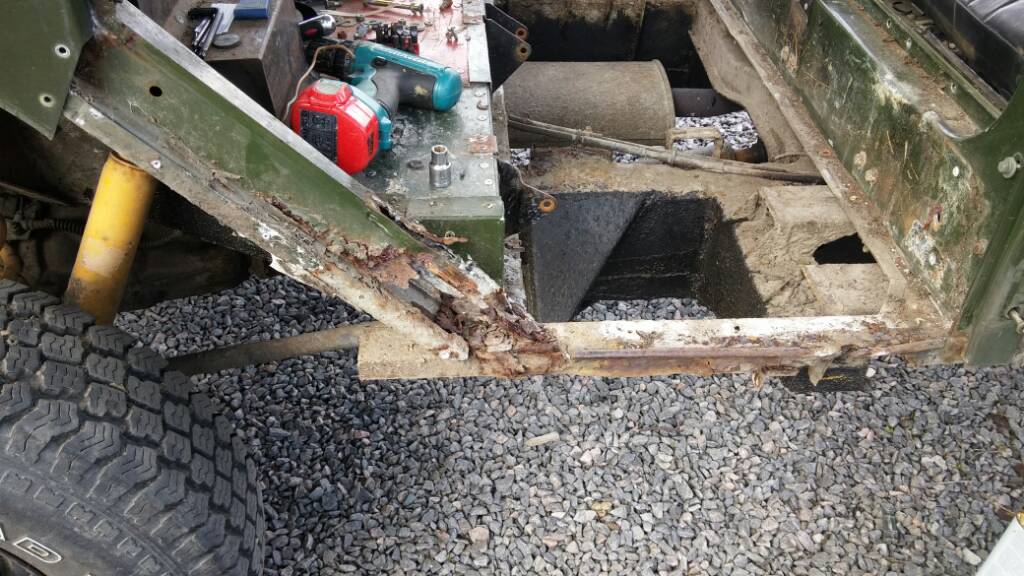
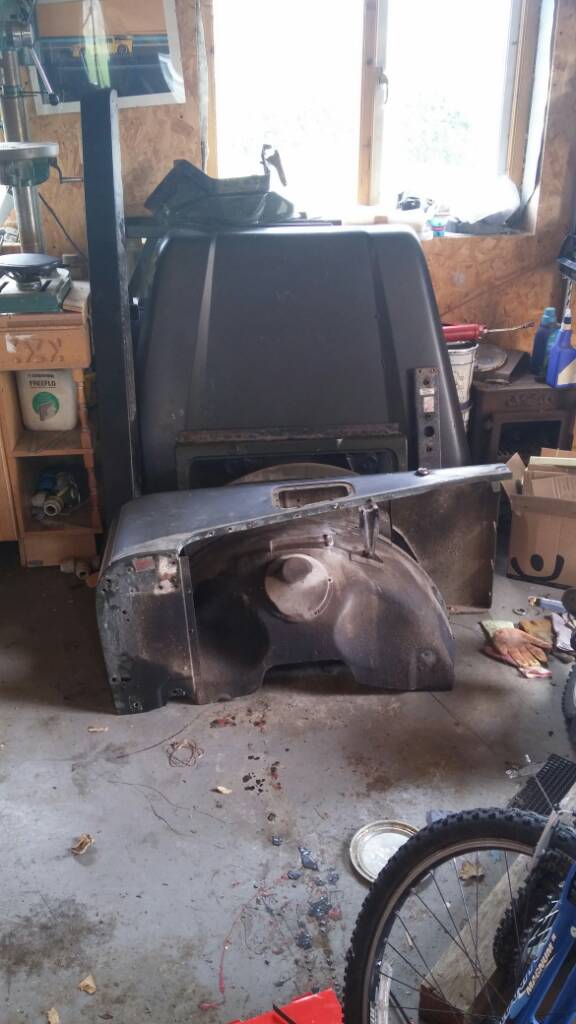
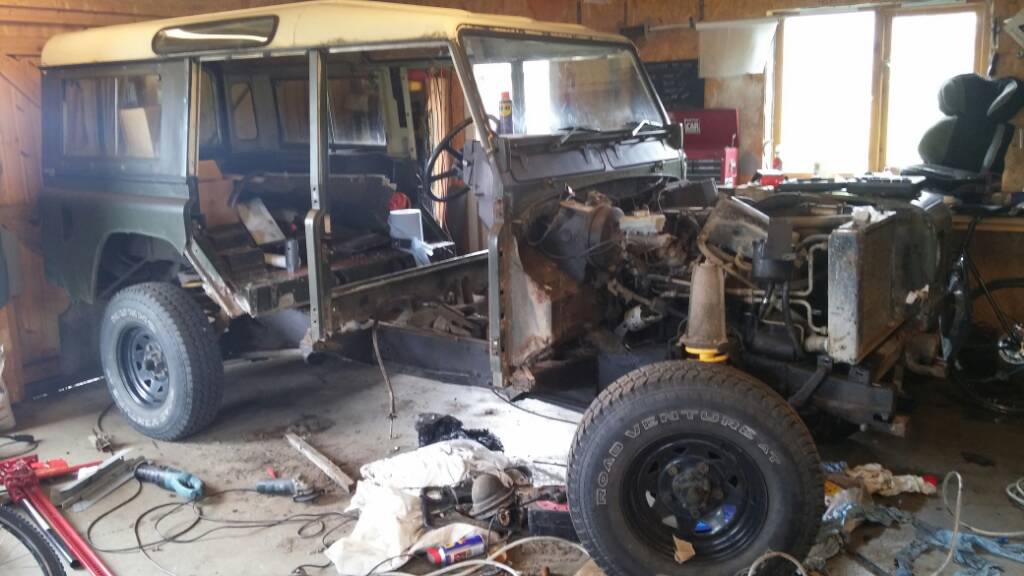
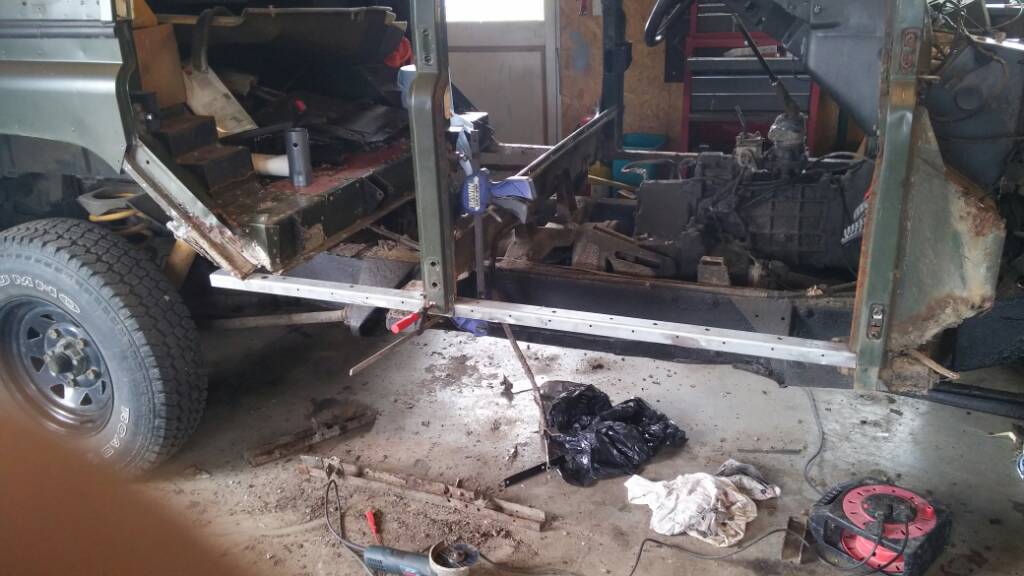
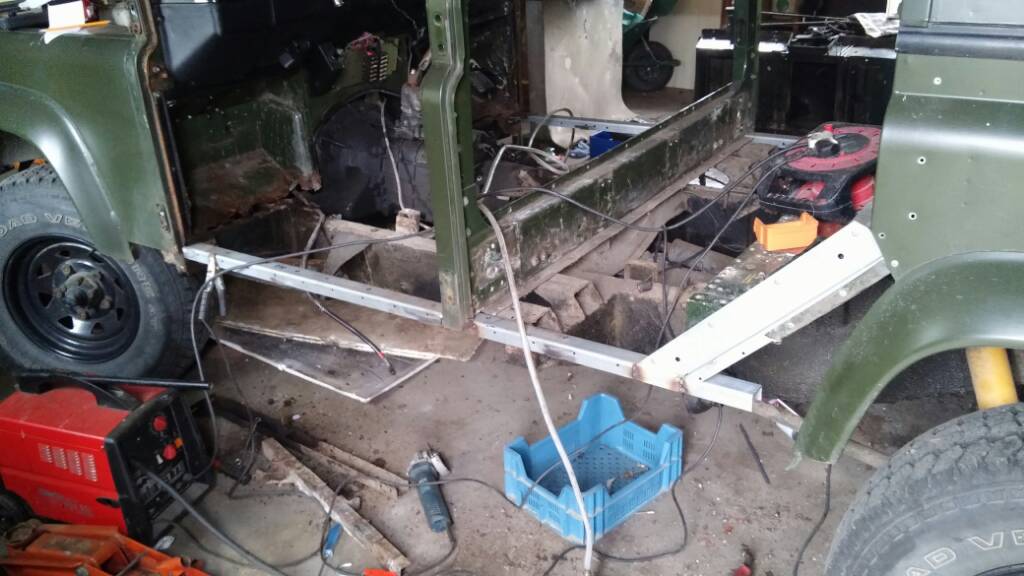
I know it looks OK, but from top to bottom, the roof rack is minging, the paintwork is grim, bulkhead corners appear to have been repaired with toothpaste, sills and C pillars are largely elsewhere, the foot wells are incapable of containing feet anymore, and the chassis has rusty patches welded onto rustier patches and nothing which could legally be described as an outrigger anymore.

The mechanicals are all good, tight and reasonably oil containing.

Interior is standard timewarp black vinyl with gaffer tape, and includes a huge steel headbutt bar for the 2nd row pax.

I plan to remove, strip, and respray the body panels, with the help of my pa who runs a shotblasting and painting co. (He has a low pressure glass bead blasting setup) obtain a galv chassis and bulkhead, and any other steel, including sills, B pillars, door frames, chassis to body brackets will be blasted, repaired if required, and galvanised before being rebuilt.

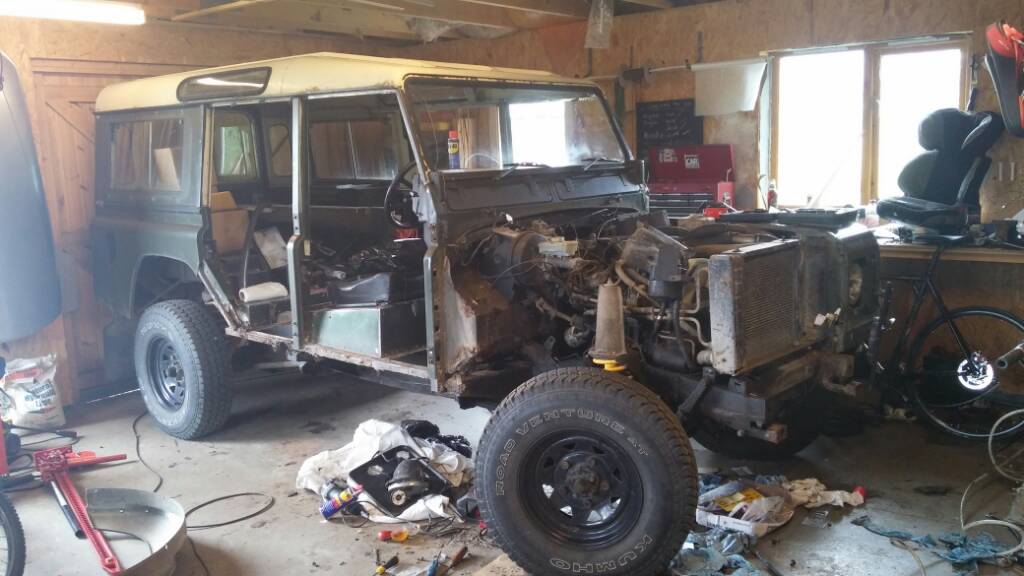
The interior is on its way out. uploadfromtaptalk1435648296447.jpg
 
Looking at the doors, I've got 3 1/2 door cards, does anyone know where I can get hold of the cards for the 2 part doors with sliding windows which use the RRC / metro / BL parts bin special handles on the inside?

All the handles are there, and they all work, but I will need to find the lower half of a nearside door card. I think it's in that weird 'no mans land' between the S3 and the wind up windows which graced the 110s further on down the road.
 
Last edited:
Picture onslaught.

d761a794b7eb293b7fa1911f408647cf.jpg
The swallows are making the most of the panel gaps. One flew past me while I was ratching for tools.

Nearside C pillar is a bit scabby. There was a piece of genuine aftermarket tin can riveted over it (Not worried. I knew it wanted doing)

ff58904470f8a315de8229f87c7a0ed5.jpg


Offside largely the same story

1a71be1807e393d87b5a983786603149.jpg
 
'Rat' look is progressing..

a165f3ef658e94788e7de2d7e43f1fec.jpg


Parts pile is growing nicely. Some minor work to be done on the door bottoms. Crispy on inside but no ally rot yet.

255049e2ef50526a090eeffb01d077b1.jpg


Dead sill removed

c9c787bc3f3fa6ccf9d04d92fb5b6218.jpg


New YRM sill dry fitted. (Now welded, but no pics. You'll have to take my word for it)

1642d2ccfb024a3ca115fb380d8f564f.jpg


The C pillar (such as it is) will be welded on after the rear tub is off, using a door for alignment, then the B post, sill, and C post assemblies will be sent away for blasting, galvanising and painting.
 
Nearside sill and lower 'C' post tacked in place.

b532716409fd7b6b60fa38021758c777.jpg


Had a chat to my old man about galvanising. He gets it on a weeks turnaround, and just under a quid a kilo. I'll have a bit of that I think.
 
My mind is turning towards getting a shopping list together. Suspension, medium / HD (planning an external cage etc) , brake lines (Stainless braided) new bushes, new steering box, new swivels, brakes (just standard ones I think) Any suggestions for polybushes and suspension kits?

I plan on using mostly on road, with some laning, probably on ATs, I'd like the ride to be pliant, but with as little 'jiggle' as possible, the roads seem to be getting progressively grimmer.
 
Last edited:
Looks good, mate. The plan you outlined in your first post seems very realistic, you obviously know what you are doing.
I've gone for standard bushes on mine, as I wanted the same ride as I had before. I've heard polybushes give a harder ride, but have no first hand experience of them.
 
Now everything aft of the handbrake is off, the chassis is completely rotten. Destined only for the skip. Well, the trailer and the scrapmans weighbridge.


Stripping the axles to tubes, then will fit temporary timber blanking pieces and they can go off with all body mounts, suspension and steering arms, and everything else that's steel to be blasted and painted, or galvanised and painted if it bolts directly to the chassis.

New chassis will be painted in a 30 yr paint system over the galvanising and should be with me early next month.
 
I've been looking for an acceptable method of having 3 x 3 point belts in the rear, as I have been blessed with a degree of fecundity.

I thought about having a bespoke rail made up which could take the top mount of the centre belt, but I've now discarded that plan in favour of 3 x 1/2 leather seats from a puma.

As my centre body crossmember wasn't there, and the tub upstand has more holes in it than a Brazilian electrician I've gone off to the good folks at YRM, and bought a galvanised puma mid crossmember, a tub repair panel, 4 x galvanised chassis to seatbox supports, some door repair pieces (natch) and a whole host of other bits and bobs, rear tub stiffeners, brackets, that kind of thing. I'll need to sort out the mahoosive latch arrangement, and also I'll need to do a spot of fabrication work on the wheelboxes but nothing too onerous. New parts are about £200 all in, may be less from a dismantlers)

I then got to looking at my rear axle. The drums were minging, the backplates were worse, a cylinder was leaking, all of which pointed me towards a rear disc conversion, the parts for which (Along with almost one of everything else from their parts list it seems) are on their way from Paddocks. THe engine is having a new timing belt and tensioner, waterpump, and a new clutch is going on the back of it.

Chassis is being delivered to the painters on Monday, I should be picking it up next weekend.

The chassis has been cut up, taken away, and weighed in, and a space is being readied.

So far, I'm about 7K in, and it looks like the bloody things come from Ikea!
 
Dropped a load of scabby rusty parts off with my old man yesterday, and what should I see in the yard but this very shiny thing.


I must have a word with Richards, as they seem to have built it upside down.

Everything needed for the assembly of a rolling chassis is now at the factory, and when I go down to collect it one weekend, I'm taking a car trailer. With the engine and box on it in a cradle.

Come on, he's got an overhead crane. It'd be daft not to!
 
Good word, fecundity! I take it you haven't been following the advice in your avatar picture :)
If I was you, or me doing a second build, I would check important measurements. ie the position of key bolting points such as tub lugs, outriggers, seat belt mounting brackets. One of my outriggers is 1cm shy of reaching the point where it bolts to the tub. If it had been welded on 1cm the other way the tub wouldn't have gone on, which would have been a sickener after building up the rolling chassis. All I have to do is find a 1cm thick bit of plate or, something similarly strong, to bolt through. Worth 10 mins with a tape measure.
PLUS ONE ON A RICHARDS CHASSIS,!!!!!! MEASURE ,MEASURE ,MEASURE !!!!!!!!!!!!!!!!!!!!!!!!!
 
Back
Top