Wet Knee Syndrome

This site contains affiliate links for which LandyZone may be compensated if you make a purchase.

JNOAKES

New Member
Posts
34
Location
Rainy City
If anybody wondering where all the this water coming from:crazy:. Have no fear on my own vehicle 110 1988 :eek: I went hunting for the my solution.:rolleyes:
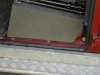
1. Start by checking around the Alpine window rubber seals first on most CSW normally. If they are tired reseal with bathroom sealant clear product around the glass to the rubber seal and on the outer roof body.
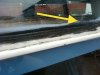
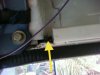
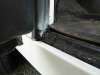
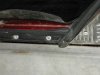
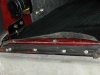
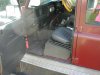
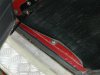
I have downloaded a few pictures to show where the water is leaking in. Follow the Yellow arrow for two gully's above the driver's door and the passenger's door the same. Here is where water seeps down towards the other picture where the Wet Knee Syndrome develops. Hope this helps anybody here wondering why.
 

Attachments

  • Alpine window.jpg
    Alpine window.jpg
    42.9 KB · Views: 1,129
  • GULLY.jpg
    GULLY.jpg
    38.9 KB · Views: 813
  • WETKNEE.jpg
    WETKNEE.jpg
    38.2 KB · Views: 557
I have been chasing the same issue (shock horror!) but I have no roof windows.. My last hope is that it's the missing vents in the roof above the rear door!
 
Little update and possible correction. I placed two wads of kitchen role in my channel nearest to the roof. one at the front of the door and at the rear of the door. Rear dry but front wet while on a minor slope. This suggests the front corner is possible cause.
 
Front corner was (one) of the casues on mine

Think I may have also improved the 'wet footwell' look as well.

Used some dumdum stuck to the front edge of the door sill (the fixed bit not the door itself) as found a gap where the rubber on the door doesn't go all the way to the edge.

Basically stuck a lump on - shut the door - reopened and then smoothed/trimmed to where the door had left an imprint.

Seems to have helped - piccy attached
 

Attachments

  • dumdum.jpg
    dumdum.jpg
    78.6 KB · Views: 607
My theory is that the water comes in through the seal between the roof and the side panel and then runs down the channel onto my leg.

I've noticed that a lot more water gets in if there's a strong wind blowing against the side of my truck, but only on the side that the wind is hitting.

I recently changed my van side panels for some sides with windows and fitted new seals which stopped the leaks for a couple of months, however the leaks have now started again. I'm planning on filling the joints up with sealant when I get chance, to see if that keeps the water out.
 
i do believe that i have just solved my wet knee mystery...

i have a 110 van with no curved corner roof windows so it wasnt those leaking, tried the kitchen roll technique but too much was coming in so both were soaked! anyway, after a good look arround i found that the top corners of the windscreen frame-roof sealant had started cracking and coming away so daubed a load of new sealant over it all and so far so good!


959456a4.jpg

58157d6c.jpg
 
Yep

That worked for me too - no longer brake and enjoy the 'internal waterfall' experience

I took the sealant right under the gutter at the front (going back about 1 - 2 cm) - one side had a larger gap than the other!
 
Just replaced the lower door seals all round and sealed the sunroof up; I'm going to replace the roof with one without a sunroof next. The alpines seem ok. Wait for some rain to test the mods out.......
 
Hi mate,

When I got the wagon, the off side didn't have any on and the ones on the near side were held by severely rusted strips, which I removed. I recently bought some off fleabay and rivetted them onto the lower frames (b post) with plenty of silicone behind them.

330609258535

I also bought an odd one and cut it in half for the second row doors.

I can take some pics if that helps.

Easy job:D
 
Pics would be gOod mate, iv gotta do em on 8 doors!

How do the seals running up the sides and along the roof fix in place? Any glue needed? Or just push in?
 
I renewed the standard door seals that attach to the body and used a thin strip of silicone to make that they stayed in place. The lower seal is rivetted onto the body between the start and finish of the main seal. I'm away tomorrow but I'll sort some pics out by the weekend.

Cost about £20 to do the four doors and takes less than an hour.

Whilst tinkering I sprayed the inside of the doors with waxoyl.
 
Last edited:
Here's the results - seems ok but then it hasn't rained!!!!
 

Attachments

  • DSCN3278.JPG
    DSCN3278.JPG
    253 KB · Views: 357
  • DSCN3277.JPG
    DSCN3277.JPG
    261.1 KB · Views: 309
  • DSCN3276.JPG
    DSCN3276.JPG
    227.4 KB · Views: 324
  • DSCN3275.JPG
    DSCN3275.JPG
    269.1 KB · Views: 325
  • DSCN3274.JPG
    DSCN3274.JPG
    248.9 KB · Views: 297
  • DSCN3279.JPG
    DSCN3279.JPG
    324.5 KB · Views: 295
Prevention is better than cure...............

I'm at the cure stage :/ I havnt had the Landy long but when I got it the bulkhead was on it's way out the the door hinge posts have gone, keep looking for a set of half decent ones on eBay bit you know what there like! And same for a bulkhead I'm really after a td5 one for the dash or the late 300 model as you said, just got alot of tidying to do!
 
Back
Top