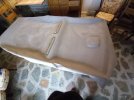
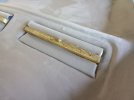
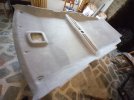
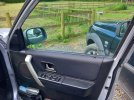
Started in middle at the net bag recesses, then finished rear then front.

First two I did were sunroof ones. Doing the plain roof later this week. Hope it is smooth at the front, the sunroof hole allows for slack to be taken out !!
 
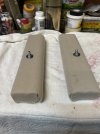
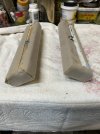
Made up a couple.of map pocket presses to make sure the headlining sticks in the corners.

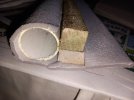
A bit of profiled skirting and 36mm waste pipe !!!

20250211_140153.jpg20250211_140212.jpg

Bolt goes through the fixing hole in the roof to pull them in firmly.
 
You're going to be rivaling Exmoor Trim at this rate Andy. First class stuff. I wondered about filling some plastic bags with sand to use in the pockets to ensyre the fabric sticks, but this method looks good.
 
Done it. Like using the suede effect. Nice and thin and stretches.
20250214_112930.jpg20250214_112944.jpg20250214_124218.jpg

The best tip is only to glue about 12 inches, sorry 300mm at a time and take your time.

Don't glue the edges until you are done and then the glue won't grab the fabric while you spread it out evenly.

Allow the fabric to feed into the recesses rather than stretch it in. Then use the stretch in the material to even out after the shape is covered.

Supplied by https://www.ebay.co.uk/itm/28405480...5qQSb6hQNK&var=&widget_ver=artemis&media=COPY

Took 3 hrs.

Will leave inside for 24hrs then refit.
 
Last edited:
Done it. Like using the suede effect. Nice and thin and stretches.
View attachment 335075View attachment 335076View attachment 335077

The best tip is only to glue about 12 inches, sorry 300mm at a time and take your time.

Don't glue the edges until you are done and then the glue won't grab the fabric while you spread it out evenly.

Allow the fabric to feed into the recesses rather than stretch it in. Then use the stretch in the material to even out after the shape is covered.

Supplied by https://www.ebay.co.uk/itm/28405480...5qQSb6hQNK&var=&widget_ver=artemis&media=COPY

Took 3 hrs.

Will leave inside for 24hrs then refit.
That looks really good
 
Done it. Like using the suede effect. Nice and thin and stretches.
View attachment 335075View attachment 335076View attachment 335077

The best tip is only to glue about 12 inches, sorry 300mm at a time and take your time.

Don't glue the edges until you are done and then the glue won't grab the fabric while you spread it out evenly.

Allow the fabric to feed into the recesses rather than stretch it in. Then use the stretch in the material to even out after the shape is covered.

Supplied by https://www.ebay.co.uk/itm/28405480...5qQSb6hQNK&var=&widget_ver=artemis&media=COPY

Took 3 hrs.

Will leave inside for 24hrs then refit.
Lovely job. :)
 
Started in middle at the net bag recesses, then finished rear then front.

First two I did were sunroof ones. Doing the plain roof later this week. Hope it is smooth at the front, the sunroof hole allows for slack to be taken out !!
Recently did mine completely changes the look inside and feels more comfy than the cloth sagging everywhere
 
Made up a couple.of map pocket presses to make sure the headlining sticks in the corners.

A bit of profiled skirting and 36mm waste pipe !!!

View attachment 334926View attachment 334927

Bolt goes through the fixing hole in the roof to pull them in fi

Made up a couple.of map pocket presses to make sure the headlining sticks in the corners.

A bit of profiled skirting and 36mm waste pipe !!!

View attachment 334926View attachment 334927

Bolt goes through the fixing hole in the roof to pull them in firmly.
What size was the skirting & wood blocks ?
 
Made some forms to fit the headliner map recess similar to yours. Now waiting for the weather to cool a bit before doing the headlining. Board is already in the garage & cleaned up.
 

Attachments

  • IMG_2578.JPG
    IMG_2578.JPG
    402.4 KB · Views: 23
  • IMG_2577.JPG
    IMG_2577.JPG
    428.7 KB · Views: 26
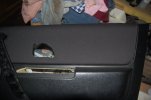
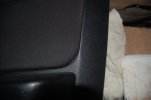
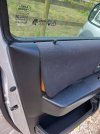
Finished the door panels this afternoon.

Used this: https://ebay.us/m/h4Hdh4

1m at £14.95 will do 8 door panels.

It is also such a close match to the original that if any are ok they can be left alone.

20250627_093129.jpg20250627_093148.jpg

LHS one is representative of the problem before recovering. Get all old foam off and the door handle has a collar on the back that can be released by twisting and then the fabric slid under while gently lifting the handle out.

The door lock button also comes out. 3 very small screwdrivers under the lugs underneath and out they pop ready for re-use.
 
Last edited:
Finished the door panels this afternoon.

Used this: https://ebay.us/m/h4Hdh4

1m at £14.95 will do 8 door panels.

It is also such a close match to the original that if any are ok they can be left alone.

View attachment 344046View attachment 344047

LHS one is representative of the problem before recovering. Get all old foam off and the door handle has a collar on the back that can be released and then the fabric slide under while gently lifting the handle out.

The door lock button also comes out. 3 very small screwdrivers under the lugs underneath and out they pop ready for re-use.
That's a really smart job.
 
Last Sunday, I bought my first Freelander 2 — and, in fact, my first Land Rover. After decades of G-Wagon ownership, this feels a bit like changing schools mid-term: familiar turf, but different uniform. Since 1996, I've owned a 1982 280 GE LWB — built like a Panzer and about as subtle. It has hauled 2.7 tonnes of rocks from the quarry, towed 5 tonnes of marble from town, and gone up a 45 degree slope (1 in 1) towing a 6 metre trailer loaded with firewood... although to do that I had to wrap the tyres with actual chains run through the wheel slots. I still have it, but it drains a tank full of petrol in about 110 miles, and costs $150 (instead of mpg, I calculate $pg)

But the Freelander is a new adventure. Technically, it’s not the first Land Rover in the family. My daughter owns a 2016 Discovery Sport, which bravely endures light horse paddock duty, transports a pair of hairy dogs, and regularly serves as a mobile toy box for my grandson. The first Land Rover I ever drove, though, was a 1970s 5-door Defender. I ferried it from the Rogue River in southern Oregon all the way to the Canadian border. Took two days, consumed fuel like a rugby team after a cup final, and I’m fairly certain it permanently damaged my hearing. It sounded like a cement mixer full of spanners being driven by a bad-tempered blacksmith. But it got there — eventually.

Now here I am with a Freelander 2. It’s not a G-Wagon, and it’s certainly not a Defender, but I have to say — it’s got charm. Feels like a spaniel in hiking boots: cheerful, competent, and always game for a muddy walk. I tend to buy "pre-collectibles" meaning distinctive cars when they have hit the bottom of their depreciation schedule before the survivors begin to rise in value. The Freelander fits in that category when the forums tend to shift from "take it to the dealer and demand warranty" to DIY workarounds.

But I digress, something I do when I am supposed to be doing my taxes, but rather write about cars.

Regarding dropping headliners, I am very familiar with the problem having just sold my 2004 Jaguar XJ6 (Ford era). The conventional solution is as found in this thread. Take out the old, remove the deteriorated inner bits, glue and replace.

However, my FL2 has a more innovative approach. Looks like they Googled "upholstery buttons", bought a batch and did a tufted pattern. Not sure if this was in addition to glue, but probably. It would ensure the tension on the glue is gravity-dispersed if I can coin a phrase.

Being a bit OCD, I would have done more precise measurements of the placement, and maybe done a more military or industrial look with contrasting buttons, but it is an interesting prototype.

Not a great photograph, I took it after dark, and it looks like there is a pizza stain I need to clean.

Headliner.jpg
 
BTW, if anyone wants the map pocket formers in post-#31 above, they are going free. (sorry to hijack Andy)
 

Similar threads