Disco 2 Where do these parts fit when refitting the headlining?

This site contains affiliate links for which LandyZone may be compensated if you make a purchase.

Keith_L

Well-Known Member
Posts
365
Location
Worcestershire, UK
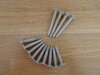
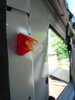
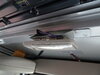
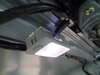
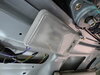
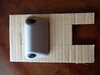
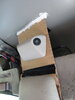
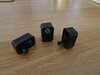
The local garage removed my headlining and trim when they sealed up my sunroofs and left everything off whilst I monitor the results. I said I would put everything back myself so they dropped of all the parts and fittings. I have been trying to work out what goes where but am stumped with the parts in the photo. Can anyone identify what they are and where they should go? I only have three of them.
 

Attachments

  • DSC08175.JPG
    DSC08175.JPG
    219.9 KB · Views: 94
That looks like it. Not entirely sure why they are needed but no doubt that will become clear when I come to screw it all together.

Now knowing what they are and where they come from I folded the 3rd row seats out and sure enough, lurking underneath one of them was the 4th spacer.

Many thanks for your help @marjon - much appreciated.
 
Two more questions.

1) I have 4 long and 9 (!) short fir-tree fasteners which I assume are for the rear upper trim panel. Where do the 4 long ones go? Right at the back?

2) Does the red bit on the trim panel just push into the white piece on the 'C' pillar? It seems an odd arrangement.

Many thanks.
 

Attachments

  • DSC08180.JPG
    DSC08180.JPG
    327.1 KB · Views: 70
  • DSC08179.JPG
    DSC08179.JPG
    198.9 KB · Views: 58
  • DSC08178.JPG
    DSC08178.JPG
    357.3 KB · Views: 60
I looked at the exploded diagram on the Land Rover Classic site which shows 3 types of fir-tree clips and they all look the same in the diagram.
I had a similar problem when I was taking the carpet out of the rear of my Disco 2 but what i did was check them off against the ones on the other side, to be sure of using the right ones, then insert them in the holes once the side panels were off.
Obvs you can't do this as the peeps you used didn't do it for you.
I think if you use a small screwdriver or a nail or something to determine the depth of the holes you may be able to work it out.
Best of luck mate, tis the sort of annoyance you don't need!:):):)
 
Thanks to both of you. It's really helpful when suppliers add useful info like that rather than just 'Trim Clip' with not even a photo. So, per side:

EZM100300LUM x 2 for rear of trim panel (~55mm)
EZM100360LUM x 3 for top of trim panel (~ 40mm)
JPC4651LUM x 1 for front of trim panel (~20mm)

I have confirmed these lengths using @Stanleysteamer 's screwdriver trick. Clearly I have the wrong clips for the front of the trim panel as 40mm will be too long to push fully home, but a few minutes with a saw should sort that.

Any thoughts on question 2?
 
Re your question 2, it is really annoying because I do recognise them, but can't be sure how they fit.
I haven't taken my headlining out, so yes I think you are right, they are something to do with the side panels where they go around the rear window. My non-thinking brain tells me they went one either side at the front edge of the window somewhere.
Do you have the rear side panniers or the third row of seats?
I have the panniers and they had to come out to get the carpet out without cutting it.
 
For your second question, sorry:( cant help, Never even sat in a D2 let alone wielded spanners at 1:).

But it does appear it just seems to rest in it , that's all I can see.

J
 
Two more questions.

1) I have 4 long and 9 (!) short fir-tree fasteners which I assume are for the rear upper trim panel. Where do the 4 long ones go? Right at the back?

2) Does the red bit on the trim panel just push into the white piece on the 'C' pillar? It seems an odd arrangement.

Many thanks.
Hi Keith, yes just push the stud over the red bit on the trim then into the yellow receiver. The long fur trees do indeed go at the back as I took pics of mine as I went along.
20200920_140936.jpg
20200920_140758.jpg
20201208_140712.jpg
 
Hi Keith, yes just push the stud over the red bit on the trim then into the yellow receiver.

Okay, thanks. So I need to get the white stud out of the yellow receiver. I did give it a tentative pull yesterday but it seemed very firmly in place. Now I know it's meant to come out I might be a bit more assertive with it.
 
Okay, thanks. So I need to get the white stud out of the yellow receiver. I did give it a tentative pull yesterday but it seemed very firmly in place. Now I know it's meant to come out I might be a bit more assertive with it.
Yeah mine was a tight fit but as long as you pull it out square it will come out, maybe a small squirt with silicone just to help it along ?
 
Progress at last. I did squirt a bit of silicone on the white bits and left them. I then went back after a while and after a lot of effort and determined yanking got them both out.

With everything now free and cleaned up I started to put all the trim back in the loadspace area, albeit I am leaving the headlining out so we can spot any future leaks from the sunroofs. It all went back surprisingly easily. Now I can see why the back grab handles have extension pieces. :)

I remounted the rear courtesy light as that fits directly onto the roof and am currently working out how to fit the front two courtesy lights as they normally mount onto the headlining or the front trim which again I am leaving out because it covers the leaky part of the front sunroof. All that will be left then will be the front alarm sensor to fix somehow.

Thank you everyone for your help. I'm starting to feel an attachment to the Disco now.
 
I've now managed to get all three courtesy lights in and working. The rear one was easy - it just bolts on. For the middle one I utilised the one screw fixing and screw which was used to hold the headlining in place, with some padding to help it sit flush and stop it rocking when you press the button. For the front one I moved it closer to the sunroof (which makes it easier to reach), put a piece of stiff foam behind it and used a cable tie round the bracket to hold it in place. Result.
 

Attachments

  • Rear.JPG
    Rear.JPG
    207.2 KB · Views: 47
  • Middle.JPG
    Middle.JPG
    207.4 KB · Views: 44
  • Front.JPG
    Front.JPG
    278.8 KB · Views: 42
And finally the left hand alarm sensor. I used a bit of corrugated card, cut to rest on the top of the upright in the 'B' pillar and cut out to take the metal surround for the sensor which I liberated from the headlining. Glued to the roof with Gorilla Glue and wedged in at the bottom with card to stop it vibrating.

All a bit Heath Robinson but everything works despite no headlining, and at virtually no cost.
 

Attachments

  • DSC08186.JPG
    DSC08186.JPG
    282.5 KB · Views: 37
  • DSC08188.JPG
    DSC08188.JPG
    234.1 KB · Views: 42
Back
Top