Northern Irelander
Well-Known Member
- Posts
- 2,890
- Location
- N. Ireland
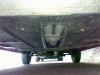
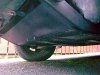
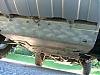
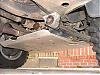
A few peeps have done this mod, removing the whole tray is an awkward task.
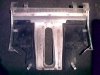
There are 12 bolts of various sizes on the earlier type, takes around 10-20min to remove, depending on how handy you are with a rachet spanner.
Drill out all the rivets at the front and sides, 14 by my counts.
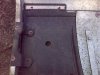
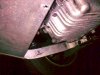
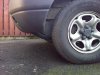
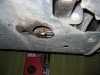
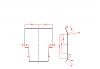
Fabricate two 90 dgree brackets(approx 5 x 4cm) plus some straight pieces of alum strip, salvage the two pieces at the front of the tray, just re-position them.
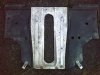
Have the holes in the brackets drilled and tapped:
Tap M6 for all the brackets - if you are using the OE black bolts at the rear of the tray/subframe. These bolts are actually M8 with 10mm hex head, although standard M6 bolts will have 10mm heads as well.
I used M8 tap, as I have replaced the 2 black bolts with standard M8 bolts, 13mm head.
Strategically place 2 strips at the front and 2 brackets at the side. The existing brackets at the rear are good, however; mine snapped so replaced them with alum strips.
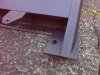
Once modified, it only takes 2min to undo 6 bolts with a single spanner (Either 10mm or 13mm depending on which size bolts you used), plus you are not wrestling with the whole tray.
Some of the Td4 boys have drilled an access hole under the oil filter/drain.
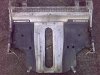
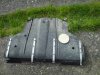
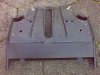
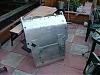
There are a couple of additional mods on this tray,
the gaping hole is an air-scoop to help keep the 1.8 engine and SS downpipe/IRD cool in summer.
There are also 2 alum strips either side of the scoop, running front to back. These were added for extra rigidity, the fibre-glass has been known to warple like a Rolf Harris whopper board, fouling on the sump whilst doing so")
There are 12 bolts of various sizes on the earlier type, takes around 10-20min to remove, depending on how handy you are with a rachet spanner.
Drill out all the rivets at the front and sides, 14 by my counts.
Fabricate two 90 dgree brackets(approx 5 x 4cm) plus some straight pieces of alum strip, salvage the two pieces at the front of the tray, just re-position them.
Have the holes in the brackets drilled and tapped:
Tap M6 for all the brackets - if you are using the OE black bolts at the rear of the tray/subframe. These bolts are actually M8 with 10mm hex head, although standard M6 bolts will have 10mm heads as well.
I used M8 tap, as I have replaced the 2 black bolts with standard M8 bolts, 13mm head.
Strategically place 2 strips at the front and 2 brackets at the side. The existing brackets at the rear are good, however; mine snapped so replaced them with alum strips.
Once modified, it only takes 2min to undo 6 bolts with a single spanner (Either 10mm or 13mm depending on which size bolts you used), plus you are not wrestling with the whole tray.
Some of the Td4 boys have drilled an access hole under the oil filter/drain.
There are a couple of additional mods on this tray,
the gaping hole is an air-scoop to help keep the 1.8 engine and SS downpipe/IRD cool in summer.
There are also 2 alum strips either side of the scoop, running front to back. These were added for extra rigidity, the fibre-glass has been known to warple like a Rolf Harris whopper board, fouling on the sump whilst doing so