BuzzLand
Active Member
- Posts
- 886
Bought this last year and it was in a bit of a rough and ready condition. The RAC inspected it and the engines a good one.
It's got the 300 Straight 4 TDI engine in it (despite being a 2001 model) so I know it's not got the potential of being a nightmare to work on compared to the newer Td5.
The bodywork was a bit rusty on the steel sections and needed some mostly cosmetic work:

Nice views, you feel like master and commander up in the cab boys

Bit 'o damage here:

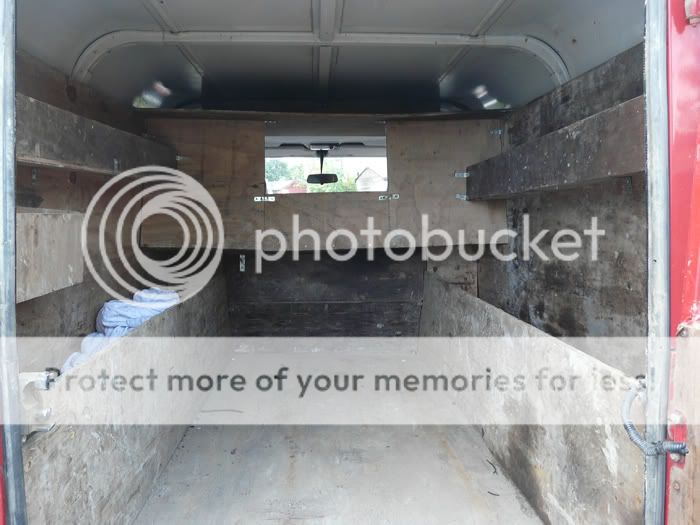
The landrover was previously owned by a drilling company and has a nice open space in the back that is stripped out and is great for stowage. I've got big plans for in here:

Theses are really handy for letting fresh outside air in. When you are at speed you don't need any fans drawing air away from the engine either

Need to see about getting a padlock on here.

While on the move to work I had a blowout. I steered safety over to the hard-shoulder and tried self-recovery.
Out came the 2 tonne jack I’d bought from Halfords but no dice. It wasn’t big enough and kept slipping off the lifting point. It’d be too dangerous to continue with that.
I called out recovery and learned my lesson, next time I’d have to get a bigger jack.
My tyres were pretty worn too and I vowed to get a full set of new tyres.
So once at the nearest tyre place I got myself some all-singing, all-dancing ‘Grabber’ All terrain tyres.
Although it wasn’t the tyre wear that caused the blowout I learned that it was from running over a roofing bolt. These, I’m told by the mechy, are the leading cause of blowouts on the motorways.
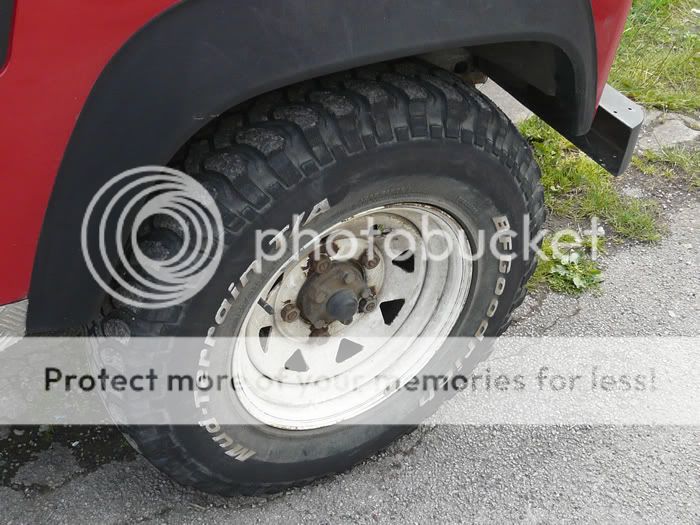
Here’s one of the old BFG tyres.

The spare tyre mounted on the bonnet is the real deal, a proper one and not a space saver either.
Now a bit of a niggle with Defenders is that they are prone to leakage. Mine was no exception. On the inside of the passenger door and the drivers side along with the cargo door it leaked. Drip, drip everytime it rained hard.
If you left the vent flaps open and it rained there’d be leaks from their too but closing them prevented that.
It was time to fix the leaks.
The drivers side leak I fixed by treating the metalwork where the rubber weather seal joined with some rust eater and touch-up paint.
The roof was where the real work was needed though and I needed something to match the white roof.

My local mechy Tom advised me that the best stuff was the window sealant used by double glazing firms. Car accessory places also supplied it.
After a few sagas I sourced some of the stuff – Tiger Seal!

I was warned not to tarry when applying it. Once it the stuff dries, it grips like a tiger and there’s no going back.
Well I attached the grease gun frame and it didn’t work. Not good as it means I’ve no way of applying the sealent to the roof seam 
In the end I just cut the neck off and stuck a big ole thin rod in and pulled it out. Then with some rubber gloves on I just finger applied it into the groove.
Took a while let me tell you but after about an hour I’d just managed to get both sides plus the cross groove done when the stuff set hard!
No leaks from the roof now, just a little bit from the door seal near the ground. But that’s nothing really.
It's got the 300 Straight 4 TDI engine in it (despite being a 2001 model) so I know it's not got the potential of being a nightmare to work on compared to the newer Td5.
The bodywork was a bit rusty on the steel sections and needed some mostly cosmetic work:

Nice views, you feel like master and commander up in the cab boys

Bit 'o damage here:

The landrover was previously owned by a drilling company and has a nice open space in the back that is stripped out and is great for stowage. I've got big plans for in here:

Theses are really handy for letting fresh outside air in. When you are at speed you don't need any fans drawing air away from the engine either

Need to see about getting a padlock on here.

While on the move to work I had a blowout. I steered safety over to the hard-shoulder and tried self-recovery.
Out came the 2 tonne jack I’d bought from Halfords but no dice. It wasn’t big enough and kept slipping off the lifting point. It’d be too dangerous to continue with that.
I called out recovery and learned my lesson, next time I’d have to get a bigger jack.
My tyres were pretty worn too and I vowed to get a full set of new tyres.
So once at the nearest tyre place I got myself some all-singing, all-dancing ‘Grabber’ All terrain tyres.
Although it wasn’t the tyre wear that caused the blowout I learned that it was from running over a roofing bolt. These, I’m told by the mechy, are the leading cause of blowouts on the motorways.
Here’s one of the old BFG tyres.

The spare tyre mounted on the bonnet is the real deal, a proper one and not a space saver either.
Now a bit of a niggle with Defenders is that they are prone to leakage. Mine was no exception. On the inside of the passenger door and the drivers side along with the cargo door it leaked. Drip, drip everytime it rained hard.
If you left the vent flaps open and it rained there’d be leaks from their too but closing them prevented that.
It was time to fix the leaks.
The drivers side leak I fixed by treating the metalwork where the rubber weather seal joined with some rust eater and touch-up paint.
The roof was where the real work was needed though and I needed something to match the white roof.

My local mechy Tom advised me that the best stuff was the window sealant used by double glazing firms. Car accessory places also supplied it.
After a few sagas I sourced some of the stuff – Tiger Seal!

I was warned not to tarry when applying it. Once it the stuff dries, it grips like a tiger and there’s no going back.
Well I attached the grease gun frame and it didn’t work. Not good as it means I’ve no way of applying the sealent to the roof seam 
In the end I just cut the neck off and stuck a big ole thin rod in and pulled it out. Then with some rubber gloves on I just finger applied it into the groove.
Took a while let me tell you but after about an hour I’d just managed to get both sides plus the cross groove done when the stuff set hard!
No leaks from the roof now, just a little bit from the door seal near the ground. But that’s nothing really.


