The rebuild begins!

This site contains affiliate links for which LandyZone may be compensated if you make a purchase.

ging360

Active Member
Posts
162
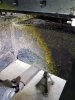
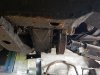
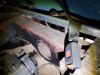
So after much faffing around trying to sort the seat box properly in my Landy which expanded to the tub door pillars and the front fwd tub crossmember it was decided that something proper had to be done. So it was all temporarily bolted back together. And the dissmantling has started to get it into the single council garage. Some pics of the seat box refurb. Found what I beleive to be the original factory build spec sheet under one of the seat box rails. The front bumper was used a an improvised workbench and a old work mate was used to fold up the panels. It was all screwed back together with stainless screws until it could be done properly. IMG_0367.JPGIMG_0368.JPGIMG_0367.JPGIMG_0368.JPG IMG_0370.JPGIMG_0375.JPGIMG_0376.JPGIMG_0378.JPGIMG_0379.JPGIMG_0380.JPGIMG_0382.JPGIMG_0383.JPGIMG_0384.JPGIMG_0386.JPGIMG_0389.JPGIMG_0393.JPG IMG_0394.JPG
 
What are your plans for the seatbox? Mine is in a similar state - I've found some of the repair panels available on line but a lot of the less common bits (so not ends) don't seem so easy to get to. I can't find anyone who might do a whole replacement either. Interested in options as I can't bring myself to refit something that's already corroded.
 
What are your plans for the seatbox? Mine is in a similar state - I've found some of the repair panels available on line but a lot of the less common bits (so not ends) don't seem so easy to get to. I can't find anyone who might do a whole replacement either. Interested in options as I can't bring myself to refit something that's already corroded.
So I managed to get a hold of replace ment ends, under strengthing parts and a new back piece I then also added some thick aluminium sheet to the back and thin to the front side of the seat box to extra reenforce the leading edge. Some pictures of what it is all like reassembled to keep it road worthy for a few months until I got time to start striping it again.IMG_0552.JPG IMG_0554.JPGIMG_0555.JPGIMG_0561.JPGWill put up some more photos when I get it all apart again. Managed to get enough of the interior trim out today to allow the roof to be unbolted from the side panels. IMG_0556.JPGIMG_0557.JPGIMG_0558.JPGIMG_0566.JPGIMG_0567.JPGIMG_0570.JPG I will need to remake the metal panels that go over the top of the windscreen frame and a few of the other panels.
 
That looks interesting. Good luck.

What's that on the back of the transfer box? An overdrive unit? I'm intrigued.
 
That looks interesting. Good luck.

What's that on the back of the transfer box? An overdrive unit? I'm intrigued.
Yes a fairey overdrive people go on about how weak they are but I use in all 4 gears and reverse with no problems at all.
 
Well more progress was made to day with the help of my dad today (he's the one in the photos). IMG_0573.JPGIMG_0574.JPGIMG_0577.JPGIMG_0578.JPGIMG_0579.JPGIMG_0580.JPGIMG_0576.JPGIMG_0581.JPGIMG_0582.JPG

Roof side and door tops all came off pretty quickly with no need to resort to grinding or cutting the only caualties of the day were one sud of a rather rotten door top and a bolt holding one of the rear jump seats in place which we removed as well. I also found some more vehicle literature stuffed down the top of the wind screen. I like the look of the Landy with the screen folded flat. Rotten top rail on the bulkhead to be expected really.
 
So not so much done yesterday. Rear tow bar removed along with its electirics which had been put in with splice connectors. There is a special place in hell for people that use those things. Also managed to get the last of the back seats out and remove the grab handles on the back of the crossmember. Unfortunately not many pictures but may get some more today. IMG_0610.JPG
 
Last edited:
IMG_0630.JPG IMG_0627.JPG IMG_0628.JPG IMG_0626.JPG IMG_0629.JPG IMG_0631.JPG IMG_0635.JPG IMG_0632.JPG IMG_0633.JPG IMG_0634.JPG IMG_0625.JPG IMG_0624.JPG IMG_0622.JPG IMG_0623.JPG IMG_0611.JPG IMG_0614.JPG IMG_0615.JPG IMG_0616.JPG IMG_0617.JPG IMG_0618.JPG IMG_0619.JPG Well back off to work for 3 months on Tuesday so the last of the Land Rover work for a while. Today the front bumper, valence and grill came off. As in the photos above the front radiator support is majorly corroded along the bottom but this is not new news to me having looked at it in the past. Both front dumb irons have been replaced at some point but the front of the passenger side one is a bit rotten so may just replace the whole thing again. Also the area around the drivers side front shock mount is quite badly corroded so that will need a bit of work. The areas around and under the chassis under the gear box, and engine have been relatively well preserved over the years by the oil leakes. There is one area behind the gearbox crossmember that I am planing to make removable that needs attention. Also the area of the main chassis rail in the area the seat box toolbox usually is needs a lot of work where people in an attempt to keep it on the road have just plated over holes. The underbody crossmember under the seat box is a bit rotten and at least the top needs replacing if not the whole xmember. Re rest of chassis apart from a patch or two which needs redoing and the fuel tank/body out riggers need replacing as they have become paper thin. And of course the inevitable rear crossmember corrosion has full taken hold an spread back to behind the rear spring hanger on the drivers side. Looks as though with some work the chassis will be salvageable. The only problem I have got is how to weld in a council garage with no power. Was cocidering one of those readywelder 2's from the states which allow you to mig weld from 2 deep cycle 12v batteries or the other option is one of the new battery arc welders but they cost almost as much in some cases more expensive than a new galv chassis. Any way that is a problem I can figure out a solution to while I'm away and before anyone says I have no space to store any kind of generator and I would rather do the work my self as getting some one else to do it's a pain and I am a reasonably competent welder.
 
Wow yours is like brand new compared to mine when I stripped it down but it should be right once it's done and another one back on the road
Yeah it ain't too bad, I have been using it as transport on and off for a few years and managed to keep it going but what needs doing is getting beyond a joke. My main problems is the rear tub is rotten with bimetallic aluminium corrosion and will require a lot of work to sort that is going to be the biggest pain. The bulk head is also fairly bad but there is nothing unusual or unexpected about the repairs there so hopefully that will be fairly easy.
 
Yeah mine is or was mainly the chassis that was like a patchwork quilt ( now replaced ) and the bulkhead I just couldn't make out as it had been repaired badly but not long before I bought the 2a but still needed loads of work to be done so have decided on fitting a new galv bulkhead which I am hoping to get in a few months time once I've got the money for it.

The body on mine is ok really other than all 3 doors which I will replace and the tub only needs the x members replacing and I mite do the bright work aswell not decided yet
 
Last edited:
Well guys after a long break and a leave period almost consumed I finally found time to get back to doing on the land rover. 20180131_180327.jpg 20180131_180251.jpg 20180131_175558.jpg 20180131_180210.jpg 20180131_170050.jpg 20180131_162753.jpg 20180131_162814.jpg
So today the passenger and driver doors came off along with the exhaust, bonnet and air filter. Got some new toys to make work a bit easier.
20180131_180436.jpg 20180131_180427.jpg 20180131_170157.jpg
 
You've done pretty well considoring the room you've got, my garage is 18' x 18' 6" and still run out of room sometimes :)

Yep the council garage is pretty resrictive but it could be worse. I would not be wanting to work on anything bigger in here, I'm going to have to come up with some innvate solutions for storing some bits, might have to start tying things up to the ceiling.
 
Well the last time I will get to do any work on the landy this time round. Did not get any way near as much as I wanted to done but hey ho, it can wait till next time.20180202_164714.jpg 20180202_162119.jpg 20180202_164726.jpg 20180202_164732.jpg 20180202_165340.jpg 20180202_162832.jpg
The passenger side mud shield put up more of a fight than expected. Actually it was on one tiny 8mm across the flats bolt that held up proceedings, even after hacksawing the head off it still held on for dear life. It never actually relinquished its hold and ended up ripping through the inner wing on the way out. So that another repair to add to the body work list.

Took out the passenger side head light as well. Has anyone got any suggestions for taking the wires and female terminals out of the plastic housings without destroying them as I can' get it out through the hole in the back, want to reuse the plastic housings if possible and don't want to cut them off just yet to get them through.
 
Well have made a bit more progress this time round, all the rear lights came off along with the front ones, got all the guddled wiring harness removed and have bravely decided I ain't messing with it no more so an entire new one will be ordered. Cab floor came out seat box is still in though. Windscreen is off as well along with the passenger side wing which put up a fight though the new angle grinder got it's first use in anger, it was fantastic. There is a lot of corrosion around the indicator holes/side/tail/number plate light holes so this is all going to have to be addressed. Got some Bulk head parts from the Scottish land rover show so they are waiting to go on. Not as many photos this time.
20180531_155621.jpg
20180531_152425.jpg
 

Attachments

  • 20180531_152425.jpg
    20180531_152425.jpg
    230.8 KB · Views: 235
Well two afternoons worth of work and the seat box is out, sills have been choped off as they were welded in by the last mechanic, the driver side wing is off and the dash board is off finally had to resort to persuader and chisel as the rive nut was spinning in the dash. 20180725_170437.jpg 20180725_141936.jpg 20180725_141941.jpg 20180725_170408.jpg 20180724_154016.jpg 20180724_154022.jpg 20180724_154026.jpg 20180724_154032.jpg
 
Last edited:
A bit more has been achieved to over the past few weeks. After getting the galvanised sheet steel out of the back load bed which was rotting the tub, I have finally got round to cutting out the old rear tub floor it was rotten, really rotten under that galv sheet. Have also managed to start unpicking some of the previous bodge work that the landy has suffered. 20180823_163318.jpg 20180823_144228.jpg 20180801_173304.jpg 20180801_173259.jpg 20180801_154509.jpg 20180801_154504.jpg 20180823_163326.jpg 20180823_163318.jpg 20180823_144228.jpg 20180801_173304.jpg 20180801_173259.jpg 20180801_154509.jpg 20180801_154504.jpg 20180823_163326.jpg
 
Last edited:
Well had a look over the chassis to day as well as inside I managed to get a cheap inspection camera from Lidl. Generally though the chassis seems to be in really bad condition run a long it with a big hammer and just the entire thing just makes a dull thud noise apart from on the relatively new out riggers. The chassis seems in a bad way on the inside with alot of bumps and bubbles under the waxoil coating. Unfortunately from my perspective the chassis has quite possibly had it, opinions are welcome.
 

Attachments

  • 20180829_143833.jpg
    20180829_143833.jpg
    574.6 KB · Views: 247
  • 20180829_143836.jpg
    20180829_143836.jpg
    448.7 KB · Views: 265
  • 20180829_143858.jpg
    20180829_143858.jpg
    268.1 KB · Views: 262
  • 20180829_143909.jpg
    20180829_143909.jpg
    254 KB · Views: 260
  • 20180829_143925.jpg
    20180829_143925.jpg
    159.4 KB · Views: 229
  • 20180829_143939.jpg
    20180829_143939.jpg
    345.3 KB · Views: 256
  • 20180829_143956.jpg
    20180829_143956.jpg
    252.1 KB · Views: 235
  • 20180829_144002.jpg
    20180829_144002.jpg
    267.9 KB · Views: 268
  • 20180829_144031.jpg
    20180829_144031.jpg
    402.8 KB · Views: 246
  • 20180829_144031.jpg
    20180829_144031.jpg
    402.8 KB · Views: 246
  • 20180829_144002.jpg
    20180829_144002.jpg
    267.9 KB · Views: 266
  • 20180829_143956.jpg
    20180829_143956.jpg
    252.1 KB · Views: 249
  • 2018-08-29_142511.jpg
    2018-08-29_142511.jpg
    14.3 KB · Views: 242
  • 2018-08-29_143110.jpg
    2018-08-29_143110.jpg
    14.4 KB · Views: 244
  • 2018-08-29_142620.jpg
    2018-08-29_142620.jpg
    14 KB · Views: 225
  • 2018-08-29_142521.jpg
    2018-08-29_142521.jpg
    16 KB · Views: 253
Back
Top