Spots Disco 2 ES Premium project.

This site contains affiliate links for which LandyZone may be compensated if you make a purchase.

Spot1

Well-Known Member
Posts
405
Location
Somerset, UK
I’ve been wanting a Land Rover for years, ever since my first time driving the British Red Cross 110 Ambulance 15 or 20 years ago.

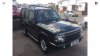
This week I finally brought myself a Land Rover! I can’t afford a defender that isn’t decades old so I brought me a 2004 Discovery 2 ES Premium Automatic as my daily drive.

When I brought it the chap mentioned the reversing lights don’t work, it was only a fuse.... however, turns out the break lights are fed from the same fuse!!:eek::eek:

I’m planning a few jobs on it but I’m not sure how far I’m going to go with it so I’ve decided to start a thread to keep you all up to date and keep all my antics and adventures in one place.

My Nanocom is due for delivery on Tuesday and Today I had a back door ladder delivered and have been for a drive to Southdown 4x4 in Devon to collect one of their snorkel kits. I can’t recomend them enough! Dave is a great chap, very friendly and helpful. He talked me throug the fitting, giving me some tips along the way.

Thankfully, my first problem happened right outside my front door... Flat tyre!! :mad: oh well, at least it wasn’t in the middle of deepest, darkest Devon during my 100 mile round trip! :cool:

The first picture should be below. Watch this space for more news and chaos! :D
 

Attachments

  • D817BEFC-1B0D-4445-9086-028D989F2D01.jpeg
    D817BEFC-1B0D-4445-9086-028D989F2D01.jpeg
    125.1 KB · Views: 436
I started fitting a ladder to the back door about 11 this morning... simple job, take door trim off, drill two holes, hook ladder over, do bolts up..... nope, couldn’t get fingers to the holes to get the nuts on the bolts.... go to B&Q for rivnuts, don’t have any... long shot, try Halfords over the road, don’t have any... ask google, suggests screw fix.... get rivnuts, go home. Need 11mm drill, don’t have 11mm drill, go to Wicks, buy 11mm drill! Get home, enlarge holes. Rivnuts won’t fit in holes! Hammer them through! Fit nut on bolt and screw bolt in and do the nut up whilst keeping the bolt still.... Not working!! Give up at 5pm have food, shower and go to work! Order rivnut tool! Not a productive day! Thought it would be an hours job at the most....
 
Sometimes you do just have days like that! The simplest thing turns into a complete @rse of a job. Better than syphoning diesel the old school way though like I was haha
 
That’s basically what I was doing but watching that, I suspect that the rivnut may have been undoing... I’ll give it another try when I’ve finished my night shifts.
 
I do something similar, but I like the idea of using the nut rather than the bolt to cause the Rivnut to crush and pinch onto the work piece :)
 
Well, the rivnut tool arrived from eBay earlier today and in 5 minutes I had both rivnuts sorted. The ladder is now secure on the back door. :D

I’ve also began the fit of a quad band amateur radio, mainly for comms when out with Wessex 4x4 Response. I’ve brought a TYT TH-9800 which has a removeable front panel so I can have just the head on the dash and the main box I’ve mounted on the inside of the internal fuse box cover under the steering wheel. Just waiting on the gutter mount and a fuse box to arrive to finish off the job.
 
Fitted a new Troop 3 roof rack from Direct 4x4 today. Took about 5-6 hours with mainly me doing the work and a friends help for 10 minutes to lift it onto the roof.

It gives me a good solid base to mount LED floods on both sides and rear, high level tail/break & indicators, rear amber strobes and a double rotor beacon on the front and a couple of aerials (CB and Amateur Radio) on the front edge.

Still plenty of work to do.

Next big job; Southdown Snorkel kit...

6AF54B80-D79C-4B3D-967B-C1AFC3A768AF.jpeg
 
Well, I had a slightly odd exchange with direct 4x4.... I had a slight issue with one of the ‘feet’ in that one of them didn’t have a captive nut welded to it. I could see where one had been welded but it had obviously been knocked off before powder coating...

Good foot;
F165CCFF-4BD3-4123-A96F-2B411CA6FFBD.jpeg


Bad foot;
F520FF34-2419-4AAE-817D-E45872E65CBD.jpeg


Now I contacted them by eBay message expecting them to simply send out a replacement....

They replied asking if I could weld a replacement nut on it and they’d give me a £50 refund!!

That surprised me!

I replied that I don’t own a welder let alone have the knowledge to use one so that wasn’t an option....

They replied that wasn’t a problem and they would send me a replacement....

It arrived by courier a couple of days later....

Not a single foot tho....

An ENTIRE 9” MOUNTING KIT!!! to replace one faulty foot!!

2F8AB35B-1366-4E5D-9F56-B4C4A1542BF5.jpeg


I can’t see the logic in that but on the bright side, I’ve sorted the faulty foot on my roof rack!
 
More bits ticked off the list today and another item added....

Retro fitted cruise control. And yes, it is as easy as they say. Disconnect the battery, leave alone for half an hour to discharge the airbag capacitors.
Use T27 torx key (needs to be a long bit/key as the bit holder won’t fit in the hole) to undo the two screws holding the airbag in place (these were FT and I needed to use pipe grips on the torx key to break the thread grip of the screws....). I had to use my phone camera to see what I was doing to get the torx key onto the screws with the steering wheel at 90 degrees to straight.
I couldn’t get the airbag to unplug so kinda put it on the top of the steering wheel so it was out of the way.... probably not the best idea but it worked! Thankfully!
I then used the dremmell to cut a hole out. Quite honestly, I guessed this and started small and enlarged it to fit. This doesn’t have to be perfect as there is a rubber ‘boot’ around the edge to hide a rough hole.
There is a little white plug to connect the switches to. It’s the only spare one in there.

Refit the airbag. That part is done.

Gently pull the switch blank out of the dash surround and the wires needed are clipped into it. Unclip them and plug them into the cruise switch and fit it back in. That’s all of 30 seconds work.

Cruse control is now fitted and working. Simples. It takes longer to wait for the capacitors to discharge and gather the few tools than it does to fit it all.
 
Whilst waiting the 30 minutes above I moved my quad-band radio head unit to above the drivers sun-visor to ‘hide’ it a bit and get it off the dashboard.

So that’s two good jobs ticked off the list however when I brought the cruise switches from a chap on Facebook, I also brought a spare centre dash console. My plan is to do a “double din conversion” on the spare console to fit a more modern stereo/touchscreen/rear camera/navigation head unit to smarten the middle up a bit and bring it up to date a bit.

So that’s another fairly large project added to the list!
Watch this space....
 
It’s a load lugger rack form ManTec

35F9AC79-1E6C-4595-B8A8-BCDA05AC80C4.jpeg


Fits in the back of the D2 to keep all your kit up and out of the way.

EEB9336B-0D73-4AC3-88B9-4BF80761BFC8.jpeg


Very simple to fit once you get your head around the instructions. Unfortunately the photos in them are less than clear but once you can see what you’re doing. It’s easy.
 
It’s a load lugger rack form ManTec

View attachment 151978

Fits in the back of the D2 to keep all your kit up and out of the way.

View attachment 151979

Very simple to fit once you get your head around the instructions. Unfortunately the photos in them are less than clear but once you can see what you’re doing. It’s easy.

That's a neat idea! Out of interest, does it block vision from the rear view mirror?

:)
 
Glad you said what it was, I would have thought it was a bit tight on space to sleep on, would keep hitting my head...LOL.

Is there anything fitted to stop something sliding backwards and taking out the rear window? or bouncing around and smashing an alpine?

Cheers
 
Back
Top