crook110
Member
- Posts
- 19
- Location
- Wolverhampton

Did you buy the ball joint already in the fulcrum link? If not, why not!?
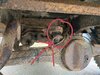
I’d say your first mission would be to physically remove as much corrosion as possible. Weapons of choice would be angle grinder and flappy discs, angle grinder with brushes, drill with brushes, good old sturdy wire brush, air needle scaler. Then you can start attacking it with chemical rust converters and preventers. Good luck with it!Thanks guys - yes purchased the ball joint and fulcrum all in one so hopefully won’t need too much fiddling and the press. The Rust and corrosion... I know! I am getting some welding done this week then will be treating all the corrosion etc. Made sense to do that first. Any tips on the best products to use would be appreciated. I was thinking the dinotrol products, paint and spray options?? And you gotta start somewhere right - it’s a project...
A new multsided 14mm socket to get the 4 bolts out of the top
Did mine two weeks ago.
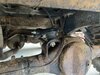
Undo the two long clamp bolts and drive out if you can, mine needed heat and then a big tyre lever to part one side off then tried to drive it out.. One went ,had to angle grind one as it had snapped mid bolt.
Then the 4 top bolts with breaker bar, do not make mistake of trying them with a hex socket they are tight and you want a s much grip as possible.
Then take it off clean up etc.
I changed the balljoint which involved as @jamesmartin posted above cutting the lugs on and a lot of effort with the press..
Went back in easy
Good Luck
Well thank you for all the tips - as you can see I managed to get it done. Took about 2hrs - bolts came out with the breaker bar and didn’t shear (thank god) knocked them out nice and easy. Had a little trouble getting the ball joint to dislodge but a little heat from the blow torch loosened it up. New one greased up and in nice and easy. Managed to do a bit more clean up on the rust whilst I was down there. Plenty still to be done! Thanks again guys!
Welcome To LandyZone, the Land Rover Forums!
Here at LandyZone we have plenty of very knowledgable members so if you have any questions about your Land Rover or just want to connect with other Landy owners, you're in the right place.
Registering is free and easy just click here, we hope to see you on the forums soon!