Project No. 2 - 1969 series 2A 88inch

This site contains affiliate links for which LandyZone may be compensated if you make a purchase.

Steve Noakes

Active Member
Posts
131
Location
Sussex
Just bought a series 2A project from a great guy in Loughborough.
It will keep me busy for a while..
[GALLERY=]
IMG_7150.jpg
[/GALLERY]
 

Attachments

  • IMG_7152.JPG
    IMG_7152.JPG
    216.7 KB · Views: 282
  • IMG_7150.JPG
    IMG_7150.JPG
    348.6 KB · Views: 285
  • IMG_7149.jpg
    IMG_7149.jpg
    47.8 KB · Views: 319
  • IMG_7151.jpg
    IMG_7151.jpg
    65.9 KB · Views: 318
Thanks, my aim is to put it back to as close as original as possible, not concourse but authentic. spent a few hours looking over it, it will keep me busy for a while but that was the plan.
It's had 14 owners according to log book so has seen a number of mods over the years which will take some time to get the right list of original specs.
The instrument layout is proving tricky, any clarity on a Feb. 1969 IIA layout would be appreciated. So far I think the spec should be : left display is coolant temp + Fuel gauge but not clear what should be in the lower segment. Speeds should be 70mph with 3 lights in lower segment. Choke in lower right corner of instrument panel. Can't determine whether there are warring lamps in the panel as well as in the dials. Mine has a separate oil pressure gauge on a separate panel plate. Was this ever a IIA option or an add on ?
 
Thanks Marmaduke, I thought they military as I've seen images like that. I have a spare set of wings which came with it and these are the non-military versions but not in great condition. Maybe look for a set of wings at Landrover fest.
 
I'm also looking for a dynamo pulley and fan as the dynamo which was in the tub has a wide belt groove which doesn't match the 2 pulleys on the engine. I believe the correct pulley should be A-section ?? Was the wide pulley from a military too ?
 
Spent some time to get her started. Needed to replace the fuel lift pump and coil and then it started first time.
My son had a go as well which was great fun. Now the real work begins for the refurb.
small video on youtube ...
 
The engine has twin belt pulleys and an oil coiler in front of the radiator. Were these fitted to civilian spec vehicles ?
 
Spent a few pleasurable hours stripping it down to expose the chassis. No unpleasant surprises so happy with the scale of work to do.
IMG_7307.JPG
 
The Dumb Iron and out rigger need to be replaced. The rear cross member has been patched up too many times so will be replaced with a new quarter chassis section.
IMG_1577.jpg IMG_1580.jpg
 
Spent a nice weekend with Dad cutting out the rotten chassis members and tacking in new ironware. A great welder from work, Dan, gave up an evening after work to weld the metalwork. A great job resulting from a guy who knows how to weld... Stick welded using a 5.5kVA Machine Mart generator. It coped very well at over 100A weld setting.

IMG_1739.jpg IMG_1740.jpg IMG_1762.jpg 
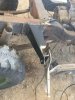
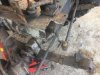
Outrigger cut out and replaced

IMG_1743.jpg New dumb iron welded up
IMG_1745.jpg IMG_1747.jpg IMG_1752.jpg IMG_1754.jpg IMG_1761.jpg 
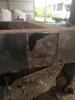
rear 1/4 replaced, great welding
IMG_1763.jpg 
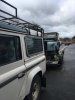
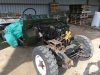
finally moved the chassis to a closed order of the barn, build a simple store to keep bits tidy

IMG_1746.jpg Dinner Al Fresco under the barn....Thanks Dad for the great help, Thanks Mum for the copious tea and bacon sandwiches and thanks to Mum and my good lady wife for letting the boys play together.
 

Attachments

  • IMG_1740.jpg
    IMG_1740.jpg
    16 KB · Views: 334
  • IMG_1739.jpg
    IMG_1739.jpg
    13.5 KB · Views: 261
  • IMG_1742.jpg
    IMG_1742.jpg
    46.1 KB · Views: 340
Last edited:
The engine came out easily thanks to the help of the farm's JCB...
A great value stand from SGS Engineering, under 100GBP for a folding unit. Very strong and sturdy.

IMG_1705.jpeg a great engine stand

IMG_1094.jpeg IMG_1103.jpeg IMG_1095.jpeg IMG_1099.jpeg IMG_1100.jpeg IMG_1101.jpeg IMG_1727.jpeg and the engine is out and ready for refurbishment...
 

Attachments

  • IMG_1704.jpeg
    IMG_1704.jpeg
    355.9 KB · Views: 291
With the welding complete, the running gear was removed and stripped ready for sand blasting. Springs seem ok to refurbish, shock are well rusted and leaking so new ones on order.

The big day for chassis sand blasting finally came. We moved the chassis into the field to save filling the barn with sand. A few hours later and the chassis and axles were cleaned and ready for further inspection.
I'm using POR 15 chassis preparation so after sand blasting, the chassis and axles got a good coating of Metal Prep and then washed off as per instructions. Only a few parts of the chassis and bulkhead need some extra work so I'll give the good areas the 2 coats of POR 15 anti-rust and leave the few places untouched ready for local repairs.

FullSizeRender.jpg FullSizeRender 2.jpg IMG_2031.jpg IMG_2039.jpg IMG_2040.jpg
 
Last edited:
The good parts of the chassis have had the POR15 chassis black paint. Looks much better. Bulkhead A pillars are as expected when first seen, 1 will be replaced fully and 1 looks repairable.

IMG_2082.jpg IMG_2085.jpg
 
The project had to take a rest for 6 months due to work commitments. Got back to it and have made some good progress.
Work completed so far :
  • Engine rebuild - valve guides replaced with later type as I couldn't get good fitting o-rings. Engine was in remarkably good condition inside.
  • New water pump, hoses etc.
  • New engine and transmission mounts
  • Front and rear diffs stripped and rebuilt with new shims to set correct mesh engagement etc.
  • New front driveshafts as 1 was significantly twisted on the spline
  • New swivel balls, seals and bearings replaced in axles
  • New Propshaft UJs as signs of wear evident
  • Brakes fully replaced with new cylinders, shoes, and pipes throughout
  • Leaf springs stripped, de-rusted, painted and re-built with new shackle rubbers. New shackle plates throughout as they all had major wear marks
  • New shock absorbers front and rear
  • Transmission checked and some seals and bearings replaced. No sign of wear or damage evident.
  • Transmission (park) brake overhauled with new cylinder, shoes, adjuster rod
  • New exhaust throughout
  • Dynamo overhauled, new brushes, cleaned, painted and new twin pulley installed
  • Round heater matrix purchased and overhauled to be installed in final assembly
  • Bulkhead repairs complete with new A-pillar, multiple bad quality and redundant holes welded up. Painted in final colour before engine installed
  • Doors stripped and frames repaired, replacing all rusted sections with new metalwork
  • Wiring harness ordered ready for final build. Costed up making my own loom and decided it was false economy. The new loom looks great.
 
Last edited:
Back
Top