Project lizzie rebuild thread

This site contains affiliate links for which LandyZone may be compensated if you make a purchase.

robbh

Crazier than a box of frogs on acid
Posts
1,755
Location
Edge of the New Forest. Wiltshire
Hi all the time has come to take my beloved (also hated) discovery aka lizzie off the road. :(
And inspired by the likes of Mr noisy and Greenhornet and many others decided to start my own rebuild thread. :D

A few months ago had a prod round with a screw driver and found lots of holes!
As the MOT was due and knew it would fail thought this would be a good a time as any to make a start on getting rid of the rot. :p

The plan is start with the body, remove the body once its solid, repair and paint chassis whilst the bodies off, possibly replace tdi lump with a v8:eek: then put it all back together.

Anyways on with the thread!
Heres a picture of what lizzie looks like at the moment
20130215_122208.jpg


Today i started stripping out the interior and it now looks like this:
20130215_170417.jpg


Now after removing the interior started finding major rust spots first up o/s rear arch
20130215_162446.jpg


N/S arch:
20130215_132107.jpg


Boot floor :
20130215_132128.jpg

worst part of the boot floor is round the n/s wheelarch most of the paint is flaking and generally bubbling rust all round the edge.
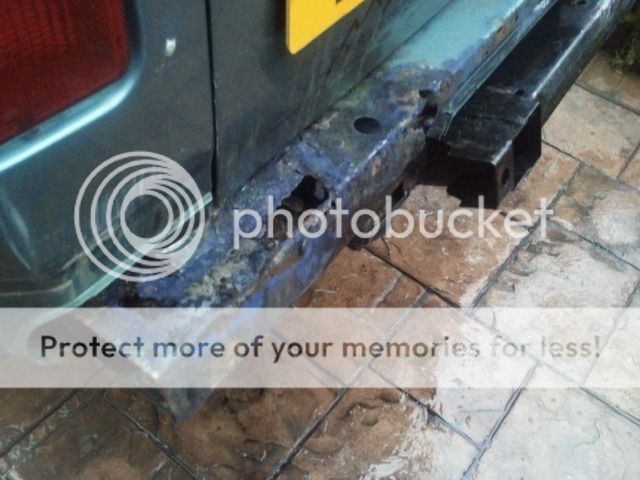

The dreaded sills;
20130215_171859.jpg


I know they dont look too bad but will being replaced anyways with 100x60 box sectionfew more pics

20130215_172132.jpg

20130215_172139.jpg


Whilst i had the camera out took a few pics of the inner wing area too heres the n/s:
20130215_171120.jpg

And the o/s:
20130215_171137.jpg


Plenty more to come over the weekend! :cool:
 
does'nt look too bad if im honest

did the same with my disco last summer thinking it would be just the rear arches and a few patches on the drivers footwell.

it soon esculated to both rear arches, both front inner arches, many patches to the floor, full rear crossmember!!

worth it in the end :)
 
Looks like it has been factory fitted with the standard Discovery rust pack.

All the usual rust spots but it does look like the boot floor has been visited before judging by the color.

Good to hear of another Disco being saved and a body off resto would be good to see.

Good luck and don't forget lot of pics

Looking forward to a good thread:pop2:

Yeah also looking forward to the pics!! :D
 
Dont worry guys there will be plenty of pics! :D

RobP the standard discovery rust pack was certainly fitted:D
And yes the boot floor has been replaced before although that was only 4 years ago :eek:
Previous owner obviously never sorted the leaking sunroof so has rusted away again :rolleyes:

Scott85i know it doesnt look too bad but you know what they say looks can be deceiving!

The plan as of now :

Body :

Both inner wings will be getting replaced completely along with headlight boxes.
Sills will be getting the 100x60 box section treatment with built in tree slider .
Boot floor will be replaced with aluminium chequer plate as its non - structural.
Arches to be repaired/replaced.
Repair front footwells as theres a bit of rust in that area too.
Rear bumper will be off tomorrow to check the condition of the rear crossmember and will make a decision of whether to repair or replace that.
And then where ever else i find rust will be cut out and replaced!

Now for a silly question :eek:
I want to remove the sunroofs and replace with a sheet of metal welded in but not sure how much of a good idea this is? Anyone done it before? Could i mig weld it in on a very low setting or would it still warp the roof badly? Or would tig welding it in be better?

Chassis is simple just a simple strip of everything, repair where necessary then a repaint. Axles will be getting a refurb as well as im going this far!

Think ive remembered everything for now......... :D
 
Now for a silly question :eek:
I want to remove the sunroofs and replace with a sheet of metal welded in but not sure how much of a good idea this is? Anyone done it before? Could i mig weld it in on a very low setting or would it still warp the roof badly? Or would tig welding it in be better?
/QUOTE]

I've seen on here somewhere it has been done, also for non land rover's.
Best bet would be to weld in short inch long sections so it has time to cool then grind it flush, then you got the headliner with a hole in it lol.
 
Todays progress or lack of as I was nursing the mother of all hangovers today as i decided it was a good idea to go out and get smashed last night. :eek:
Using the angle grinder was a killer!

Anyways today i continued to strip out the interior got the centre console out and started removing the dash but gave up :p but got this far.

20130216_164946-1.jpg


After a bacon sarnie, piece of cake and a decent brew decided to crack on and remove the rear bumper the crossmember is almost like new except the two body mounts.

20130216_143021.jpg

20130216_143024.jpg

20130216_143015.jpg


Next up floor removal!

20130216_153603.jpg

20130216_154922.jpg

20130216_154933.jpg

20130216_154959.jpg


Had a clean up of the chassis there arent any holes that i can see and had a good poke round with a screwdriver so im happy its solid just needs some tlc. I reckon im gonna have to completely replace the floor skirts as they look shot everywhere and dont want to have to do this again so would make sense.

Couple more pictures for you these are of the footwells in the front.

20130216_131142.jpg

20130216_131252.jpg


Discomark ive done a bit of research regarding the sunroof deletion and i reckon im going to go ahead with it. Just need a lot of care and patience by the sounds of it.
Will look into brass heat sinks on the opposite side of the weld so as remove as much heat as possible.

More tomorrow! :cool:
 
the crossmember is almost like new except the two body mounts.

20130216_143021.jpg
Looks a hell of a lot better than mine
2012-05-09200053.jpg


I think looking at the pics you are starting from a much better base than a lot of the rebuilds on here. Keep the pics coming
 
Righty then bit more done today.

First up tried undoing the fuel lines to tank in preparation of dropping the tank. As you can see the lines a very corroded and broke as soon as i twisted them :rolleyes: probably wont be using the tank again as i plan on fitting a winch in the space the fuel tank currently occupies.

20130217_143551.jpg


Tank now out

20130217_163942.jpg


The chassis at the rear is absolutely sound apart from all the surface rust which comes off easily with a 40 grit flap disc. But will leave the chassis now until the body comes off.
Also carried on tidying up round the floor edges getting it all back to bare metal. But then questioned myself as to why when i decided yesterday im replacing the floor skirts:crazy:

Next up a couple more photos of the rear crossmember which still doesnt look too bad except the body mounts. At least thats a nice easy fix.

20130217_150941.jpg

20130217_150954.jpg


Whilst i was underneath the thing removing the rear arb and fuel tank looked over at my rear brakes and realised both rear discs are completely fecked!

20130217_151049.jpg

20130217_151111.jpg


Pictures arent great but you can see what i mean. Only the inner side of the discs are knackered the outer sides are ok. I swear they werent like that a month ago when i changed the springs :eek:

Anyways onwards! I started running out of daylight by this point (too many tea, cake and fag breaks) but got a photo of the filler neck area. Will be interesting to see what the inner quarters look like when i get round to it.

20130217_150900.jpg


Question time!

1. Rear quarters? Can i leave the glass in situ or do i have to remove it? Also any tips to make it as easy as possible?

2. Rear winch? Anybody on here done it? If so any pictures? Was sort of thinking welding a 6mm sheet in between chassis legs with the wire/rope going through a slot in the chassis crossmember then have the fairlead attached to the bumper. Also making some sort of loackable inspection hatch on a hinge in the floor for easy cleaning/repairs. With rubber seals of course to keep the mud/water out.


3. How do i repair this bit?

20130217_150821.jpg


Very rusty under the alpine window. Only the o/s the n/s is perfect. Just falls apart if you poke it :confused:
 
Robbh, your Lizzie doesn't look too bad as others have said. Looking forward to following this thread with a body off resto on the cards. Just as a thought, would it be easier to remove the body and repair once off the chassis?

I only say this as it is what I would do if it were me, not saying I know better BTW! Just thinking out load but as you can't hear me thought I would write it down, although now I have written it down it seems a little long winded........ Sorry.....

Anyhow with the body off you can get to the underside easier as the chassis won't be in the way.

The rest of the motor looks clean, chassis appears good and the fuel sender, well mine did the same and I posted pictures on how to repair it. Mine is still going strong!!!

Good luck and I hope you have cover to make it easier on yourself lol
 
cross member looks more rotten than first might appear ,its best to remove rear brake shields

Cheers james had a little poke with a screwdriver after taking the photos and made one hole near the o/s body mount.
But will get the jet wash on it next weekend to give it a good clean and go from there i reckon.
Brake shields will be removed permanently when the axles comes off for a refurb.
 
Robbh, your Lizzie doesn't look too bad as others have said. Looking forward to following this thread with a body off resto on the cards. Just as a thought, would it be easier to remove the body and repair once off the chassis?

I only say this as it is what I would do if it were me, not saying I know better BTW! Just thinking out load but as you can't hear me thought I would write it down, although now I have written it down it seems a little long winded........ Sorry.....

Anyhow with the body off you can get to the underside easier as the chassis won't be in the way.

The rest of the motor looks clean, chassis appears good and the fuel sender, well mine did the same and I posted pictures on how to repair it. Mine is still going strong!!!

Good luck and I hope you have cover to make it easier on yourself lol

Cheers Hornet! Im not going to lie mine is pretty good compared to most discos on here. But i have the dream of a completely rust free discovery:hysterically_laughi

Hmm... Now youve got me thinking! Body off to repair it would be a lot easier i agree. Id just be a bit worried of the body twisting or something if i cut too much out?

Glad the hornet is still going strong ive followed your build right from the start and it looks the doggys doo dahs i must admit! Hopefully mine will look nearly as good as that one day!

Cant wait for daylight to get out and do some more now.
 
Quarter panels removed is definitely the way to go. I wish I had known about it before I started, it would have made my life easier.

To stop the body twisting I would weld in supports between pillars both longitudinally and laterally with an additional diagonal support.

The body is not that heavy that a rotisserie cannot be fashioned easily from heavy box section for not much money. Plus you can sell it on later.
 
Back
Top