Flat Bed Disco 2 Project - Anderson Connector Finally Fitted.

This site contains affiliate links for which LandyZone may be compensated if you make a purchase.
No need for IVA. As long as you have not changed the chassis.

That's good to know, I'm not really up on IVA ;)

I don't doubt what you're saying btw because I know things have all changed these days but ...........

So what's the story if I should end up with a replacement Galv Chassis, if it had no numbers at all on it or I were to stamp it with my VIN surely no one would give a flying ..............
Or is that just classed as a replacement part as it is essentially "the same" Chassis :confused:

I remember back in the good old days during the 90's I ground up built a steel bodied wide arch spaceframed Chevy V8 400ci with NOS FIAT 500 ....

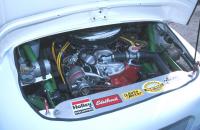
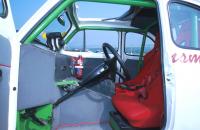
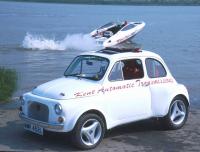


We never IVA'd that even though I think it was supposed to be, it was taxed and mot'd, on it's original Reg, insured through Adrian S Flux as a Street Legal FIAT 500 Custom Car, all mods disclosed, and after a few months I sent the Log Book to Swansea and just changed cc from 500 to 6200 :D:D:D

The boat had a 502 ci Big Block that I creatively slipped in btw .................

Many Boats, Cars and a divorce is why I got no money now :D
 
Last edited:
I love mental stuff like that. If I was just replacing the chassis with a new galvanised one I wouldn't declare it as I'm sure many other LR owners have done the same, just treating it as a replacement part. As for the project, I'll just post my docs off with the body change details and hope for the best but plan for the worst.
 
It's been slow going the past couple of days but I've got a couple more panels done for the tool/battery compartment. I've mainly concentrated on getting all the fastener holes drilled and tapped for the two side panels and getting all the rivet holes drilled for the big panel just behind the cab. I've also trimmed the side panels a little bit at the rear but I'm still not sure about how it looks. I'll leave it like that for now and see how it looks once I've sorted out wheel arches and rear light mounts. The panel at the back of the battery compartment is a bit of 1mm stainless steel I had lying around that already had a lip folded into it. This will come in really handy as a fixing point for the sub floor when I make the big drawer compartment.

Now that the battery compartment has all sides apart from the lid I'm going into town tomorrow to buy two new batteries and start sorting out how they will be fixed in place and wired together. I've also got an Anderson connector that I'm going to incorporate somewhere in one of the side panels for jump starting and charging.

089.JPG


090.JPG


091.JPG


092.JPG


093.JPG
 
Coming along nicely :)

When I built a Recovery Truck years ago I found that some of the Commercial Vehicle Suppliers sold hefty black plastic wheel arches for Chassis Cabs loadsa different sizes available, not too expensive, and they worked out great for Wheel Tubs, no rust either ;) just an idea ;)
Living where we do it's a shame we can't build an entire Discovery outta plastic eh :D :D :D
 
Living where we do it's a shame we can't build an entire Discovery outta plastic eh

Or aluminium. I've harboured ideas of building a complete body with aluminium panels. With no restrictions on passenger or load room I'd make something completely wacky. That's a pipe dream though. Got to get this one finished before indulging in any more mad ideas. Perhaps a project to while away the time in my retirement.

I've been looking at these for wheel arches. They come in a variety of sizes and would be very easy to fit with the flat top.
 
Yes those Wheelarches are the kinda thing I was talking about, and as you say, the flat top would be ideal for your Flat Bed ;)

Including my Discovery I have 4 ongoing project vehicles :D :D :D Most are nearly done, my problem is when one Car gets to that stage something else turns up and gets nearly finished ;)

The 3 Cars that need finishing are all Paintwork, so last couple of years I had another project on the go ..............

I decided to build a double Garage which I have turned into a Positive Pressure Paint Booth, that too is almost finished, and would have been if I hadn't got the Discovery ROFL
 
I was in a similar position before I moved to Shetland seven years ago. I had several projects and two dailies. I had to sell them all and just come to Shetland with two vehicles, mine and the wife's. Not that moving here has curbed my desire to buy "interesting" vehicles. I have tried to calm down a bit though and now just have two projects and two dailies. I am definitely not going to be buying any more projects for a long time yet.
 
Well I got my two new batteries today and sorted out the fitting arrangements. They are 70Ah units and will be wired in parallel so plenty of juice for extra goodies like a winch, lights and possibly an on-board compressor.

The rails they sit on are yet another handy bit of aluminium angle I just happened to have in my hoard. The clamp assembly is yet more stuff from my hoard; some M12 stainless threaded bar and some 20mm angle steel. There's a lot more room in there than I thought there'd be so it shouldn't be too tight with all the necessary wiring, which I will hopefully start on tomorrow.

094.JPG


095.JPG


097.JPG


098.JPG


099.JPG
 
I've been carrying on with the dual battery install the last couple of days:

+ Made a power distribution block with some stainless bar, nuts, bolts and some old small shock absorber rubbers.
+ Made loads of new cables to join the batteries together, earth them to the body and chassis and provide power to the starter and main fuse box via the power distribution block. My new toy for cable crimping made all this really easy.
+ Removed old dud battery.
+ Removed old battery to starter motor cable.
+ Re-engineered main fuse box cable.
+ Modified engine earth cable.

+12V now goes from the battery, through the power distribution block and direct to the starter motor. The re-engineered main fuse box power cable now goes from the fuse box to the positive connector on the starter, thereby saving me having to make a much longer cable. The cable from the PDB to the starter is temporarily routed along the top of the driver side chassis rail. No point in making permanent fixings for now as I'll be changing the chassis.

It all works really well and I managed not to weld or electrocute anything during the whole process. I can now drive the Disco in and out of the garage without all the palaver of having to jump start it from my other Disco every time I want to move it as the original battery would barely hold enough charge to start it without needing a recharge every time.

100.JPG


101.JPG


102.JPG


103.JPG


104.JPG


105.JPG


106.JPG


107.JPG


108.JPG
 
So when you remove the back body are you having another battery under the bonnet?

a nice non conductive/rubber mounts are 300tdi air filter mounting rubbers.

I do like these projects & the way each of them is individual.
 
Once the back body is finally fitted it will only ever come off if I need to get the fuel tank out. I suppose I could rig up a temporary single battery holder at the back if I ever have a need to drive it without the back on. I'd also need to rig up some lights as the main lights will be mounted under the bed. The shock rubbers have a small raised lip on the inner faces that fits in the hole I've drilled at the end of the bar. They should close together when tightened down. However, I intend to get some rubber washers that will fit in the recess as well just for extra safetyness. I'm also intending to fit a big fuse between the battery and PDB.
 
So I've been working on a couple of different things the last few days as I've come to a temporary stop on the bed due to shortages of materials. One job I've been meaning to do for a while is remount the intercooler as it doesn't fit properly. It's an aftermarket item and is much larger than the original and was fitted in such a way that it forced the radiator to lean back enough that there was no room for the fan, hence it was removed. I've refitted it so that it now allows the radiator to stand up straight. Sounds easy but it was a right palaver and took me most of a day. I had to completely remove the original mounts on the front panel and cut off the corresponding mounts on the intercooler and make some standoff brackets to steady the top of the radiator and get the distance right so that all the plastics will fit properly again. The brackets will get some fettling to make them look better but they'll do for now.


109.JPG


110.JPG


112.JPG


116.JPG


117.JPG


119.JPG


120.JPG
 
I have also started to tackle the wiring for the bed. Today I sorted the mess of rear loom that I'd just dumped in the back of the cab into some semblance of order. I started by separating each branch on the passenger side and laying them out on the floor. For now I have coiled up the rear passenger door branch and the back door branch. I wanted to concentrate on the rear passenger side lights for now and this branch also included the sound controls for the seats in the boot, the rear 12v socket and some unused plugs that I presume would be for the aircon, had it been fitted. I separated out the wires for the rear lights and cut everything else off. I turned the end of every cut wire and insulated them individually before taping them all together and then taping that to the main loom to tidy it all up. There were a bunch of earth cables in this part of the loom too, all connected together in a dummy plug which bolted to the body with an earthing bracket. Two of these were for the rear lights. I separated those out, cut them short and crimped them together in a new earth connector that will bolt to the side of the lower bed panel along with a P clip to secure the harness. The rest of the earth cables I have cut from the dummy plug and coiled up for later attention. They will be cut short and earthed inside the cab. I also drilled a hole in the back of the cab for the loom to pass through.

Same again tomorrow on the drivers side.

121.JPG


122.JPG


123.JPG


124.JPG


125.JPG


126.JPG
 
More fun with wiring so far today. This time I'm concentrating on the drivers side wiring that runs to the back lights and back door. As yesterday I've coiled up the branch that went into the driver side rear passenger door and separated out everything that ran to the back. At the moment I've got the rear lights, tow bar and number plate light wiring all separated and laid out ready for routeing and modifying. I've cut off everything that I could identify like most of what was in the rear door, the other rear sound control wiring and such like. Again, all this has been carefully insulated and will be taped up and secured to the main loom. I've also removed the two aerial wires that go to the electronic gizmos that were attached to the rear windows on each side.

This leaves me with a couple of plugs that I couldn't identify. One I'm pretty sure is probably for the fuel flap lock. The other I have no idea about. I'm going to have to spend some time going over wiring diagrams to find that one. I won't be cutting either of these off until I know it's OK. I have a much bigger pile of redundant wiring this time.


128.JPG


129.JPG


127.JPG


130.JPG
 
Last edited:
So what's the story if I should end up with a replacement Galv Chassis, if it had no numbers at all on it or I were to stamp it with my VIN surely no one would give a flying ..............
Or is that just classed as a replacement part as it is essentially "the same" Chassis :confused:
My Understanding of the points rules are that it is technically supposed to be a manufacturer supplied original replacement chassis.
However replacement chassis built to this same spec by third party manufacturers have been accepted as suitable as long as they are essentially exact replicas built to the same standard, or better.
I think it would be sensible to tell the insurers that you have a galv chassis and I stamped mine with the original number but I think for Landys a replacement chassis is not counted as a modification if not different from the original.
Of course I could be talking bollox but if I am then I have just bent the rules:eek:
 
I've been carrying on with the dual battery install the last couple of days:

+ Made a power distribution block with some stainless bar, nuts, bolts and some old small shock absorber rubbers.
+ Made loads of new cables to join the batteries together, earth them to the body and chassis and provide power to the starter and main fuse box via the power distribution block. My new toy for cable crimping made all this really easy.
+ Removed old dud battery.
+ Removed old battery to starter motor cable.
+ Re-engineered main fuse box cable.
+ Modified engine earth cable.

+12V now goes from the battery, through the power distribution block and direct to the starter motor. The re-engineered main fuse box power cable now goes from the fuse box to the positive connector on the starter, thereby saving me having to make a much longer cable. The cable from the PDB to the starter is temporarily routed along the top of the driver side chassis rail. No point in making permanent fixings for now as I'll be changing the chassis.

It all works really well and I managed not to weld or electrocute anything during the whole process. I can now drive the Disco in and out of the garage without all the palaver of having to jump start it from my other Disco every time I want to move it as the original battery would barely hold enough charge to start it without needing a recharge every time.

View attachment 247408

View attachment 247409

View attachment 247410

View attachment 247411

View attachment 247412

View attachment 247413

View attachment 247414

View attachment 247415

View attachment 247416

What you have done is great work. enjoyed the read to catch up:).

Just a Point. I would leave a little space between batteries, Also not keen on your "bus bar" with the bolts, that's gonna short out sooner or later.
Plastic sleeve or couple of layers of shrink wrap on the bolts, would make me feel a little more comfortable.

Keep going though its gonna look great:).

J
 
Just a Point. I would leave a little space between batteries, Also not keen on your "bus bar" with the bolts, that's gonna short out sooner or later.
Plastic sleeve or couple of layers of shrink wrap on the bolts, would make me feel a little more comfortable.

I addressed this in post number 51 and some of the parts arrived today. Look out for some more updates soon that should calm your nerves a bit.
 
I'm at the point where I'm happy with the wiring going to the rear lights and tow bar. Just need to wrap it all now and get some split conduit for extra protection. I also need to source some properly fitting grommets for the holes I drilled in the back of the cab. One is a bit bigger than the other because the towing electrics plug is quite large. I also discovered that the rear passenger door wiring just unplugs in the B pillar. I hadn't noticed because it was covered up by the plastic trim panel that covers the seat belt which I only just removed today while tidying up the wiring inside the cab. So now that's gone as well but I will be re-using the speaker connections at a later date when I'm finally doing the interior. Once the interior panels are sorted they will hide the final messy bits that are left.

132.JPG


133.JPG


131.JPG


134.JPG
 
Got a few other small jobs done this afternoon.

1. The previous owner had problems with the fuel cooler so it had a 10P fuel cooler fitted on the fuel lines but the water hoses were still going to the 15P cooler. The 10P cooler was just wedged in among the pipework next to the original one. There was a spare correct cooler in the stash that came with it so I removed both the fitted ones and put the good spare in.

2. While I had the fuel cooler out it gave me room to remove all the redundant EGR vacuum hoses and solenoids. I blanked off the T piece in the main vac hose with one of the smaller hoses I removed that had a screw in one end. I also removed the bracket that was fixed to the inner wing for the solenoids. I had no hope of getting the bolts undone so I just bent it back and forth until it snapped. There's now a lot more room on that side of the engine and it looks much tidier.

3. I removed the rear brake calipers (the old ones, not the new ones) and all the brake lines back to the ABS block. I crimped and bent the stubs of pipe left in the block to stop crap getting in there. Just a time saver for later when I change the chassis.


135.JPG


136.JPG


137.JPG


138.JPG


139.JPG
 
Back
Top