Disco Tray back build

This site contains affiliate links for which LandyZone may be compensated if you make a purchase.

discomark10

Well-Known Member
Posts
3,977
Location
Milton Keynes
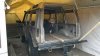
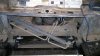
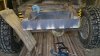
So ive decided to do away with the rust and turn my Disco into a Tray Back and (possibly) Front, Also finish the work on replacing the door seals which i started last year!
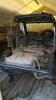
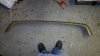
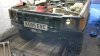
Yesterday i picked up a shed load of scafolding poles wich i brought for an AMAZING price on Ebay.
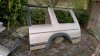
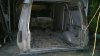
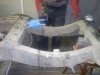
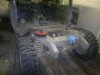
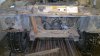
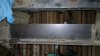
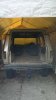
I also spent the day stripping the interior and removed the boot door and glass from the back.
 

Attachments

  • 320855_10150956530500504_622440503_21631411_1033309850_n.jpg
    320855_10150956530500504_622440503_21631411_1033309850_n.jpg
    29.5 KB · Views: 2,137
Last edited:
only thing that i havent worked out in my head is sorting out the back end, i have 2 idea's.. 1st is to cut the back end up and fit it to the new back (so just basicly cut out a big section from the middle and join the front and back) or just do away with the middle and back and just make a new pannel...
 
So i made a bit more progress today, finished removing the windows, and any lil bits that were left.

I removed the screws at the back that held the exterior panels on (by the boot door)
Drilled out all the all the spot welds around the windows with a lil help from the GF.
The panels were stuck at the top with a sticky strip which was rather on there, come of easy with a heat gun.
the panels came off all good as you can see.

I used a grinder with a thin blade to slice the body in half, had to do a couple bits with a large jig saw thing.. forget what its called. took about 15min to draw a nice line to follow, took about 20min to cut it all around.
 

Attachments

  • 379626_10150969113190504_622440503_21674583_1076366724_n.jpg
    379626_10150969113190504_622440503_21674583_1076366724_n.jpg
    50.1 KB · Views: 2,574
  • 317321_10150969104490504_622440503_21674548_1463008880_n.jpg
    317321_10150969104490504_622440503_21674548_1463008880_n.jpg
    32.7 KB · Views: 3,214
  • 389140_10150969118900504_622440503_21674619_2094494899_n.jpg
    389140_10150969118900504_622440503_21674619_2094494899_n.jpg
    33.8 KB · Views: 2,236
  • 310928_10150969117310504_622440503_21674611_989089940_n.jpg
    310928_10150969117310504_622440503_21674611_989089940_n.jpg
    34 KB · Views: 2,802
Hi there, fair play for doing this online. I am going make mine into a tray back in the very near future so I will be following your work with great interest.

Just a quick ? for you if you dont mind. With the drivers door shut, what is the measurement from the rear of the door to where you have made the cut to form rear of cab?

Cheers Gav......
 
Ill have to check when im of my night shifts as its not at my place, but i wanted to have a lil room behind the seats for like tools and lunch or what ever, so i cut it at the boot floor join n the same distance all the way round, also i think that should make it a lil easyer for me as im going to try and fit the last 6 inchest of the rear end to it to make it look a lil better.
 
its a big gazebo, its at my old mans place (he has more room than me lol) he was fed up of me fillling his garage so he put that up the side of his garage.
Ill try and find out for you.
 
Today, after waking up from my night shift, I went to work stripping the front end out for shortening.
I removed the rad ,pipes, wiring and lights.
I also removed the fuel tank after soaking the fule line connections for a couple days with WD40 and cut the back end of the chassis!
 

Attachments

  • 26112011350.jpg
    26112011350.jpg
    260 KB · Views: 4,081
  • 26112011351.jpg
    26112011351.jpg
    238.6 KB · Views: 4,729
Last edited:
keep up the good work, Im following this with an eager eye, its something i would love to do with mine.

loving the pics keep em coming.
 
So due to my metal stockist being closed i made a start on sorting the front end out a bit.
I shortened the Chassis to allow my winch bumper to site under the lights and create less overhang, fabricated a few patches for the front wheel arches and cut the bit off the roof for the new back end.
Tomorrow i shall start on the roll cage :) :) :)
 

Attachments

  • 27112011640.jpg
    27112011640.jpg
    228.2 KB · Views: 1,544
  • 27112011639.jpg
    27112011639.jpg
    238.6 KB · Views: 1,707
  • 27112011637.jpg
    27112011637.jpg
    266.2 KB · Views: 2,791
Today's progress, picked up the metal from the suppler and set to welding the new rear end together.
The back plate is 10mm x 31inch x 5 n half inch, the one under that is 5mm 31inch x 5 n half inches again.
I also started with the mounting points for the the roll cage, 5mm square plates.

I started the welding with a rod welder... yea didnt go to well, so i picked up sum gassless 8m wire and started to get back into the swing of welding after a year or not doing any.
 

Attachments

  • 28112011641.jpg
    28112011641.jpg
    275.4 KB · Views: 4,061
  • 28112011642.jpg
    28112011642.jpg
    232.4 KB · Views: 1,536
  • 28112011643.jpg
    28112011643.jpg
    282.3 KB · Views: 1,621
Did a lil bit more today, Ive ordered a cutting tool to do the joints for the roll cage tube.
Ive also sorted the front end out a bit.... frixed the now sorter front winch bumper on (lost about 5 inches from the front) which i think looks quite good!
I had to trim the botom of the lights and grill to make a lil room for the bumper, its now an inch higher too.
Also my tanker of Hammerite arrived today, time to start painting tomorow!! :D
 

Attachments

  • 05122011658.jpg
    05122011658.jpg
    206.9 KB · Views: 2,218
Ooo well ecited.. got my cutting tool for the roll cage tubes! got my extended breather pipes (diy ;) ) and got my rubber fule lines to relocate the pipes to the new tank... when i get it lol.

2 days and i commence the cage build!! :D
 
Back
Top