Well my clutch slave cylinder leaked a while back with the wading plug still in and ruined the clutch that was in so i was faced with a £500 bill for my local indy to do it or about 140 for me to have a go so I thought it was worth a bash and spent a day doing it myself. After reading round and the great help i got on here i went and got the parts i needed and 8 am on a saturday i had rented an engine crane had a new borg & beck clutch kit, new clutch relese fork and bearing, a 3/8th socket set, few spanners, a trolly jack, car on level ground outside the house and i was off!
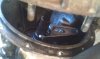
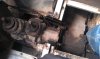
First off i chocked the wheels and removed both prop shafts, took the passenger seat, cubby box,bellhousing and gearbox cover off to gain acess to the gearbox. (Photo1)
the previous owner had helpfully hacked a chunk out of the seat box so it was easier to get the strap in to support the gear box (photo2)
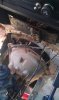
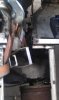
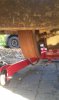
I then put the crane in the passenger door and used an old truck ratchet strap to hang the gear box from it (photo 3&4)
Next i used my trolly jack to support the engine to stop it from moving too far when i droped the gearbox down at this point i noticed my camera had very little battery so the photos were kept for later as it is pretty self explanatory.
Now on to removing the gearbox mounts, with the engine supported and the crane holding the weight of the gearbox use a 13mm spanner on one side and a socket on the other and start removing the bolts ( photos 5&6)
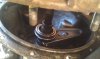
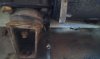
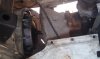
once both mounts were removed i lowered the gearbox so it was resting on the cross member (photo 6&7) and then removed all the 17mm nuts holding the bellhousing to the engine carfully wiggled the gearbox free to reveal the clutch & pressuse plate ( DONT get under the box at this point as it is very heavy and if it slips your goose is cooked!) Photo (6)
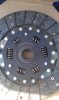
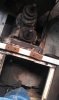
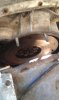
Next you will find around 5 or 6 10 mm bolts holding the pressure plate and clutch on to the fly wheel, before you remove them make sure you have a feel for how it is all aligned and take note for reference when refitting later. remove the bolts and you will be left with this (photo 7)
Now for part two as it wont let me upload anymore files :doh:
First off i chocked the wheels and removed both prop shafts, took the passenger seat, cubby box,bellhousing and gearbox cover off to gain acess to the gearbox. (Photo1)
the previous owner had helpfully hacked a chunk out of the seat box so it was easier to get the strap in to support the gear box (photo2)
I then put the crane in the passenger door and used an old truck ratchet strap to hang the gear box from it (photo 3&4)
Next i used my trolly jack to support the engine to stop it from moving too far when i droped the gearbox down at this point i noticed my camera had very little battery so the photos were kept for later as it is pretty self explanatory.
Now on to removing the gearbox mounts, with the engine supported and the crane holding the weight of the gearbox use a 13mm spanner on one side and a socket on the other and start removing the bolts ( photos 5&6)
once both mounts were removed i lowered the gearbox so it was resting on the cross member (photo 6&7) and then removed all the 17mm nuts holding the bellhousing to the engine carfully wiggled the gearbox free to reveal the clutch & pressuse plate ( DONT get under the box at this point as it is very heavy and if it slips your goose is cooked!) Photo (6)
Next you will find around 5 or 6 10 mm bolts holding the pressure plate and clutch on to the fly wheel, before you remove them make sure you have a feel for how it is all aligned and take note for reference when refitting later. remove the bolts and you will be left with this (photo 7)
Now for part two as it wont let me upload anymore files :doh:
Attachments
-
 IMAG0135.jpg760.4 KB · Views: 1,436
 -
 IMAG0136.jpg207 KB · Views: 1,412
 -
 IMAG0137.jpg1,016.8 KB · Views: 1,286
 -
 IMAG0138.jpg663.8 KB · Views: 1,195
 -
 IMAG0140.jpg630.9 KB · Views: 1,202
 -
 IMAG0141.jpg161.7 KB · Views: 1,381
 -
 IMAG0143.jpg899.4 KB · Views: 1,171
 -
 IMAG0145.jpg686.1 KB · Views: 1,285
 -
 IMAG0156.jpg145.8 KB · Views: 2,567
 -
 IMAG0147.jpg779.2 KB · Views: 1,133