spudy
Well-Known Member
- Posts
- 1,220
Adjusting the wheel bearings is the same from the early series to the 300TDi Discovery. The twin taper roller bearing arrangement was and still is a popular arrangement. Vehicle is a 1981 SWB S3.
This is a very easy job, and doesn't even require removal of the road wheel. You do however need to jack the wheel clear of the ground in order to check any play in the bearing. In order to ascertain if you need to do replace the bearing or adjust it - then grip the wheel at the 3 and 9 o-clock position, and try to rock the wheel. If there is some movement - then spin the wheel. If the wheel spins smoothly, then it's pretty safe to say that the bearing only needs adjusting. If there is an audible rumbling, and/or a roughness, then the bearing will have to be replaced.
Front and rear bearings are the same, but on the front, you need to seperate the drive flange from the driveshaft - the CV joint (or U/J on series), prevents you from withdrawing the front driveshaft. On the rear, the flange and driveshaft can be removed as one.
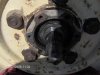
Before jacking the wheel clear of the ground - slacken the 6 drive flange bolts.
(pic 1)
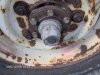
Jack the road wheel clear of the ground, remove the hub cap - steel on series, and a wierd type of rigid rubber on later vehicles.
(pic 2)
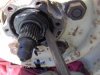
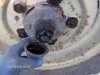
Series vehicles have a nut and split pin holding the driveshaft in the flange - defenders and disco's have a circlip and shims.
Remove it, plus the 6 flange bolts.
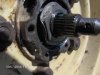
(pic 3)
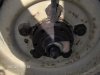
If the flange is stuck, and they usually are, use this method (or similar), to break the seal.
(pic 4)
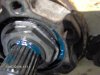
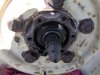
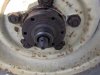
Once removed - the two nuts, and lockwasher can be seen.
(pic 5)
Tap a screwdriver, blunt chisel, or similar tool between the lockwasher and outer nut face.
(pic 6)
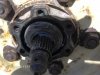
The outer nut can now be undone using the correct box spanner or 52mm/1 1/16" socket.
Once the outer nut is removed - remove also the tab washer.
(pic 7)
You should now be looking at this:-
(pic 8)
Using the same socket - tighten the nut and spin the wheel. Once the wheel feels as though it's binding - slacken 1/4 turn or until the wheel spins freely with no play in the bearing.
You can use the old lockwasher providing you didn't wreck it, or it appears to have been used more than once before. You must use a new part of the washer though, and as the bearing nuts will be in a new position, then this isn't a problem. Hammer the washer flat on a convenient hard surface, re-grease the outer wheel bearing if it needs it, then re-fit the washer, and tighten the outer nut.
Should look like this now:-
(pic 9)
Bend the tab washer inwards over one flat of the inner nut.
(pic 10)
This is a very easy job, and doesn't even require removal of the road wheel. You do however need to jack the wheel clear of the ground in order to check any play in the bearing. In order to ascertain if you need to do replace the bearing or adjust it - then grip the wheel at the 3 and 9 o-clock position, and try to rock the wheel. If there is some movement - then spin the wheel. If the wheel spins smoothly, then it's pretty safe to say that the bearing only needs adjusting. If there is an audible rumbling, and/or a roughness, then the bearing will have to be replaced.
Front and rear bearings are the same, but on the front, you need to seperate the drive flange from the driveshaft - the CV joint (or U/J on series), prevents you from withdrawing the front driveshaft. On the rear, the flange and driveshaft can be removed as one.
Before jacking the wheel clear of the ground - slacken the 6 drive flange bolts.
(pic 1)
Jack the road wheel clear of the ground, remove the hub cap - steel on series, and a wierd type of rigid rubber on later vehicles.
(pic 2)
Series vehicles have a nut and split pin holding the driveshaft in the flange - defenders and disco's have a circlip and shims.
Remove it, plus the 6 flange bolts.
(pic 3)
If the flange is stuck, and they usually are, use this method (or similar), to break the seal.
(pic 4)
Once removed - the two nuts, and lockwasher can be seen.
(pic 5)
Tap a screwdriver, blunt chisel, or similar tool between the lockwasher and outer nut face.
(pic 6)
The outer nut can now be undone using the correct box spanner or 52mm/1 1/16" socket.
Once the outer nut is removed - remove also the tab washer.
(pic 7)
You should now be looking at this:-
(pic 8)
Using the same socket - tighten the nut and spin the wheel. Once the wheel feels as though it's binding - slacken 1/4 turn or until the wheel spins freely with no play in the bearing.
You can use the old lockwasher providing you didn't wreck it, or it appears to have been used more than once before. You must use a new part of the washer though, and as the bearing nuts will be in a new position, then this isn't a problem. Hammer the washer flat on a convenient hard surface, re-grease the outer wheel bearing if it needs it, then re-fit the washer, and tighten the outer nut.
Should look like this now:-
(pic 9)
Bend the tab washer inwards over one flat of the inner nut.
(pic 10)

")