dollydisco
New Member
- Posts
- 184
- Location
- kidlington ,oxford
right guys,now i have access to a proper laptop not my mums silly bloody notebook,i can do my project thread ") forgive me if this is in the wrong place,but im sure somebody will move it if needs be.
forgive me if this is in the wrong place,but im sure somebody will move it if needs be.
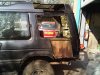
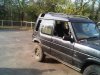
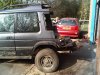
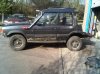
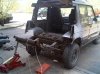
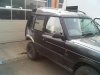
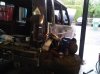
anyways on with the disco,as most of you will probably have read my thread in `introduce yourself` sub forum,so ill save time by skipping that.
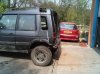
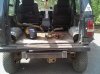
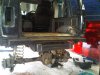
so one night im out with my mates,wandering what to do in the back of my disco after id sorted the boot floor , i started building a box section frame to house sub,amp,recovery gear and my aux battery etc etc.
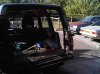
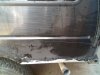
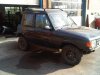
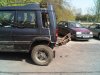
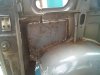
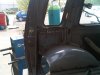
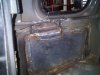
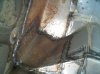
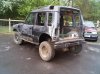
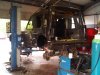
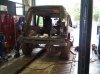
whilst chatting to my fellow landy owners one of them said bobtail it,a few others said trayback it, so out came the blackberry looking for pictures of bobtail/trayback discos,after a few quick measurements i had my mind set on bobtailing it,and by no means hanging around,i wanted to start it the next day! and that is what i did,i got to work the next morning and started by stripping the whole back of the interior out ( pictures uploaded are in order of process ) after stripping the interior ,and measuring from 3 different places ,i drew all my lines of where i needed to cut and was going to leave it at that,then my work mate said i bet you wont cut it.as id already trimmed of the bottom of the rear quarters to aid with measuring etc etc. anybody that knows me personally will know not to do dare me.out comes the angle grinder with my favourite 1m inox stainless cutting discs and of comes a few sections!!.now many of you might say why did i do it like i have rather than removing the outer skin first ,then cutting the innerskin like they do with the rangeys.my one answer.because im different
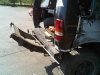
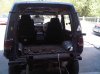
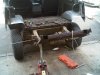
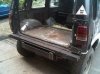
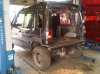
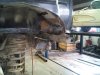
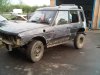
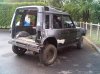
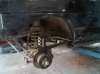
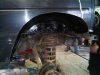
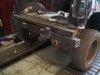
with a little bit more measuring and a bit more stripping i was left with the rear load space completely stripped,no headlining,no windows,no boot door,no carpets no rear seats no rear seatbelts,mounting etc . so ive now cut the outer skin and most of the inner skin,next step i undid the rear body mounts ,finished cutting the inner skin and then lifted the rear section of. for those of you that are realy in the know you will notice that i have cut a hell of a lot out.
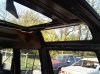
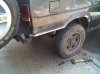
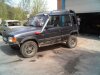
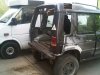
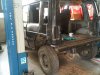
from research on the internet it seems the norm to cut out is around 13-15" whereas ive cut a full 17"!!! now because of this and the fact i wanted it as short as physically possible i lost the gutter lines on the roof. the original rear back window sections line up,but im going to be plating the roof (for reasons which will become clear later on) .
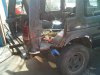
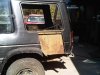
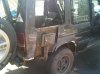
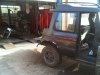
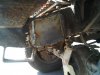
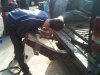
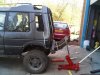
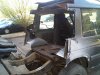
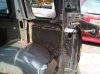
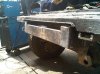
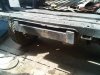
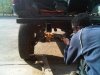
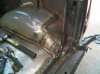
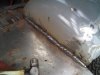
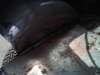
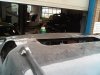
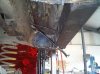
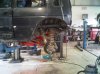
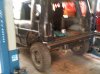
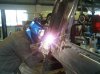
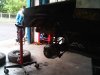
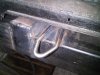
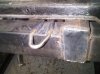
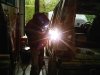
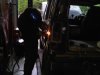
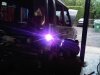
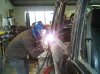
once cut,the next job was to clean up all the cut edges and the paint from around where id cut ready for welding. now here comes the scary part,the chassis, id already decided how i was going to make my bumper and recovery points so i got my jack out to support the rear of the chassis,and cut a slit on the 3 lower sides of both the rear chassis legs just behind where the new boot floor will begin, i leveled up the chassis using the tyre pressures and using the jack i bent up the rear of the chassis legs so that i kept the original upsweep to the boot floor and rear body mountings.one bent and leveled i used 5mm steel plate to rejoin the parts i had cut slits into,so now i was left with a chassis bent up to were i need it and then welded up with such penetration in the weld that id even struggle to get through with a grinder,that should keep mr.mot man happy (;.then comes the oxy kit, after id marked the length of the chassis legs to the very back of the rear body section,i cut through it and cleaned the nasty edges up,then using 4inch square and 4mm wall thickness box section i made up a new rear crossmember and using the same 5mm plate i capped the ends of the chassis legs of to stop crap getting in there. so with the rear crossmember in it was time to level up the body,jig it in place and get welding!! using 4mm steel plate i bridged all gaps with a 4inch overlap on all of the steel inner skin of the body,i did this again across the roof to hold it together before i put the plate over the roof to loose the top rear quarter lights and the sunroof .
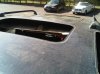
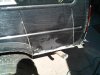
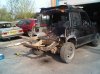
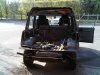
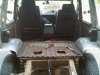
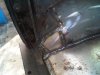
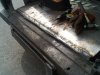
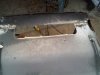
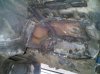
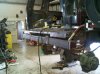
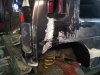
with it all welded in place i trimmed my rear arches out,smashed all the rust out and cut back to clean metal then repaired all of the rust on the arches before making an entire new boot floor with 3mm steel sheeting ,i lost the rear seat mounts as i will be making mounts for 2 single rear seats to match my new front seats, i then overlapped another 3mm steel sheet over the new boot floor and folded down and over the rear of the body where it steps up into the rear passenger section.
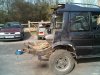
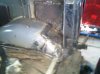
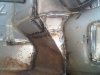
now all the rear arches have been trimmed,the interior side of plating is complete and all the rust inside has dissapeared,all thats left to do is finished remaking my arches from underneath,make a new bootfloor to sandwhich the void from underneath,finish a couple of bits on the rear crossmember which i couldnt get to whilst the car was on the floor,then today me and a couple of mates stripped off all exterior plastics etc etc ready for when i paint it on saturday. once all the welding is done underneath the fabricator at work will tig weld the alloy panels on the outside,before i then plate over the roof, more updates will be added each day,but for now,grab a cuppa,sit back and look through the pictures and laugh at what a danger i am when left with a welder and a grinder! comments and critism accepted ;p


forgive me if this is in the wrong place,but im sure somebody will move it if needs be.anyways on with the disco,as most of you will probably have read my thread in `introduce yourself` sub forum,so ill save time by skipping that.
so one night im out with my mates,wandering what to do in the back of my disco after id sorted the boot floor , i started building a box section frame to house sub,amp,recovery gear and my aux battery etc etc.
whilst chatting to my fellow landy owners one of them said bobtail it,a few others said trayback it, so out came the blackberry looking for pictures of bobtail/trayback discos,after a few quick measurements i had my mind set on bobtailing it,and by no means hanging around,i wanted to start it the next day! and that is what i did,i got to work the next morning and started by stripping the whole back of the interior out ( pictures uploaded are in order of process ) after stripping the interior ,and measuring from 3 different places ,i drew all my lines of where i needed to cut and was going to leave it at that,then my work mate said i bet you wont cut it.as id already trimmed of the bottom of the rear quarters to aid with measuring etc etc. anybody that knows me personally will know not to do dare me.out comes the angle grinder with my favourite 1m inox stainless cutting discs and of comes a few sections!!.now many of you might say why did i do it like i have rather than removing the outer skin first ,then cutting the innerskin like they do with the rangeys.my one answer.because im different
with a little bit more measuring and a bit more stripping i was left with the rear load space completely stripped,no headlining,no windows,no boot door,no carpets no rear seats no rear seatbelts,mounting etc . so ive now cut the outer skin and most of the inner skin,next step i undid the rear body mounts ,finished cutting the inner skin and then lifted the rear section of. for those of you that are realy in the know you will notice that i have cut a hell of a lot out.
from research on the internet it seems the norm to cut out is around 13-15" whereas ive cut a full 17"!!! now because of this and the fact i wanted it as short as physically possible i lost the gutter lines on the roof. the original rear back window sections line up,but im going to be plating the roof (for reasons which will become clear later on) .
once cut,the next job was to clean up all the cut edges and the paint from around where id cut ready for welding. now here comes the scary part,the chassis, id already decided how i was going to make my bumper and recovery points so i got my jack out to support the rear of the chassis,and cut a slit on the 3 lower sides of both the rear chassis legs just behind where the new boot floor will begin, i leveled up the chassis using the tyre pressures and using the jack i bent up the rear of the chassis legs so that i kept the original upsweep to the boot floor and rear body mountings.one bent and leveled i used 5mm steel plate to rejoin the parts i had cut slits into,so now i was left with a chassis bent up to were i need it and then welded up with such penetration in the weld that id even struggle to get through with a grinder,that should keep mr.mot man happy (;.then comes the oxy kit, after id marked the length of the chassis legs to the very back of the rear body section,i cut through it and cleaned the nasty edges up,then using 4inch square and 4mm wall thickness box section i made up a new rear crossmember and using the same 5mm plate i capped the ends of the chassis legs of to stop crap getting in there. so with the rear crossmember in it was time to level up the body,jig it in place and get welding!! using 4mm steel plate i bridged all gaps with a 4inch overlap on all of the steel inner skin of the body,i did this again across the roof to hold it together before i put the plate over the roof to loose the top rear quarter lights and the sunroof .
with it all welded in place i trimmed my rear arches out,smashed all the rust out and cut back to clean metal then repaired all of the rust on the arches before making an entire new boot floor with 3mm steel sheeting ,i lost the rear seat mounts as i will be making mounts for 2 single rear seats to match my new front seats, i then overlapped another 3mm steel sheet over the new boot floor and folded down and over the rear of the body where it steps up into the rear passenger section.
now all the rear arches have been trimmed,the interior side of plating is complete and all the rust inside has dissapeared,all thats left to do is finished remaking my arches from underneath,make a new bootfloor to sandwhich the void from underneath,finish a couple of bits on the rear crossmember which i couldnt get to whilst the car was on the floor,then today me and a couple of mates stripped off all exterior plastics etc etc ready for when i paint it on saturday. once all the welding is done underneath the fabricator at work will tig weld the alloy panels on the outside,before i then plate over the roof, more updates will be added each day,but for now,grab a cuppa,sit back and look through the pictures and laugh at what a danger i am when left with a welder and a grinder! comments and critism accepted ;p