Axle refurbishments

This site contains affiliate links for which LandyZone may be compensated if you make a purchase.

Brown

Well-Known Member
Full Member
Posts
7,767
Location
East Midlands
I didn't have to go in to work this morning so I thought I'd get a start on my axles seeing as last night's rain had stopped. Let's try a wheel bearing to get us in the mood. Well it's a bit more than a wheel bearing. My nearside rear hub keeps filling up with oil so it might be a good idea to fit a new half shaft seal. Not too difficult I thought. But the brake calliper would not come off. The bolts were new in only about 18 months ago but they did not want to shift. Eventually I got them moving but every turn was a struggle. They weren't corroded, it was just the Loctite. Blimey, it's good stuff.

Here's the hub dismantled and a lot of gloopy, expired EP90 draining into a dish into which I have also chucked the old bearings.


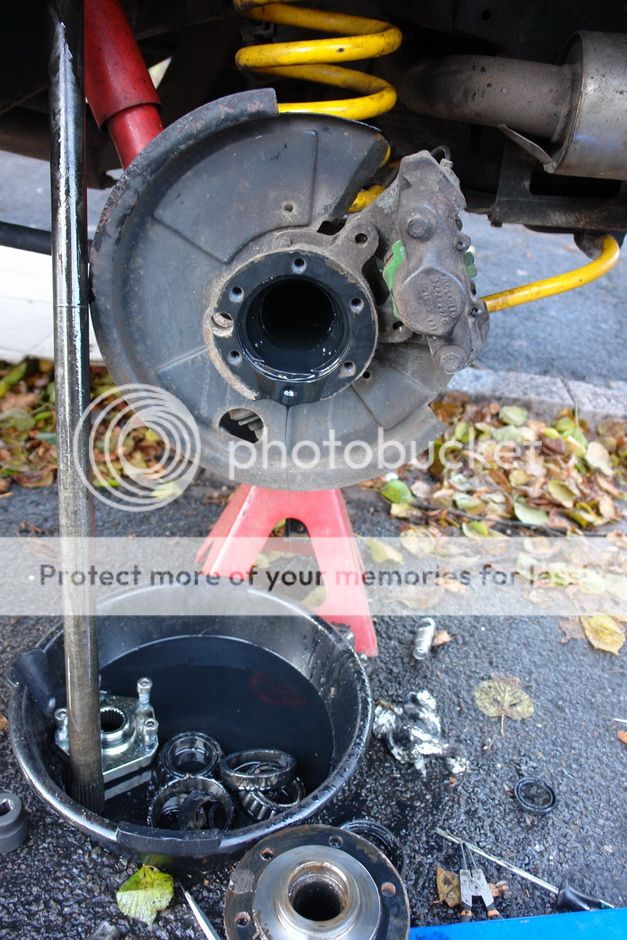
Everything else was straightforward. Old bearing races tapped out, new ones tapped in, new seal tapped in, then taken out again because I'd forgotten to put the inner race of the inboard bearing in first, seal checked; no I hadn't damaged it getting it out thank goodness, so tap it back in carefully. Stub axle seal replaced, Loctite on the bolts and stub axle back on. Plenty of grease and hub and hub retaining nut back on.


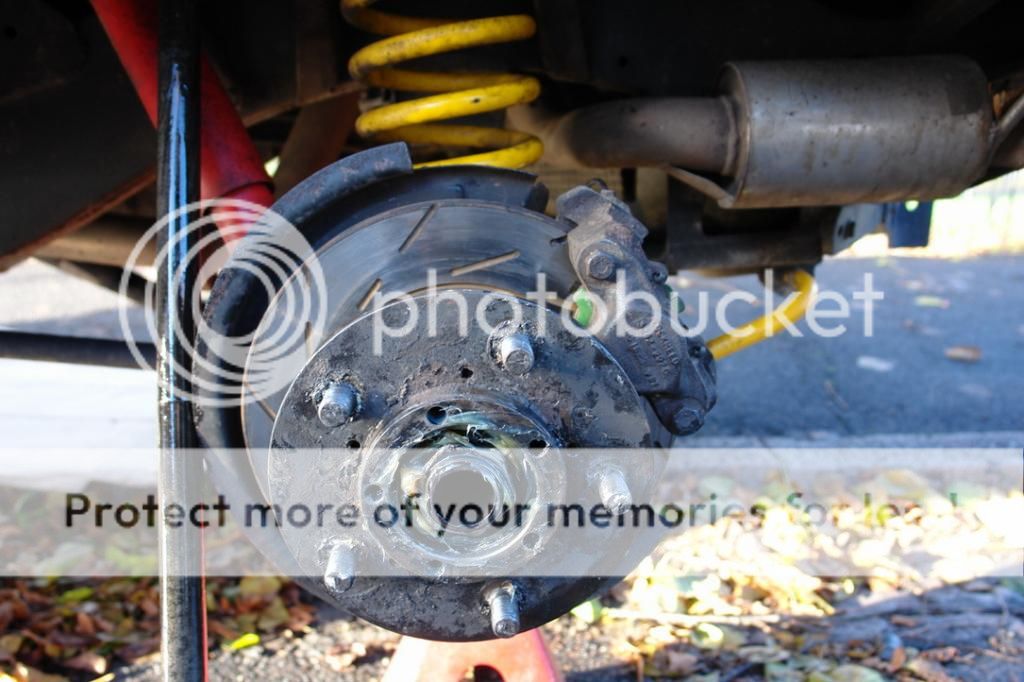
Phew. Shame I wasted over an hour just getting the calliper off.

Now lets have a look at the diff seal. Here's where I thought I really would struggle. I was expecting the bolt to be immovable and the flange to require a puller to get it off. But everything was only finger tight.


I butchered the seal out and couldn't find the seals which I could have sworn Id bought. Plenty of big ones for the hubs and small ones for the halfshafts, but no intermediate sized ones for this job. Where had I put them? Or maybe I'd forgotten to order them completely. Better go to work now. Tune in tomorrow for another instalment.
 
Thanks for the compliments gentlemen. There's a bit of road dirt underneath but you can still see the colour of the Dinitrol on the chassis rails I put on in the summer of 2013, so that's holding up well. I try and remember to give it a good hose out underneath when I clean it and it seems to be keeping the mud and rust at bay.
 
Last edited:
Nice work :) when you installing the Ashcroft centres then :p

I'll probably swap the diff centres over at the weekend before the half shafts go back in. I left the diff mechanism bolted into the axle case to change its seal because I was expecting to have to give the flange and its bolt some serious abuse to get them out of the way and I thought it would be easier with the diff in the axle. Anyway, it was a lot easier than I thought. The nuts that hold the diff in have been anointed with Plus Gas so I hope they'll just spin off with the impact wrench when the time comes.

I've found my pinion seals eventually, so I'll fit that and another wheel bearing before I go to work tomorrow probably if it isn't raining too hard. I don't mind the rain but I don't want to introduce too much water into the mechanism while it is apart.

Ah, fair enough :)
I'd be interested to see how you get on with them actually, as they're a darn sight cheaper than a full on locker, but probably stronger than the standard ones I have in now and would be a cheaper route for me to go down.
Did yer get some shiny new nuts for the diffs :p
 
I've done a bit more this morning but have to stop now as it is nearly time to go to work. First, I tackled the driver's side rear wheel bearing. The brake calliper bolts came out relatively easily so very soon it was looking like this:


A new seal for the stub axle:


And new bearing races for the hub: There's a new race just about to be hammered in resting in the opening in the hub casting.


Now let's try and get the diff mechanism out. Despite a 24 hour soak in Plus Gas the nuts weren't happy. some of them made their studs rotate, and others stripped out and wouldn't come off when passing over the dirty bit of thread at the ends of the studs which had been exposed to the elements. Some of them wedged themselves so firmly inside the socket that they wouldn't come out.


Operation James Martin was indicated:


In other words I chiselled off some of the more stubborn ones.

Even with all the nuts off the diff was reluctant to come out. All that sealant you can see sticking out was very tough. I kept counting my way round the studs thinking I had forgotten one, but all the nuts were off and it was just sealant holding it in. Eventually it yielded to my superior brutality. Here it is in the dining room:

.

Off to work now, but more over the weekend.
 
Just a quick update while I'm waiting for my tea to cook. I swapped the diff centre when I got home from work. Here's a nice new bearing being hammered on to the new centre:


I've tried to keep track of which bearing cap goes on which side as I assume they're made the same way as big end bearings - they mate them up and then ream the hole out - so they'll be slightly different.

Once things were back together I fiddled around with the adjusters on either side to get the best feel. It's surprising the difference a single notch can make. I think it is in the best position now - one notch tighter and it is too stiff - so I've tightened the bearing bolts and hammered the roll pins down to stop the adjusters moving.


Now to get it back in. I've discovered that the studs are 3/8" UNF. I have some suitable nuts because I bought a load for the propshafts. But the studs really need a die running down them to clear the crud out of the threads otherwise I'll just strip out even more nuts. I can't find one about the house. I'll see if the local Machine Mart has such a thing tomorrow morning.

This is a very Loctite-intensive job. There didn't seem to be any on the internal bolts in the diff when I took them out but I put some on when they were reassembled. On our old Series I remember changing the rear diff oil one day (a lovely old ENV diff, with a perfectly spherical casing) and found a load of bits of metal. Fearing the worst we took the mechanism out and discovered that the bolts holding the crown wheel to the diff centre had escaped their yokes and were coming out, milling their heads off against the inside of the diff casing. At least it wasn't gear teeth. No wonder the performance was so sluggish. We don't want any of that shenanigans here.
 
Last edited:
its easiest to chisel the nut flat along its length
how have you set diff crown wheel adjusters, wound crown wheel side till it touches pinion with no backlash at all then adjusted other side to create 6 thou backlash ?
 
Yes I know, it's not exactly precision nut chiselling. My excuse is that the taper on the nut where the nylock bit is tended to deflect the chisel when I tried to slit it down a flat, so I just got the chisel to bite wherever it could, which resulted in my peeling the nut off as shown. I'm sure you'd be much neater.

Yes, I advanced the crown wheel toward the pinion until it was tight and then backed off a fraction (about 1.5 notches) and then adjusted the other side to suit. I think I've got around 0.1mm (under 5 thou in the old money) but going to the next notch was too much for my liking. I haven't messed about with the pinion shims because the diff mechanism and crown wheel are still effectively on the same axis, so if it was OK before, it would be OK again now. In terms of feel, I'm pleasantly surprised how smooth it is. The teeth are good too. Nice and shiny, no notches or steps where they bear against each other, no chips or other warning signs.
 
you place chisel on the side of the nut not down the length of it , a its easier and b it splits before you get to thread so no damage
you advance adjuster till c/w is just touching no backlash then leave that adjuster alone , then use other adjuster to create the backlash this gives the correct backlash and bearing preload:)
 
Yes but going lengthways you've got the casting to act as an anvil so you can make more progress.

Yes I thought things would free up as I tightened the adjuster on the opposite side to the crown wheel so as to push the crown wheel away from the pinion, but it was still bit too tight for my liking so I took the crown wheel side out a notch and re tightened and it felt just nice.
 
believe me you split nuts across the flat thats how all were trained to , the adjusting as i said is as the book it gives correct bearing preload as well as backlash
 
Oh James, I've taken your name in vain! I'll try it your way next time and see how I get on.

Re: adjustment. As I've described the process, I've had the opportunity to feel what it was like in the adjacent notches and I've got it in the place I'm happiest with. In fact, if I hadn't pushed the crown wheel so tight against the pinion to begin with it would have been exactly what you've just said, so we're not very far apart.

I'm often over in the east of England so one of these days I might pop in and shake the hand that splits the nuts and hammers the undersized sockets onto stubborn bolts. I'm sure you're busy so I don't want to detain you long but I'd like to put a face to the posts.
 
Great thread this one! WIll be very useful when I get around to ding mine!

Thanks. Not very many piccies this morning as I've been reassembling. Fortunately Machine Mart had a cheap UNF tap and die set so I have rehabilitated my axle studs and hammered them back in, managed to manipulate the diff back in without pushing any of them back into the casing and tightened up. There wasn't a gasket there originally, just loads of rubbery sealant but I have a gasket in there now, with a smear of sealant each side for good measure. Aaron Morris said his gasket wasn't sealing on its own so I thought I'd use some.


Halfshafts back in, drive flanges back on, wheels back on and fresh 75-90 in the diff case. No obvious leaks yet.

I'll have a bite to eat and then I'll start on the front. Must go out and buy some more Loctite. I'm getting through tons of it.
 
This afternoon I did a bit of dismantling of the front axle before it got dark. I also went out to Halfords to get some Loctite and everything was jam packed with traffic. I'm so glad I don't have to waste Saturday afternoons in crowded shops. The range of thread locking products was predictably poor, as these things usually are when you go to terrestrial shops. The light was going so I brought some of the bits into the dining room to have a look at:


New bearing and seal for the hub and in this picture I'm just about to separate the chrome ball from the outer housing. Below is a picture of what the swivel bearings looked like. You can see how the rollers have been indenting the outer races in the straight ahead position. No wonder it was a bit notchy.


I even managed to get the lock stop bolt out without shearing it off. Time for some dinner.
 
No pictures from todays endeavours on the front axle sadly. They'd have looked very similar to what I've already posted as there are only so many ways you can photograph a hub or a diff mechanism and it still look interesting.

I've still not mastered the correct James Martin procedure, and I've been splitting my diff nuts lengthways. The three top ones refused to come off the ends of the studs and I was getting too much bounce attacking them sideways. Plus the ones that needed breaking off were right on the top and it's hard to get a good swing at them from the side because there are things like radius arms and engines in the way.


Anyway, the diff is swapped for the new Ashcroft one, the swivels and hubs are back on complete with new bearings and the brake callipers are on again. Wheels are back on too. I'll take some pictures when it's light.
 
I went to work today and attended a 'staff engagement day'. It wasn't very engaging so I disengaged from it and came home and did a bit more on the Land Rover. There are a few more pictures of work in progress from the past couple of days. Here's a swivel going back together:


The bearings are in and adjusted to eliminate play by means of the shims. Here's the seal going in:


They weren't a very tight fit in the housing, so I've put a bead of sealant round so as to make leakages less likely.

On to today's activities, here's a swivel back on the car, with nice new gaskets and new bolts:


Better remember to connect that steering arm before I try to go anywhere.

Here's something to keep them fresh and moist. I know it says Britpart on the bottles, but even Britpart can't get grease wrong surely?


Here's the axle getting as drink of something nice:


Brake backplates and lock stop bolts back in and steering connected up:


That 1/4" socket came for a drive round the block with me to test things out. I forgot to take it off. Fortunately I didn't lose it and it is safely back in the tool box.

I now have two spare diff centres which make attractive mantelpiece ornaments:


Been for a little drive and all seems well. Funny noises or wobbly steering. Things are a little stiffer to turn as a result of all those new bearings and seals, but I'm sure they'll bed in. None of the hubs seemed to be getting warm, so I don't think anything is binding. I'll keep checking for signs of slack as things bed together, in case I need to take the odd shim out or tighten the odd hub nut, but all seems well so far.

I haven't tested the limited slip capabilities of the new diffs yet. Next time I go to Wales I'll get an impression of how they perform as there's a lot of slippery stuff. Wet grassy slopes, muddy hills freshly rained on and maybe even some snow if we're lucky.
 
Last edited:
Back
Top