A Simple Method Of Testing Your Injectors.

This site contains affiliate links for which LandyZone may be compensated if you make a purchase.

PopRivet

Well-Known Member
Posts
317
Location
Acrtic
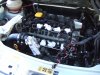
My latest project. I bought Car Diagnostic Software and an ELM327 OBDII Interface lead to carry out checks on my FL1. My suspicions were that one or more of the fuel injectors were not functioning correctly. Basically, starting and tick-over could be a bit lumpy, especially when cold.

Anyway, I used the Diagnostics and found there were no Fault Codes and everything seemed to be normal. However, I still wasn’t convinced. My reasoning for not being entirely satisfied is because I used Diagnostics on Aircraft, and you only get a part of a much wider picture from the testing equipment. That’s experience. It cannot be taught & we must never assume.

I then formulated an idea, a theory based on fuel consumption and the return of unused fuel to the tank. If all injectors are working equally, then the fuel used should be the same, and the return supply should also be the same for each cylinder. But how to test without a Flow-meter? Hmmm.

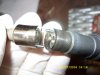
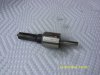
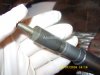
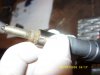
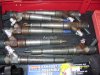
I recently replaced the plastic fuel return pipes and connections on top of each injector with Mercedes Brass units. This left me with the original plastic parts. I never throw anything away.

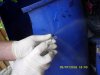
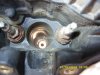
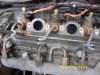
I used 6mm (outer-diameter, 4mm inside diameter) plastic tubing. I bought a roll of this from a pet-shop as it’s used for fish-tank pumps. See Photo No1.

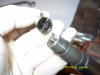
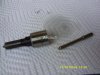
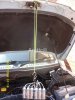
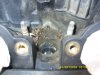
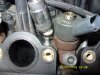
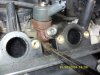
The tubing was connected to each of the four plastic connectors, with three blanked off on their outlets. See Photo No2.

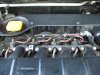
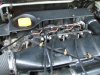
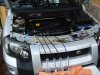
With the engine at working temperature, the overhead plastic cover was 1.JPG 2.JPG 
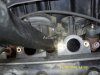
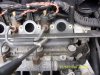
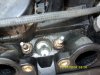
removed for access, I disconnected the Brass fuel return system before connecting my adapted plastic units. Each of the four hoses was fed into four plastic bottles, where any return could be measured & compared following an engine run.

Each bottle should be the same as the others, and any difference would show, by comparison, which was not working properly.

Before running the test I bent the car’s return fuel pipe to block any leakage, tightening it with a tywrap, just like the tubes I was using to feed fuel into the bottles. See photo No2 - again.

With everything fitted and bottles sighted, the test began.

I ran the car for about three minutes, watching to make sure all was well. It was. The return fuel flow wasn’t very much, but enough to show there was indeed a difference. See Photo No7.

Bottles 1,3 &4 were very much equal, but No2 was about twice as much as the others, which of course means only half as efficient. Guess which Injector is getting replaced?

So there you have it. This has proved to be a reasonably simple method of checking your Injectors. And even if you do not have an additional set of fuel return unions, you can still use the ones fitted by disconnecting them and fitting to the type of hose I used.

Information…

The pipe lengths were cut to 100cm’s. The size has already been mentioned. The bottles were used for water, so are oil-based plastic. The collected diesel was decanted into a nylon bottle, saved for cleaning dirty parts.

I hope this might be of some help to others. Oh, it can probably be used on any other type of vehicle too.
 

Attachments

  • 3.JPG
    3.JPG
    319.8 KB · Views: 274
  • 4.JPG
    4.JPG
    329.6 KB · Views: 281
  • 5.JPG
    5.JPG
    300.2 KB · Views: 317
  • 6.JPG
    6.JPG
    284.8 KB · Views: 262
  • 7.JPG
    7.JPG
    311.3 KB · Views: 268
In addition to what I've written, since carrying out my experiment earlier today, I've formulated an idea to seriously clean the suspect injector without removing it from the car.
It's all a sort of Blue-Peter kind of system (without the used toilet-rolls, sticky-backed-plastic & pipe-cleaners... I'm showing my age now!) but should work.
It's quite simple, I think, and will let everyone know how I got on when it's done. I just need to locate the bits first. I'll go shopping tomorrow.
And if my idea works, it'll be a whole lot cheaper (and easier) than replacing what seems like a faulty, expensive unit.
Watch this space.
I'm not called, 'Scotty', for nothing. Beam me up! :D
Should be interesting, I heard of people using ultrasonic jewellery cleaners to clean them up.
 
Should be interesting, I heard of people using ultrasonic jewellery cleaners to clean them up.
Hi Raywin. I can see the logic & benefits to using such a device, but there are easier & cheaper ways, I'm sure. How many have access to an Ultra-Sonic cleaner, I wonder?
I'll stick to simple & cheap. If it works, I'm quid's in. If not, I've learned a lesson.
 
Hi Raywin. I can see the logic & benefits to using such a device, but there are easier & cheaper ways, I'm sure. How many have access to an Ultra-Sonic cleaner, I wonder?
I'll stick to simple & cheap. If it works, I'm quid's in. If not, I've learned a lesson.
Look forward to seeing it hope it works for you.
The ultrasound cleaners are pretty cheap nowadays you can find them on tbay from about £25 not top line ones but ok for occasional use.
 
Most of the time it is just the tip jet that needs cleaning, this can be done quite easy once the injector as been removed.
 

Attachments

  • SDC16966.JPG
    SDC16966.JPG
    169.3 KB · Views: 244
  • SDC17125.JPG
    SDC17125.JPG
    126.8 KB · Views: 246
  • SDC17127.JPG
    SDC17127.JPG
    162.4 KB · Views: 244
  • SDC17128.JPG
    SDC17128.JPG
    194.9 KB · Views: 234
  • SDC16923 (3).JPG
    SDC16923 (3).JPG
    175.9 KB · Views: 247
  • SDC16738.JPG
    SDC16738.JPG
    564.4 KB · Views: 271
Most of the time it is just the tip jet that needs cleaning, this can be done quite easy once the injector as been removed.
Arctic2, you're a gem! Forearmed with what you posted in reply, along with you pictures, I belted out to the car, which was complete & running, with all my tools and ripped into the system. The No2 Injector's tip-jet 1.JPG 2.JPG was indeed fouled by muck. I dismantled it, cleaning with an aerosol can of Contact Cleaner, and another of Brake & Clutch cleaner. The nozzles took a bit to clear fully and now they are good as new. I saved buying a repalcement, thanks to your knowledge, as well as all the other helpful replies. So thanks to you all. By the way, I bought one of those propriety brands of liquid injector cleaner, the one you pour into the fuel. That had no effect at all. You just cannot beat the physical approach.
The car started with a few chugs, but that was because there was air in the system. I've now started it several times and what a difference. I would have done all four injectors by a slight drizzle stated to develop. Spain is suffering from a drought, and it starts to rain when I get the engine apart. Typical. The remaining three will get my undivided attentiion the next time I'm into its guts.
Photo 1 is obvious, I'm into the engine. No2 is the removed injector. No3 is everything back together with surrounding olive groves and grape-vines. I'm now going to have a single-malt.
 

Attachments

  • 3.JPG
    3.JPG
    381.7 KB · Views: 228
My wife, upon hearing of my repairing the No2 injector, is egging me on to do the other three. I did the No2 in about one hour for the complete job, so reckong I could do the 3 in about 2 - 3 hours.
If tomorrow is sunny, as per normal - except to day, I'll go ahead and do it. I'll give another report on completion.
That's great news to hear that it works so well, its nice to see people who don't give in and just take on problems, looks like your determination has been rewarded.
 
My wife, upon hearing of my repairing the No2 injector, is egging me on to do the other three. I did the No2 in about one hour for the complete job, so reckong I could do the 3 in about 2 - 3 hours.
If tomorrow is sunny, as per normal - except to day, I'll go ahead and do it. I'll give another report on completion.

Great to hear you got down to it, did the injector come out ok ? sometimes they can be a pain therefore it is always best to remove the injectors when the engine is hot, lets say after about a 10 mile run minimum, if this is not possible for some reason leave the car running for about 30 minutes.

Also when you are removing the injector, ie prying it out, use a flat piece of metal on the cam cover so you do not breach it, hole it etc, few more photo's below, another tip is when you undo the main cover on the injector once you have cracked it, slowly undo it keeping your finger on the tip this hold it in place as you remove the cover.

Also use a small wire brush to clean the tip a the start before anything else, make sure if you can when removing the injector from the car that you have cleaned round it before taking it out, this helps stop any rubbish going into the chamber, the photo's are a bit out of order but you get the drift I am sure.

I keep meaning to do a write up on it with all the photo's but real life keeps getting in the way cheers Arctic
 

Attachments

  • SDC16962.JPG
    SDC16962.JPG
    267 KB · Views: 209
  • SDC16963.JPG
    SDC16963.JPG
    150.3 KB · Views: 202
  • SDC16965.JPG
    SDC16965.JPG
    134.4 KB · Views: 186
  • SDC17141.JPG
    SDC17141.JPG
    293 KB · Views: 210
  • SDC17152.JPG
    SDC17152.JPG
    252.3 KB · Views: 177
  • SDC17153.JPG
    SDC17153.JPG
    229.6 KB · Views: 165
  • SDC17086.JPG
    SDC17086.JPG
    343.7 KB · Views: 195
  • SDC17087.JPG
    SDC17087.JPG
    371.8 KB · Views: 207
  • SDC17111.JPG
    SDC17111.JPG
    345.5 KB · Views: 179
  • SDC17112.JPG
    SDC17112.JPG
    274.5 KB · Views: 197
  • SDC17113.JPG
    SDC17113.JPG
    247.8 KB · Views: 173
I've finished it. The remaining 3 Injectors, engine stripped and all 3 cleaned to perfection. Excluding the time to get my tools out and put away - post job, it took me 1hr 30 mins, almost to the second.
I'm just back from test running the car and it's as smooth as silk. Starts beautifully too. All-in-all, a job worth doing.
My thanks go to all those who gave me relevent info, especially Landyzone member, Arctic. His information included pictures as well as important hints, all of which proved to be invaluable - especially his mention of collets. They are the size of a pin-head so could be easily missed if unaware. I highly recommend cleaning your Injectors if they haven't had any attention for a while.
We're off to Portugal this weekend then the UK early next year. My car should be reliable after the work I've done. Any maintenance is worth its weight in gold, in my books.
 

Attachments

  • DSCF0253.JPG
    DSCF0253.JPG
    310.8 KB · Views: 140
I've finished it. The remaining 3 Injectors, engine stripped and all 3 cleaned to perfection. Excluding the time to get my tools out and put away - post job, it took me 1hr 30 mins, almost to the second.
I'm just back from test running the car and it's as smooth as silk. Starts beautifully too. All-in-all, a job worth doing.
My thanks go to all those who gave me relevent info, especially Landyzone member, Arctic. His information included pictures as well as important hints, all of which proved to be invaluable - especially his mention of collets. They are the size of a pin-head so could be easily missed if unaware. I highly recommend cleaning your Injectors if they haven't had any attention for a while.
We're off to Portugal this weekend then the UK early next year. My car should be reliable after the work I've done. Any maintenance is worth its weight in gold, in my books.
let us know how it goes especially if it has better fuel consumption.
 
excellent work popRivet as you say any preventive work is always worth doing, I have a few spare injectors from the R40 when I had my Tourer, which I have kept as I intend to have another in near future, those will be fitted if needed and the ones I take out will be cleaned as above.

It would be great if all members added their real name somewhere on here maybe in the profile, as I always like to address people properly if possible, just my little opinion.
 

Attachments

  • SDC16983.JPG
    SDC16983.JPG
    331.5 KB · Views: 152
let us know how it goes especially if it has better fuel consumption.
I've run the car again, including up-and-down steep hills with lots of bends in-between. No problems at all. In fact, I had been getting some blue & white smoke when starting from cold prior to cleaning the Injectors, but now... nothing except an instant start and a steady tick-over.
I've filled my tank, zero'd the mileometer and making ready to checkout the fuel consumption. I'll let you know my findings when they've been calculated.
And as I'm driving to Portugal tomorrow, approx' 650 miles each way, I should have a good oportunity to see how everything is going.
 
Back
Top